 |
|
The node-based editor works just like Mecanim's Animator view except with conversation trees instead of animation state machines.
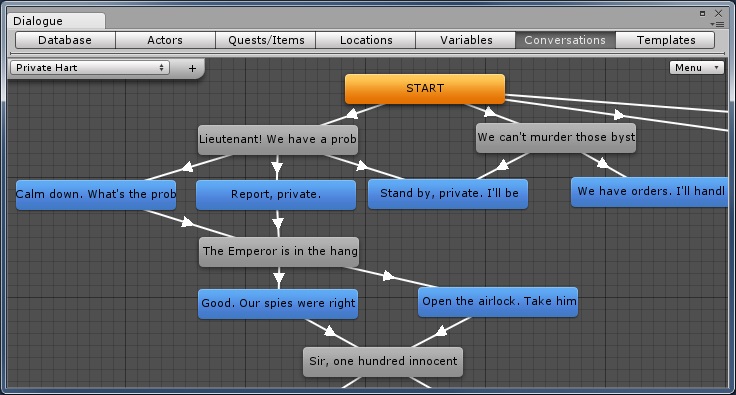
Similarly to Mecanim's Animator view, it displays the state of current conversation at runtime in a Conversation Live View.
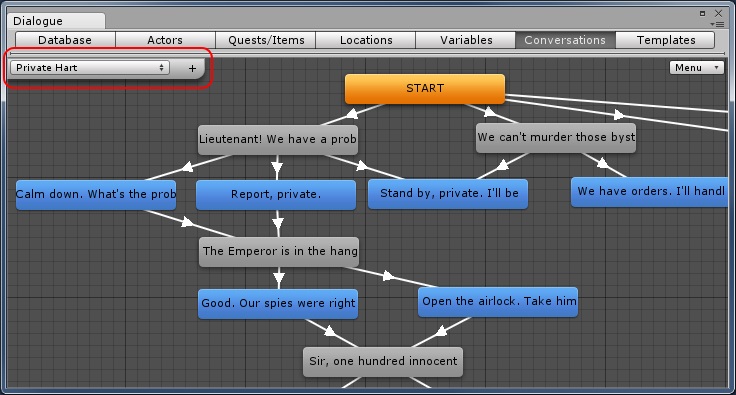
The upper left corner of the canvas contains the conversation menu.
When you create a new conversation, you'll want to set its title and assign the participants. To do this, click on the canvas and set the Title, Actor, and Conversant in the inspector.
If you want to organize your conversations in groups, you can use forward slashes in titles, such as "Level 1/Commander", "Level 1/Radio Barks", and "Companions/Romantic/Nadia/In Barracks". The slashes will act as submenus here and in conversation trigger pop-up menus.
To delete a conversation, select it from the pop-up menu and right-click on the canvas. Then select Delete Conversation from the context menu.
To copy a conversation, select it from the pop-up menu and right-click on the canvas. Then select Copy Conversation from the context menu.
To edit the conversation's properties, click on the canvas. In the Inspector, you can set:
| Field | Description |
|---|---|
| ID | The conversation's internal ID number. Change at your own risk. Dialogue entry links use the conversation ID. Links that reference the old ID will be broken until you update their references to the new ID |
| Title | The title of the conversation. Conversation triggers reference conversations by this title |
| Actor | The main actor, usually the PC in a PC-NPC conversation |
| Conversant | The other actor, usually an NPC |
| Override Display Settings | Tick to set conversation-specific settings that override the Dialogue Manager's Display Settings |
The upper right corner of the canvas contains the control menu.

| Menu Item | Description |
|---|---|
| New Conversation | Create a new conversation |
| Copy Conversation | Create a copy of the current conversation |
| Split Pipes Into Nodes | Split any entries whose Dialogue Text contains pipe characters into separate entries |
| Sort | Sort the conversation list by Title or ID |
| Actor Names | Show/hide the speaker's name on each node |
| Actor Portraits | Show/hide the speaker's portrait next to each node |
| Search Bar | Toggles the search bar |
| Outline Mode | Switch to Outline-Style Editor mode |
| RelationsInspector | (If Seldom Tools' RelationsInspector is installed) |
If Seldom Tools' RelationsInspector is installed and you have imported its Dialogue System backend, you can choose these menu items:
| Action | Procedure |
|---|---|
| Drag Canvas | Middle-click and drag, or Ctrl + Alt + left-click and drag |
| Select a Node | Left-click on node |
| Multi-select Nodes | Left-click and drag on empty canvas |
| Reposition Node(s) | Select node(s), then left-click and drag |
| Node Menu | Right-click on node, or Ctrl + left-click |
| Select a Link | Left-click on link |
| Link Menu | Right-click on link, or Ctrl + left-click |
| Conversation Menu | Right-click on empty canvas, or Ctrl + left-click |
Conversations always start with a node named START. To create a link from START to a new node, right-click on START and select Create Child Node. (If you plan to edit the START node, please see Notes about START Node.)
If a node already exists and you want to create another link to it, right-click on the source link and select Make Link. Then click on the destination node.
To delete a node, right-click on it and select Delete, or just press the Delete key.
To auto-arrange the nodes, right-click on the canvas and select Arrange Nodes.
To edit a node, click on it to select it. In the Inspector, you can set:
| Field | Description |
|---|---|
| ID | The entry's internal ID number. Use care if modifying this |
| Title | The title of the dialogue entry. It's entirely optional and is only for your reference |
| Description | A description of this entry. It's entirely optional and is only for your reference. Only appears if you've defined a field named "Description" |
| Actor | The speaker |
| Conversant | The listener |
| Group | If ticked, this entry is a special type of entry that is used to group child entries |
| Menu Text | The text to use in the player response menu. This could be a short paraphrase of the Dialogue Text. If this is blank, the response menu uses the Dialogue Text. This field is ignored for NPC entries |
| Dialogue Text | The text spoken by the actor. If this is blank for a player line, the Menu Text will be spoken instead |
| Sequence | The cutscene sequence to play when the actor speaks this line. If blank, the Dialogue System will use the default sequence. If your project uses lip sync, see How to Add Lipsync |
| Response Menu Sequence | An optional field that specifies a sequence that will play in the background after the dialogue entry's text has been delivered and the response menu is being shown. If the player makes a selection in the response menu while the response menu sequence is playing, the response menu sequence will end and the next dialogue entry's sequence will begin on the same frame. If both sequences include Camera() commands, you may need to include a delay in the next dialogue entry's sequence to ensure that it runs after the response menu sequence is completely stopped |
| Conditions | Any Lua conditions that must be true to allow this line to be spoken. If you need to perform additional processing outside of Lua, you can use an IsDialogueEntryValid Delegate. You can enter Lua code directly or use a wizard to generate it for you with simple drop-downs. See the Lua Wizards section for more information about how to use the wizards. Note that Conditions are not checked on the START node. For more information about Conditions, see More on Conditions |
| False Condition Action | Specifies what to do when the conditions are false. See False Condition Action |
| Script | Lua script to run when this entry has been spoken. You can enter Lua code directly or use a wizard to generate it for you with simple drop-downs. See the Lua Wizards section for more information about how to use the wizards |
| Event: OnExecute() | A UnityEvent that's executed when the dialogue entry is used in a conversation. See Notes about UnityEvents for more info |
| Links To | Manually set links using drop-down menus, adjust their priorities, and adjust their order. You can also add cross-conversation links here. |
By default, the Dialogue System catches any exceptions raised by Lua code in Conditions and Script. If you're calling an external function in Lua, you may find it useful to allow the exception to filter up to aid in debugging. To do this, set DialogueManager.AllowLuaExceptions = true.
If you've set up the dialogue database for localization, you may also see additional fields for localized versions of Dialogue Text, Menu Text, and/or Sequence. (See Localization)
If you're using Unity UI, you can use bold, italic, and color rich text codes, as well as some special timing codes described in the Typewriter Effect section.
For more information about Conditions, see More on Conditions.
The False Condition Action specifies what to do when the conditions are false.
| Value | Description |
|---|---|
| Block | Don't evaluate entries linked from this entry |
| Passthrough | Don't consider this entry, but evaluate its children to possibly be spoken |
The START node has some unique properties:
None() instead of the Dialogue Manager's Default Sequence. This tells the Dialogue System to immediately progress to the next node.Delay({{end}}) or something similar, and tick Show PC Subtitles During Line.It's easiest to leave the START node as-is, and treat it as a jumping-off point for the "real" conversation starting with the next node. It primarily exists so you can immediately branch the conversation based on the Conditions fields of its child nodes.
You can also select links between nodes. In the Inspector, you can set the priority of the link. If a node has outgoing links of different priorities, the Dialogue System will check all links of the highest priority first. If it finds any valid links at that priority, it will stop checking and only use those links. Otherwise it will check the next priority down, and so on.
The right-click context menu allows you to delete the link, or you can just press the Delete key.
To add links to another conversation, select the source node and use the Inspector view.
If you expand the Event foldout, you can add event handlers to a UnityEvent called OnExecute(), similar to adding an event handler to a Unity UI Button's OnClick() event. However, since the dialogue database exists independently of whatever scene is open, you can't assign a scene object to the event handler. Instead, you must assign an asset file such as a ScriptableObject.
For a detailed example, see: Dialogue Entry UnityEvents.
UnityEvents aren't converted by the Database > Export feature or Dialogue Database Converters.
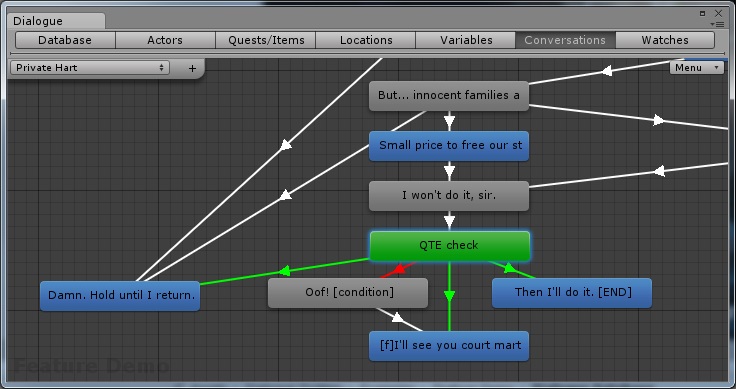
At runtime, during conversations the current dialogue entry is colored green. Links whose conditions are true are also green. (This includes links without conditions.) Links whose conditions are false are red.
<< Dialogue Editor Conversations Tab | Outline-Style Editor >>