Recipes

This page contains an assortment of solutions developed for and by other Dialogue System users.

You can find many more free extras at: http://www.pixelcrushers.com/dialogue-system-extras/

You will also find more solution on the Pixel Crushers forum: http://pixelcrushers.com/phpbb/

Topics


Dialogue Entry UnityEvents

In the Dialogue Editor, you can add event handlers to a UnityEvent on dialogue entries called OnExecute(). It works similarly to adding an event handler to a Unity UI Button's OnClick() event.

However, since the dialogue database exists independently of whatever scene is open, you can't assign a scene object to the event handler. Instead, you must assign an asset file from your project, such as a ScriptableObject asset. (For more information on creating ScriptableObjects, see Unity's tutorial: https://unity3d.com/learn/tutorials/modules/beginner/live-training-archive/scriptable-objects )

In the example below, we'll create a ScriptableObject asset that provides a method to play audio clips. Then we'll assign that method to a dialogue entry's OnExecute() event.

First, create a new C# script named TestScriptableObject containing this code:

using UnityEngine;
[CreateAssetMenu(fileName = "TestScriptableObject")]
public class TestScriptableObject : ScriptableObject
{
public AudioClip[] audioClips;
public void PlayAudioClip(int i)
{
AudioSource.PlayClipAtPoint(audioClips[i], Vector3.zero);
}
}

To keep the example short and clear, the code doesn't do any error checking.

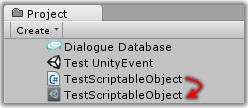
Next, in the Project view select Create > TestScriptableObject. This will create an asset file from the script:

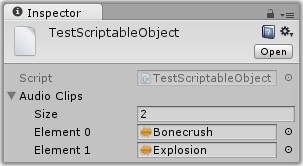
Inspect your new asset file. You'll be able to assign audio clips to it:

Finally, inspect a dialogue entry's OnExecute() event, click the "+" button, and assign TestScriptableObject. Select the method you want to execute (PlayAudioClip) and specify the index of the audio clip that you want to play.

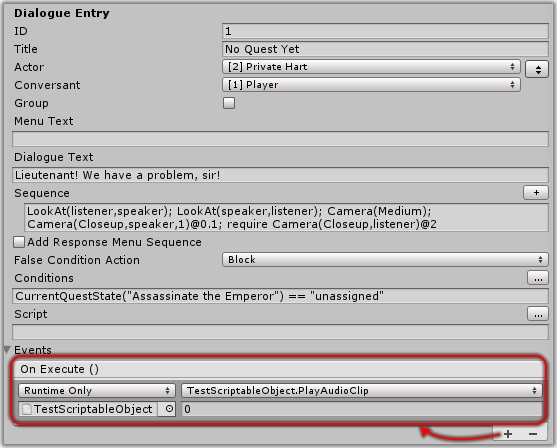
In the example above, the dialogue entry plays the audio clip "Bonecrush".

This is a contrived example since you can easily use sequencer commands to accomplish the same thing. The purpose of this example, however, is to demonstrate how to expose your own code to the OnExecute() event. Your code could just as easily, for example, use GameObject.Find() to locate a GameObject in the current scene and perform operations on it.


Tutorial Conversations

See the Tutorial Example for an example of how to write a tutorial conversation. In brief, create a conversation that uses sequencer commands with the @Message(message) syntax to wait for messages. As the player completes gameplay objectives in the tutorial, call Sequencer.Message(message) to notify the waiting sequencer command.

You'll often want to disable player control during regular conversations but leave them enabled during tutorial conversations. To do this, add a Condition to your Set Component Enabled On Dialogue Event (or equivalent) component. Here are some example steps:

  1. Create an empty GameObject named "Tutorial". (Or add an Override Actor Name component to your existing GameObject and set the Override Name field to "Tutorial".)
  2. Add a Conversation Trigger that runs your tutorial conversation, and assign the Tutorial GameObject as the Conversant.
  3. Inspect your player's Set Component Enabled On Dialogue Event component.
    • In the On Start section, expand each element.
    • Then expand each element's Condition foldout.
    • Set Lua Conditions > Size to 1.
    • Set the Element 0 field to: Variable["Conversant"] ~= "Tutorial"

This way it will only disable your player movement components if the Conversant is NOT "Tutorial".


Adding Voiceovers to Alert Messages

To add extra handling, such as a voiceover (VO), to alerts, add a Lua observer to Variable["Alert"]:

DialogueManager.AddLuaObserver("Variable['Alert']", LuaWatchFrequency.EndOfConversation, OnAlertChanged);
void OnAlertChanged(LuaWatchItem luaWatchItem, Lua.Result newValue) {
// (play your voiceover here)
}

In OnAlertChanged(), you can check the value of Variable['Alert'] and play the right VO based on its value, or you can set an additional Variable[] element with, say, the filename of the audio clip to play. For example, if you set Variable["AudioClip"]:

void OnAlertChanged(LuaWatchItem luaWatchItem, Lua.Result newValue) {
string sequence = string.Format("Audio({0})", DialogueLua.GetVariable("AudioClip"));
DialogueManager.PlaySequence(sequence);
}

If you use the value of Variable['Alert'], you'll only be notified if the value has changed between the end of one conversation and the end of another. If the value doesn't change – for example, if you set Alert to the same value again – you won't get another notification.

The first parameter passed to your observer is a LuaWatchItem:

void OnAlertChanged(LuaWatchItem luaWatchItem, Lua.Result newValue) { ... }

After Variable["Alert"] has been cleared by the Dialogue System's automatic end-of-conversation processing, you can call luaWatchItem.Check() to tell the observer to manually re-check the variable, which will update the observer's cached value to a blank string. One way is by using a coroutine:

void OnAlertChanged(LuaWatchItem luaWatchItem, Lua.Result newValue) {
if (string.IsNullOrEmpty(newValue.AsString)) return;
StartCoroutine(PlayVO(luaWatchItem));
}
IEnumerator PlayVO(LuaWatchItem luaWatchItem) {
// Play the audio clip:
string sequence = string.Format("Audio({0})", DialogueLua.GetVariable("AudioClip"));
DialogueManager.PlaySequence(sequence);
// Then wait one frame (to let Alert be processed normally and cleared):
yield return null;
// Then re-check Alert to update the observer's cached value:
luaWatchItem.Check()
}

You could also run the message as a bark instead of an alert by using BarkOnDialogueEvent set to trigger OnConversationEnd. In the bark dialogue entry's sequence, you can use the Audio() sequencer command.


Additional QTE Features

  • To trigger a QTE "outside a conversation," run an empty conversation with a QTE. This conversation should do nothing except present the QTE option.
  • You can also implement your own additional QTE options. Depending on your needs, you can:
    • Create a simple subclass of the dialogue UI class that overrides the ShowQTEIndicator() method, or
    • Create a custom QTE sequencer command.

Additional Conversation Checks

If you want to perform additional checks on dialogue entries as a conversation progresses, you can use an IsDialogueEntryValid Delegate.

For example, conversations can involve other NPCs in addition to the main actor and conversant. You may want to verify that the other NPCs are close enough to the PC before allowing the line to be spoken.

If you haven't stored this information in the Dialogue System's Lua environment, it won't be available to the dialogue entry's Condition script. In this case, set a delegate that checks the proximity of the entry's speaker to the player.


Get Element from String in Lua

The Dialogue System registers a function RandomElement(string) with Lua. This returns a random element in a string of elements separated by horizontal bar characters (|).

You can add the LuaGetElement.cs script below to the Dialogue Manager to register a new function GetElement(index, string). This function returns the element at the specified index, which starts at 1.

using UnityEngine;
public class LuaGetElement : MonoBehaviour {
void Start() {
Lua.RegisterFunction("GetElement", null, SymbolExtensions.GetMethodInfo(() => GetElement(0, string.Empty)));
}
// Given an index and a string containing elements separated by '|',
// returns the element specified by the index (starting at 1).
private static string GetElement(float index, string list) {
if (string.IsNullOrEmpty(list)) return string.Empty;
string[] elements = list.Split(new char[] { '|' }, System.StringSplitOptions.None);
return elements[((int) index) - 1];
}
}

For example, the Dialogue Text below will display "Such a lovely toddler!"

  • Dialogue Text: Such a lovely [lua(GetElement(2, "baby|toddler|teenager"))]!

Watch Lua Value

The script below (WatchLuaValue.cs) logs a message to the console whenever a specified Lua expression changes. You can use it to watch the values of variables, quest states, etc. To use it, add it to the Dialogue Manager object and set Lua Expression. The default frequency is EveryUpdate, which may cause a some overhead depending on the complexity of your Lua expression. If you only need to check the value every dialogue entry or at the end of conversations, change the frequency.

using UnityEngine;
public class WatchLuaValue : MonoBehaviour {
public string luaExpression = "Quest[\"MyQuest\"].State";
public LuaWatchFrequency watchFrequency = LuaWatchFrequency.EveryUpdate;
void Start() {
DialogueManager.AddLuaObserver(luaExpression,watchFrequency, OnLuaValueChanged);
}
void OnLuaValueChanged(LuaWatchItem luaWatchItem, Lua.Result newValue) {
Debug.Log(string.Format("<color=magenta>{0} CHANGED TO: {1}</color>", luaExpression, newValue.AsString));
}
}

Toggle Subtitle Cancel Key

The Cancel trigger (key and/or button) configured in the Dialogue Manager always cancels the current subtitle.

In some cases, you might want to make a subtitle absolutely mandatory to sit through. For example, say you want to force an audio clip to play to completion in a particular dialogue entry, whereas the player is allowed to skip audio in all other dialogue entries.

To do this, you'll have to temporarily disable the cancel key. A relatively easy solution is to use a custom sequencer command.

Save this in your project as SequencerCommandSetCancelKey.cs:

using UnityEngine;
namespace PixelCrushers.DialogueSystem.SequencerCommands {
// Use SetCancelKey(true) to enable the cancel key, SetCancelKey(false) to disable it.
public class SequencerCommandSetCancelKey : SequencerCommand {
public void Start() {
var enable = GetParameterAsBool(0);
DialogueManager.DisplaySettings.inputSettings.cancel.key = enable ? KeyCode.Escape : KeyCode.None;
Stop();
}
}
}

Then in your sequence use these commands:

SetCancelKey(false); AudioWait(myClip)->Message(Done); SetCancelKey(true)@Message(Done)

This sequence:

  1. Disables the cancel key.
  2. Plays the audio clip 'myClip' and waits. When it's done, it sends the sequencer a 'Done' message.
  3. The last command waits until it receives the 'Done' message. Then it sets the cancel key back to Escape.

Quests and HUD Tracking

The Dialogue System provides several options for integrating HUD systems with the Quest System. In addition to the methods described in the Quest System, you can use these techniques to run external code when quests change:

Accepting Quests:

Players usually accept quests in conversations. This is described in Working with Quests in Conversations and, in this case, you either use the User Script field or the Sequence field.

The User Script field runs Lua statements. To use it, you need to register your C# or UnityScript function with the Lua environment. You can examine Scripts/Supplemental/Aurora/TemplateNWScript.cs for an example that registers a function named "NWScript()" with the Lua environment.

The Sequence field runs sequencer commands. It's very easy to add your own How to Write Custom Sequencer Commands. You can add a Sequencer command that runs your external function.

If the player can accept quests outside of conversations, you can add a Quest State Observer that will call a function if the quest state changes. See: Setting Quest State Observers

Abandoning Quests:

If you're using the built-in quest log window system, the player can use the quest log window to abandon quests (if the quest is marked as Abandonable). When a quest is abandoned, it sends an OnQuestTrackingDisabled() message to the Dialogue Manager GameObject. To see an example of how this message is used, examine Scripts/Supplemental/QuestTracker.cs. If the player has other ways to abandon a quest, add a Quest State Observer.

If you're using KGFMapSystem, it already includes HUD integration in the form of KGFMapIcon().


Scale Font Size in Unity GUI

Unity GUI doesn't provide an easy way to scale fonts to the current resolution. You can attach this script to your GUIRoot to handle scaling. Add each style whose font you want to scale to the Styles list.

using UnityEngine;
public class ScaleFontSize : MonoBehaviour {
[System.Serializable]
public class StyleScale {
public string styleName = string.Empty;
public float scaleFactor = 0.04f;
}
public StyleScale[] styles = new StyleScale[0];
private GUIRoot guiRoot = null;
private float lastScreenHeight = 0f;
void Awake() {
guiRoot = GetComponent<GUIRoot>();
}
void OnGUI() {
if (guiRoot == null || guiRoot.guiSkin == null) return;
if (Screen.height == lastScreenHeight) return;
lastScreenHeight = Screen.height;
foreach (var style in styles) {
GUIStyle guiStyle = guiRoot.guiSkin.GetStyle(style.styleName);
if (guiStyle != null) {
guiStyle.fontSize = (int) (style.scaleFactor * Screen.height);
}
}
guiRoot.ManualRefresh();
}
}

Unity UI with Response Button Template in Scrolling Response Panel

using UnityEngine;
using System.Collections.Generic;
// Extends UnityDialogueUI with a response button template (instead of having
// define a number of reponse buttons) and a scrolling response area.
public class UnityDialogueUIWithResponseTemplate : UnityDialogueUI {
public GUIScrollView responseButtonScrollView;
public GUIButton responseButtonTemplate;
public Color npcNameColor = Color.magenta;
public override void Awake () {
base.Awake();
if (responseButtonScrollView == null) Debug.LogError(string.Format("{0}: Response Button Scroll View is unassigned!", DialogueDebug.Prefix), this);
if (responseButtonTemplate == null) Debug.LogError(string.Format("{0}: Response Button Template is unassigned!", DialogueDebug.Prefix), this);
}
// Add speaker name to subtitle:
public override void ShowSubtitle(Subtitle subtitle) {
subtitle.formattedText.text = string.Format("<color={0}>{1}:</color> {2}", Tools.ToWebColor(npcNameColor), subtitle.speakerInfo.Name, subtitle.formattedText.text);
base.ShowSubtitle(subtitle);
}
// Add response buttons using the template, and reset the scrolling response panel:
public override void ShowResponses(Subtitle subtitle, Response[] responses, float timeout) {
if (responseButtonScrollView == null) return;
foreach (var button in dialogue.responseMenu.buttons) {
if (button != null) Destroy(button.gameObject);
}
List<GUIButton> buttonList = new List<GUIButton>();
float buttonHeight = responseButtonTemplate.scaledRect.GetPixelRect().height;
GUIButton previousButton = null;
for (int i = 0; i < responses.Length; i++) {
GameObject go = Instantiate(responseButtonTemplate.gameObject) as GameObject;
go.name = "Response Button " + i;
go.transform.parent = responseButtonScrollView.transform;
GUIButton button = go.GetComponent<GUIButton>();
button.depth = i;
button.scaledRect.y.value = i * buttonHeight;
if (previousButton != null) button.fit.below = previousButton;
previousButton = button;
buttonList.Add(button);
}
dialogue.responseMenu.buttons = buttonList.ToArray();
responseButtonScrollView.NeedToUpdateLayout = true;
base.ShowResponses(subtitle, responses, timeout);
}
}

DF-GUI UI with Intro & Outro Tweens

The following subclass of DiakonForgeDialogueUI allows you to add a list of dfTweens to your NPC subtitle and response menu panels. For example, you could add tweens that grow the panel when showing it (the intro), and shrink the panel away when hiding it (the outro).

using UnityEngine;
using System;
using System.Collections.Generic;
using System.Collections;
public class IntroOutroDaikonForgeDialogueUI : DaikonForgeDialogueUI {
public dfTweenGroup _npcSubtitleIntroTweenGroup = null;
public dfTweenGroup _npcSubtitleOutroTweenGroup = null;
public dfTweenGroup _responseIntroTweenGroup = null;
public dfTweenGroup _responseOutroTweenGroup = null;
private bool _isNPCSubtitleOpen = false; // Track when the NPC subtitle is open.
private bool _isResponseMenuOpen = false; // Track when the response menu is open.
private float _npcSubtitleOutroDuration;
private float _responseOutroDuration;
public override void Start()
{
base.Start();
RecordOutroDurations();
}
public override void Open() {
base.Open();
_isNPCSubtitleOpen = false;
_isResponseMenuOpen = false;
}
public override void Close() {
if (_isNPCSubtitleOpen) {
CloseNPCSubtitle(base.Close);
} else if (_isResponseMenuOpen) {
CloseResponseMenu(base.Close);
} else {
base.Close();
}
}
public override void ShowSubtitle(Subtitle subtitle) {
base.ShowSubtitle(subtitle);
OpenNPCSubtitle(subtitle);
CloseResponseMenu(null);
}
public override void ShowResponses(Subtitle subtitle, Response[] responses, float timeout) {
base.ShowResponses(subtitle, responses, timeout);
OpenResponseMenu();
CloseNPCSubtitle(null);
}
private bool IsNPCSubtitle(Subtitle subtitle) {
return (subtitle != null) && (subtitle.speakerInfo.characterType == CharacterType.NPC);
}
private void OpenNPCSubtitle(Subtitle subtitle) {
if (IsNPCSubtitle(subtitle)) {
if (!_isNPCSubtitleOpen) PlayTweenGroup(_npcSubtitleIntroTweenGroup);
_isNPCSubtitleOpen = true;
}
}
private void CloseNPCSubtitle(Action doneAction) {
StartCoroutine(PlayNPCSubtitleOutro(doneAction));
}
private void OpenResponseMenu() {
PlayTweenGroup(_responseIntroTweenGroup);
_isResponseMenuOpen = true;
}
private void CloseResponseMenu(Action doneAction) {
StartCoroutine(PlayResponseMenuOutro(doneAction));
}
private bool IsTweenGroupEnabled(dfTweenGroup tweenGroup) {
return (tweenGroup != null) && tweenGroup.enabled;
}
private void PlayTweenGroup(dfTweenGroup tweenGroup) {
if (IsTweenGroupEnabled(tweenGroup)) tweenGroup.Play();
}
private float GetTweenGroupDuration(dfTweenGroup tweenGroup) {
float duration = 0;
tweenGroup.Tweens.ForEach(tween => duration = Mathf.Max(duration, (tween as dfTweenFloat).Length));
return duration;
}
private void RecordOutroDurations() {
_npcSubtitleOutroDuration = GetTweenGroupDuration(_npcSubtitleOutroTweenGroup);
_responseOutroDuration = GetTweenGroupDuration(_responseOutroTweenGroup);
}
private IEnumerator PlayNPCSubtitleOutro(Action doneAction) {
if (_isNPCSubtitleOpen) {
if (IsTweenGroupEnabled(_npcSubtitleOutroTweenGroup)) {
dialogue.npcSubtitle.SetActive(true); // Make sure the NPC subtitle is visible.
_npcSubtitleOutroTweenGroup.Play();
yield return new WaitForSeconds(_npcSubtitleOutroDuration);
_npcSubtitleOutroTweenGroup.Stop();
dialogue.npcSubtitle.SetActive(false);
}
_isNPCSubtitleOpen = false;
if (doneAction != null) doneAction();
}
}
private IEnumerator PlayResponseMenuOutro(System.Action doneAction) {
if (_isResponseMenuOpen) {
if (IsTweenGroupEnabled(_responseOutroTweenGroup)) {
dialogue.responseMenu.SetActive(true); // Make sure the response menu is visible.
_responseOutroTweenGroup.Play();
yield return new WaitForSeconds(_responseOutroDuration);
_responseOutroTweenGroup.Stop();
dialogue.responseMenu.SetActive(false);
}
_isResponseMenuOpen = false;
if (doneAction != null) doneAction();
}
}
}

Saving Custom Data (Inventory Table)

This recipe shows how to add a custom table to the Lua environment and include it in saved game data.

Say your player has an inventory, and you want to keep track of which item is in each slot. You can define a Lua table named Inventory[] in your dialogue database's Global User Script field, available on the Dialogue Editor's Database tab:

  • Global User Script: Inventory = {}

For the sake of this example, say it has three fields: Slot1, Slot2, and Slot3. Each field will point to an element in the Item[] table. For example, you could assign a sword item to Slot1:

Lua.Run("Inventory['Slot1'] = Item['sword']");

Unfortunately for our example, the Save/Load System only records specific content in the Lua environment. This keeps saved-game data small.

However, we can add a special method called a delegate to record extra data. Write a method that returns the Lua code necessary to repopulate the Inventory[] table when loading a game:

public string GetInventorySaveData() {
StringBuilder sb = new StringBuilder();
LuaTableWrapper inventory = Lua.Run("return Inventory").AsTable;
for (int n = 1; n <= 3; n++) {
string slot = "Slot" + n;
LuaTableWrapper item = inventory[slot] as LuaTableWrapper;
if (item != null) sb.AppendFormat("Inventory[\"{0}\"] = Item[\"{1}\"]; ", slot, item["Name"]);
}
return sb.ToString();
}

This might, for example, return a string such as:

Inventory["Slot1"] = Item["sword"]; Inventory["Slot2"] = Item["helmet"]; Inventory["Slot3"] = Item["shield"];

To tell the PersistentDataManager to use this method, assign it as the GetCustomSaveData delegate:

PersistentDataManager.GetCustomSaveData = GetInventorySaveData;

Now, whenever the PersistentDataManager gathers data to save a game, it will also append the string returned by GetInventorySaveData().

Switching Player Characters

This recipe contains one approach to handle switching between multiple PCs using the Dialogue System.

Write a conversation titled "Select Character":

[0] Player: START
    [1] Game: Select your character.
        [2] Player: Dave [END]
        [3] Player: Syd [END]
        [4] Player: Wendy [END]

How you start this conversation depends on your game design. You could start it from a menu by using a PlayMaker action or calling DialogueManager.StartConversation() in a script. Or perhaps it starts when the player walks into a "changing room," using a Conversation Trigger set to OnTriggerEnter.

Use sequencer commands in dialogue entries 2-4 above to change the active PC. How you change the active PC again depends on how PCs work in your game. For this example, let's say that every PC has two sets of scripts:

  1. A set of scripts that translate PC input (mouse clicks, keyboard presses, etc.) into actions such as walking around and activating object. These scripts are active when the player has control of this PC.
  2. A set of "AI control" scripts that do things like follow the active PC and/or play idle animations. These scripts are active when the player does NOT have control of this PC.

You can use the SetEnabled() sequencer command to enable some scripts and disable others.

Or, you can use the SendMessage() command to call a method on a script. (Maybe you have a SwitchCharacter script.)

Or, you can write a custom sequencer command that handles the switch.

Let's say you decide to write a CharacterSwitcher script and put it on a dedicated GameObject named CharacterSwitcher, something like this:

public class CharacterSwitcher : MonoBehaviour {
    public GameObject[] characters; // Assign all PCs to this array.

    public void SwitchTo(string characterName) {
        foreach (var character in characters) {
            character.SendMessage("OnPlayerControl", string.Equals(character.name, characterName));
        }
    }
}

Then use this sequencer command on Dialogue Entry 2 (Dave):

SendMessage(SwitchTo, Dave, CharacterSwitcher)

This will end up sending "OnPlayerControl(true)" to Dave, and "OnPlayerControl(false)" to Syd and Wendy.

Now the PCs need to do something when they receive "OnPlayerControl". Maybe another script ControlSwitcher on each PC, such as:

public class ControlSwitcher : MonoBehaviour {
    public MonoBehavior[] playerControlScripts; // Assign player control scripts.
    public MonoBehavior[] aiControlScripts; // Assign AI control scripts.

    public void OnPlayerControl(bool isPlayerControl) {
        foreach (var playerControlScript in playerControlScripts) {
            playerControlScript.enabled = isPlayerControl;
        }
        foreach (var aiControlScript in iaControlScripts) {
            aiControlScript.enabled = !isPlayerControl;
        }
    }
}

Fade In Legacy Unity GUI Barks

UnityBarkUIOnGUI was made to be extensible by creating a subclass. By default, barks appear immediately and fade out. Put this subclass (UnityBarkUIOnGUIFadeIn.cs) on your barker if you want barks to also fade in. If your barker already has a UnityBarkUIOnGUI component, remove that. If it doesn't have one, you don't need to do anything extra.

using UnityEngine;
using System.Collections;
namespace PixelCrushers.DialogueSystem.UnityGUI {
public class UnityBarkUIOnGUIFadeIn : UnityBarkUIOnGUI {
public float fadeInDuration = 0.5f;
public override void Show(Subtitle subtitle, float duration, GUISkin guiSkin, string guiStyleName, TextStyle textStyle, Color textStyleColor, bool includeName, Transform textPosition) {
base.Show(subtitle, duration, guiSkin, guiStyleName, textStyle, textStyleColor, includeName, textPosition);
StartCoroutine(FadeIn(fadeInDuration));
}
public IEnumerator FadeIn(float fadeDuration) {
float startTime = Time.time;
float endTime = startTime + fadeDuration;
while (enabled && (Time.time < endTime)) {
float elapsed = Time.time - startTime;
alpha = Mathf.Clamp(elapsed / fadeDuration, 0, 1);
yield return null;
}
alpha = enabled ? 1 : 0;
}
}
}

PixelCrushers.DialogueSystem.UnityGUI
Definition: UnityGUIQuestLogWindow.cs:5
PixelCrushers.DialogueSystem.BarkSubtitleSetting.Show
PixelCrushers.DialogueSystem.DaikonForgeGUI
Definition: DaikonForgeBarkRoot.cs:4
PixelCrushers.DialogueSystem.Articy.EntityCategory.Item
PixelCrushers.DialogueSystem.CharacterType
CharacterType
Specifies whether a character is a player character (PC) or non-player character (NPC).
Definition: CharacterType.cs:6
PixelCrushers.DialogueSystem
Definition: ArticyConverterWindow.cs:8
PixelCrushers
Definition: ArticyConverterWindow.cs:8
PixelCrushers.DialogueSystem.UnityGUI.TextStyle
TextStyle
The TextStyle enum is used by several dialogue system components that draw text using Unity GUI.
Definition: TextStyle.cs:11
PixelCrushers.DialogueSystem.LuaWatchFrequency
LuaWatchFrequency
Lua watch frequencies.
Definition: LuaWatchers.cs:10
NLua.GCOptions.Stop
Stops the garbage collector.