 |
|
The video tutorial is newer and recommended over the text version.
This tutorial demonstrates how to set up a basic quest. We'll use Unity's standard 2D character controller, but the same process applies to 3D and other character controllers. In this quest, the quest giver NPC will ask the player to fetch his children.
There is overlap between this tutorial and the Interaction Tutorial. For more detailed instructions on interaction, see the Interaction Tutorial.
Step 1. If you're using Unity 2018 or older, import Unity's standard 2D assets: Assets → Import Package → 2D. If you're using Unity 2019 or newer, you can use these steps to access th standard 2D assets:
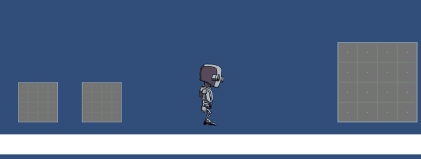
Step 2. In a new scene, add the Platform36x01 prefab and set its position to (-20, 0, 0).
Step 3. Add CharacterRobotBoy and set its position to (0, 2, 0).
Step 4. Add three new sprites. Name them Parent, Baby1, and Baby2.
At this point, your scene should look similar to this:
Now we'll add the Dialogue System components!
Step 5. Add the Dialogue Manager prefab. Next to the Initial Database field, click Create to create a new database.
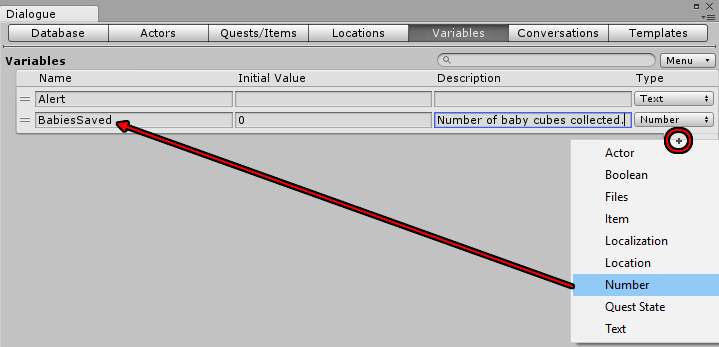
Step 6. The Parent box will ask the player to retrieve two baby boxes. We'll define a variable to record how many baby boxes the player has picked up. On the Variables tab, add a Number variable named "BabiesSaved":
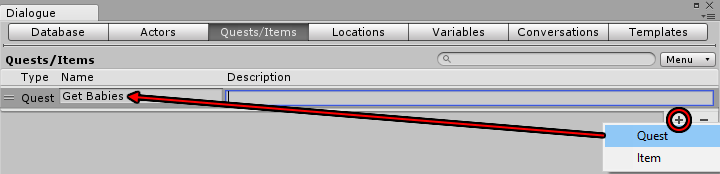
Step 7. On the Quests/Items tab, add a new quest named "Get Babies":
Click on the quest to edit it. Set these values:
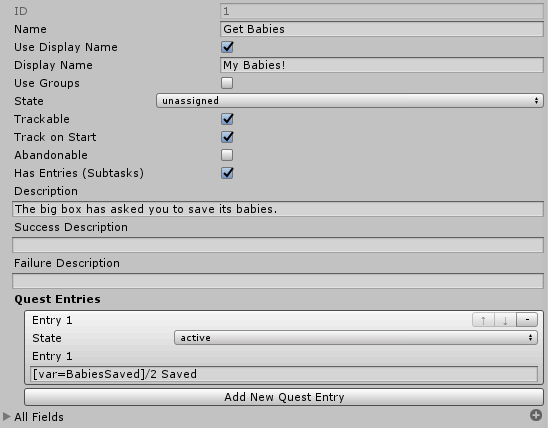
| Property | Value | Notes |
|---|---|---|
| Use Display Name | Ticked | UIs will use Display Name instead of Name field. |
| Display Name | My Babies! | Name to use in UIs. |
| Trackable | Ticked | Player can toggle quest HUD tracking. |
| Track on Start | Ticked | When the quest is accepted, it starts with tracking turned on. |
| Has Entries | Ticked | Quest has entries (making the Add New Quest Entry button available). |
| Description | The big box has asked you to save its babies. | Shown in the quest log window. |
| Entry 1 State | active | Entry is visible when quest is active. |
| Entry 1 | [var=BabiesSaved]/2 Saved | Entry text, which uses the [var=varName] markup tag. |
Note that Entry 1 uses a markup tag. During play, it will be replaced by the current value of the BabiesSaved variable. You can use markup tags in quest's Display Names, descriptions, and entries.
Step 8. On the Conversations tab, create a new conversation titled "Save My Babies":
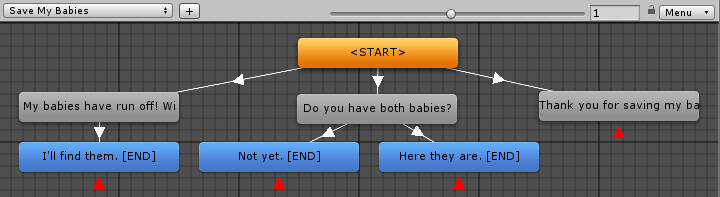
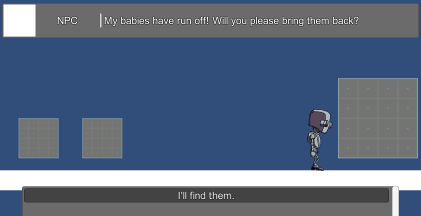
The text is:
NPC: My babies have run off! Will you please bring them back?
Player: I'll find them.
NPC: Do you have both babies?
Player: Not yet.
Player: Here they are. (links to the line below)
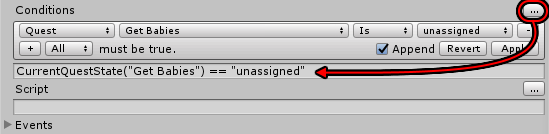
NPC: Thank you for saving my babies!Step 9: We need to add conditional logic to this conversation. For more detailed instructions on conditional logic, see the Conversation Conditions Tutorial. Set the Conditions and Script fields as indicated:
NPC: My babies have run off! Will you please bring them back? [Conditions: CurrentQuestState("Get Babies") == "unassigned"]
    Player: I'll find them. [Script: SetQuestState("Get Babies", "active")]
NPC: Do you have both babies? [Conditions: CurrentQuestState("Get Babies") == "active"]
    Player: Not yet. [Conditions: Variable["BabiesSaved"] < 2]
    Player: Here they are. [Conditions: Variable["BabiesSaved"] >= 2] [Script: SetQuestState("Get Babies", "success")]
NPC: Thank you for saving my babies! CurrentQuestState("Get Babies") == "unassigned"]
Use the "..." button next to the fields to set them using dropdown menus:
That does it for the database. Now we need to set up the scene.
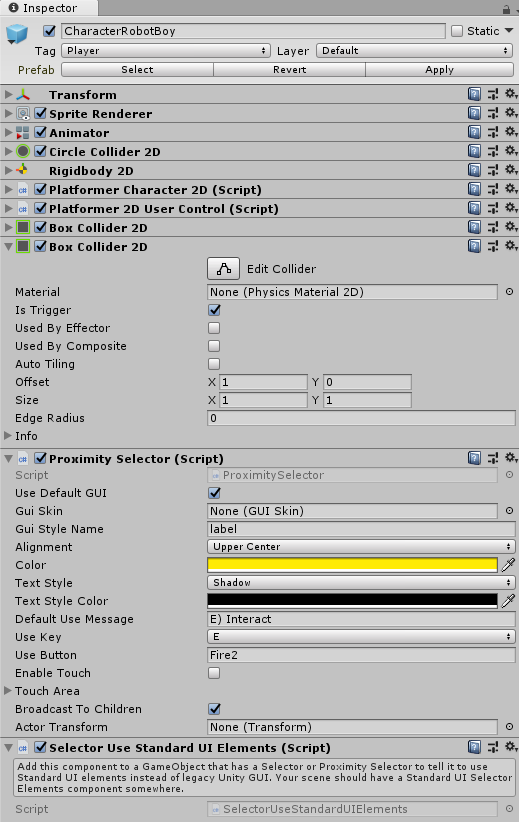
Step 10. Inspect our player, CharacterRobotBoy. Add another BoxCollider2D. Set its Offset to (1, 0) and Size to (1, 1). Tick Is Trigger.
Step 11. Add a Proximity Selector. Since the space bar is already mapped to the 2D controller's jump action, we'll use the E key to interact.
CharacterRobotBoy's Inspector should now look similar to this:
We won't add components to disable player control during conversations. If you want to add those on your own, refer to the Interaction Tutorial.
Step 12. Inspect Parent. Add a Usable component.
Step 13. Add a Dialogue System Trigger component.
When the player interacts with Parent, it will start the Save My Babies conversation.
Next, we'll configure the babies for "pickup".
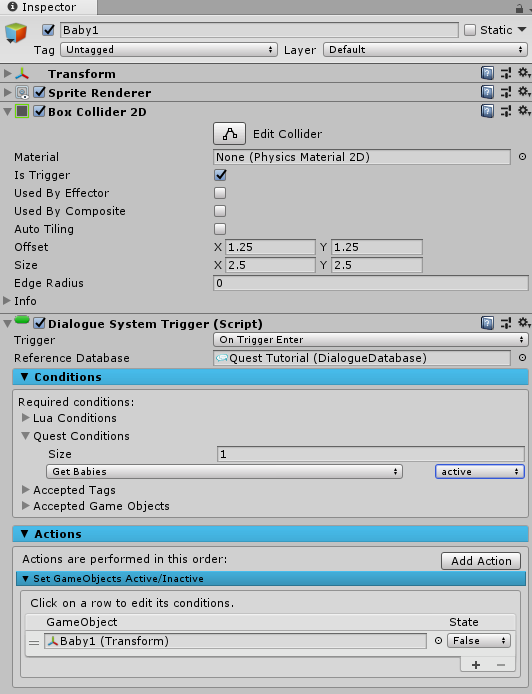
Step 14. Inspect Baby1. Tick the BoxCollider2D's Is Trigger checkbox.
Step 15. Add a Dialogue System Trigger component with these settings:
Baby1's Inspector should now look similar to this:
Step 16. Add an Increment On Destroy component with these values:
There's no need to set a Condition on the Increment On Destroy since we're already checking the condition in the Dialogue System Trigger.
Baby1's Inspector should now look similar to this:
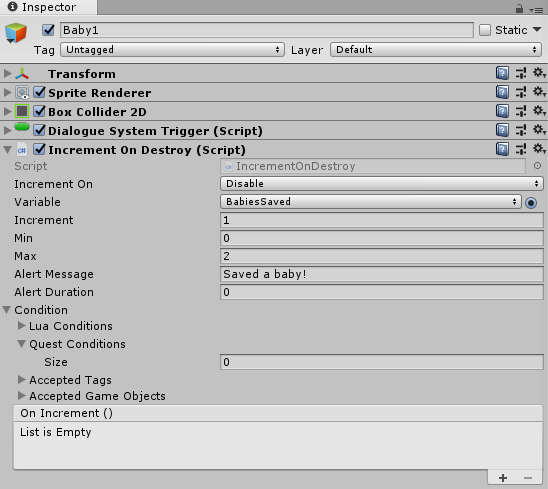
You can use Increment On Destroy for kill quests as well as fetch quests like this one. It's useful any time you want to do something when a GameObject is deactivated or destroyed.
We could just as well have configured the Dialogue System Trigger to do everything the Increment On Destroy component does in this case, but we included Increment On Destroy in this tutorial because it's useful on its own, too.
Step 17. Repeat these steps for Baby2.
Finally, play your scene!
Talk to Parent. The conversation will branch based on the current state of the quest and the value of the BabiesSaved variable.
When you enter the babies' trigger colliders, they'll be "picked up" – that is, their GameObjects will be deactivated, and the BabiesSaved counter will increase.
For additional quest examples, examine the Demo Scene.
<< Tutorials