 |
|
(Click Here For Video Tutorial)
The Dialogue System uses the Pixel Crushers Common Library’s Save System. A complete manual on the save system is available in Plugins ► Pixel Crushers ► Common ► Documentation.
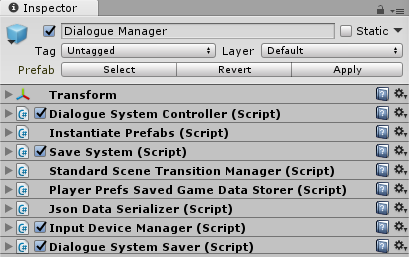
The Save System components are configured in the Demo scene. The Dialogue Manager has a Save System component and some related components that work with the Save System component:
The demo menu calls the static script method SaveSystem.SaveToSlot() to save the game and SaveSystem.LoadFromSlot() to load the game.
Use these instructions to set up the Save System:
To save and load games, see Saving & Loading.
To change scenes, see Changing Scenes.
For a visual representation of how this works, see Save System Overview Flowchart.
Add these components to any GameObjects whose states you want to save:
| Component | Function |
|---|---|
| Active Saver | Saves the active/inactive state of a GameObject. If the GameObject starts inactive, add this component to a different GameObject that's guaranteed to be active, and assign the target GameObject. |
| Multi Active Saver | Saves the active/inactive states of multiple GameObjects. |
| Animator Saver | Saves the state of a GameObject’s animator. |
| Destructible Saver | Saves when a GameObject has been destroyed or disabled. The next time the game or scene is loaded, if the GameObject has previously been destroyed/disabled, this script will destroy/deactivate it again. It will also spawn a replacement destroyed version if a prefab is assigned. |
| Enabled Saver | Saves the enabled/disabled state of a component. If the GameObject starts inactive, add this component to a different GameObject that's guaranteed to be active, and assign the target component. |
| Multi Enabled Saver | Saves the enabled/disabled state of multiple components. |
| Position Saver | Saves a GameObject’s position and rotation. |
Every saver component needs a unique key under which to record its data in saved games. If the Key field is blank, it will use the GameObject name (e.g., "Orc"). If you tick Append Saver Type To Key, the key will also use the saver’s type (e.g., "Orc_PositionSaver"). This is useful if the GameObject has several saver components. If GameObjects have the same name, you will need to assign unique keys. Otherwise they will all try to record their data under the same key, overwriting each other. To automatically assign unique keys to every saver in a scene, select menu item Tools → Pixel Crushers → Common → Save System → Assign Unique Keys....
You can also write your own Saver components. The starter template script in Plugins ► Pixel Crushers ► Common ► Templates contains comments that explain how to write your own Savers. The EnabledSaver script is a useful example to follow.
To save and load games from a script, use the static methods PixelCrushers.SaveSystem.SaveGameToSlot and PixelCrushers.SaveSystem.LoadGameFromSlot.
To access Save System methods without scripting, such as in a UI Button’s OnClick() event, add a Save System Methods component and configure the UI buttons to call the component's SaveSlot and LoadFromSlot methods.
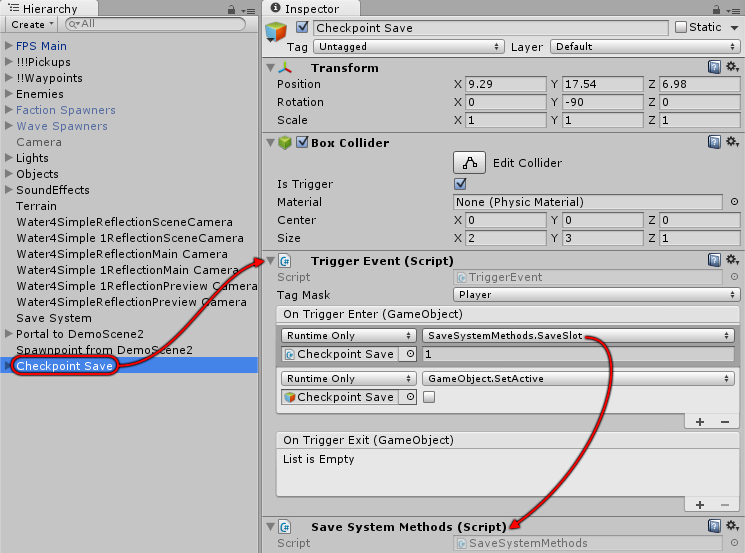
Checkpoint saves are trigger areas that automatically save the game when the player enters them. To set up a checkpoint save:
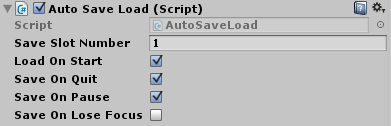
Mobile games typically auto-save when the player closes the game and auto-load when the player resumes the game. To add this behavior to your game, add an Auto Save Load component to the Save System:
You can set the Save System component's Version field, or the SaveSystem.version C# property, to include a version number in your saved games. When restoring saved games, you can check SaveSystem.currentSavedGameData.version to know what version the game was saved in. This may be useful if things have changed between releases of your game.
If you only want to save the state of the dialogue database (e.g., dialogue database variables, quest states, and SimStatus), you can bypass the Save System and use PixelCrushers.DialogueSystem.PersistentDataManager instead:
If you change scenes using the Dialogue System's save system, it will save the state of the old scene so it can restore the state when you return to the scene. The state is saved in memory, in the property SaveSystem.currentSavedGameData. After loading a scene, the save system will apply that scene's saver data from the in-memory SaveSystem.currentSavedGameData.
To change scenes, use one of these techniques:
PixelCrushers.SaveSystem.LoadScene("scene") or LoadScene("scene@spawnpoint");SaveSystem.BeforeSceneChange() and SaveSystem.RecordSavedGameData() before changing scenes and SaveSystem.ApplySavedGameData() after changing scenes if you're using some other method to change scenes.You can use the LoadLevel() sequencer command in conversations and in Dialogue System Triggers' Play Sequence actions. If you use LoadLevel() in a conversation, keep in mind that the conversation will still be active when you change scenes. Conversations are allowed to span scene changes.
When changing scenes, you can specify a spawnpoint. This is typically an empty GameObject. If the player GameObject has a Position Saver component whose Use Player Spawnpoint checkbox is ticked, it will move the player GameObject to match the position and rotation of the spawnpoint GameObject.
To play outro and intro animations, and/or show a loading scene while loading the next actual scene, add a Standard Scene Transition Manager to your Save System:
If Pause During Transition is ticked, make sure your Animator(s) are set to Unscaled Time.
If a Scene Transition Manager is present, the Save System will:
To additively load additional scenes into the current environment, use SaveSystem.LoadAdditiveScene. This will load the scene and tell its Savers to apply their data from the current saved game data.
To unload an additively-loaded scene, use SaveSystem.UnloadAdditiveScene.
The Dialogue System has a Spawned Object Manager that can track objects that have instantiated into the scene at runtime and include them in saved games. When you load a game, it re-instantiates the objects.
This is an overview of the configuration process:
Add a Spawned Object component to the prefab that will be instantiated. Repeat for all items that can be instantiated in the scene that you want to remember in saved games.
Create an empty GameObject and add a Spawned Object Manager component as shown below.
Each scene should have its own Spawned Object Manager, and the Spawned Object Manager in each scene should have a unique key that's not used in other scenes.
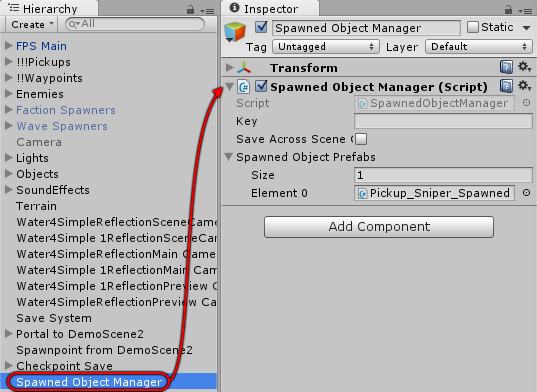
Add all Spawned Object prefabs that can be created in the scene to the Spawned Object Prefabs list. If a prefab is missing from the list, the Spawned Object Manager will not be able to re-spawn it when loading games or returning to the scene. In the example screenshot above, a prefab named "Pickup_Sniper_Spawned" has been added to the list.
The image below recaps how the Save System works with the Dialogue System:
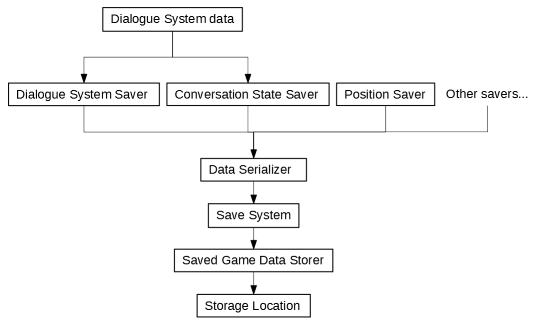
Loading is the reverse (i.e., the steps flow up instead of down).
When changing scenes, the process is the same except the Saved Game Data Storer is not used. The Save System simply holds the save data in memory and applies it to the newly-loaded scene. The Save System performs these steps when changing scenes:
<< Welcome to the Dialogue System for Unity! | Localization >>