 |
|
The Dialogue System supports language localization for dialogue databases and also provides general purpose Text Tables.
When you change the language from the default, the Dialogue System will use text from fields that contain localized versions for the specified language.
Localization Package Support: The Dialogue System supports Unity's Localization Package. See Localization Package Integration.
I2 Localization Support: The Dialogue System supports Inter-Illusion's I2 Localization. If you use I2 Localization, you may want to use the Dialogue System's I2 Localization Support.
Localization Services: If you would like to outsource your localization, Pixel Crushers is partnering with localization services to provide easy, economical options to work with professional localization experts. To contact a localization partner, open the Dialogue Editor window. In the Database section > Localization Export/Import foldout, click the Send Localization Request dropdown.
For each localized language, you will use a language code. The codes are up to you, but a good choice is the ISO 639-1 standard: https://en.wikipedia.org/wiki/List_of_ISO_639-1_codes.
Example language codes are:
| Code | Language |
|---|---|
| es | Spanish |
| ru | Russian |
| fr-CA | French (Canadian) |
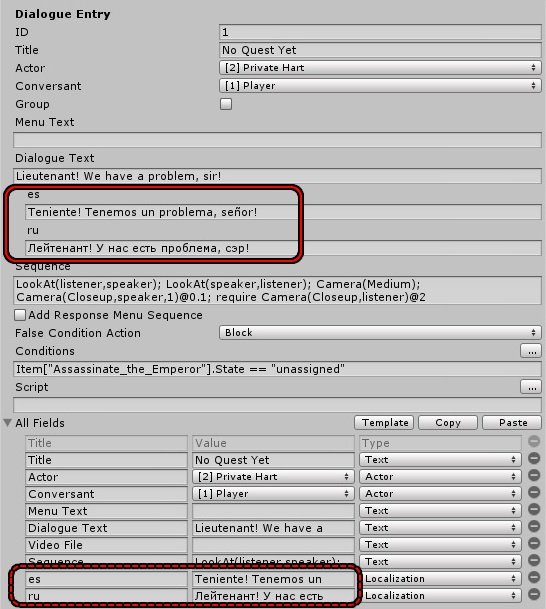
All fields are localizable by adding a blank space and the language code to the field name. The one exception is the Dialogue Text field. For Dialogue Text, use the language code by itself. Set the Type of localized fields to Localization.
The fields below are common ones to localize. If a localized field name is not defined for the current language, it will use the default field.
For each language LN, the names of the dialogue entry fields will be:
| Default Field | Localized Field | Example |
|---|---|---|
| Dialogue Text | LN | es |
| Menu Text | Menu Text LN | Menu Text es |
| Sequence | Sequence LN | Sequence es |
| Response Menu Sequence | Response Menu Sequence LN | Response Menu Sequence es |
For each language LN, the names of the quest fields will be:
| Default Field | Localized Field | Example |
|---|---|---|
| Name | Name LN | Name es |
| Description | Description LN | Description es |
| Success Description | Success Description LN | Success Description es |
| Failure Description | Failure Description LN | Failure Description es |
| Entry # | Entry # LN | Entry 3 es |
In Lua code, you can use the GetLocalizedText() Function to get the localized version of a field, which can be useful in dialogue entry Script or Conditions fields or when using [lua(code)] Markup Tags.
If you have ticked Use Display Names, you can set an actor's Display Name. To set localized versions of the Display Name, set these fields:
| Default Field | Localized Field | Example |
|---|---|---|
| Display Name | Display Name LN | Display Name es |
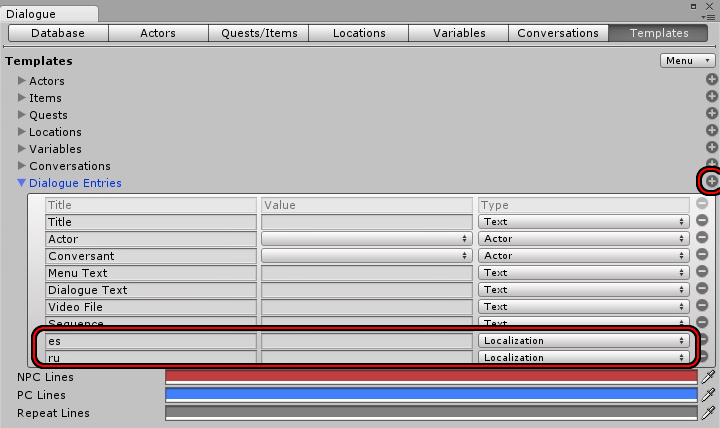
The easiest way to localize using the Dialogue Editor is to add localization fields to the template on the Templates tab. This way, they will automatically be added to assets as you add them.
Follow the instructions below to add localization to a dialogue database.
These steps demonstrate how to add Spanish (es) and Russian (ru) to conversations.
On the Templates tab, expand the Dialogue Entries foldout.
These steps demonstrate how to add Spanish (es) and Russian (ru) to quests.
Description followed by a space and the language code.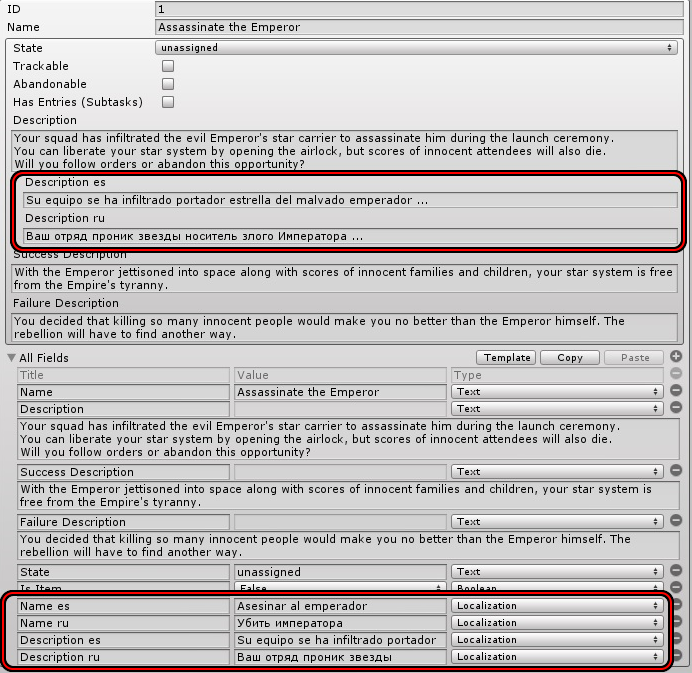
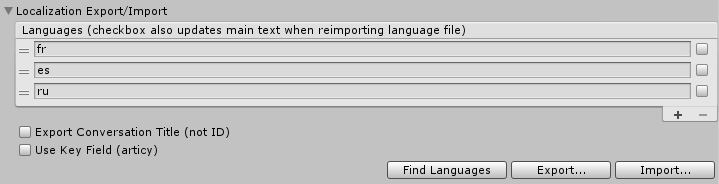
You can use the Database tab's Localization Export/Import foldout to export separate CSV spreadsheet files for each language. If your database contains quests, each language will generate two files:
If your database doesn't contain quests, the Export... button will only generate the Dialogue_language.csv files.
By default, each row in the CSV spreadsheet will identify a line of dialogue by conversation ID (or title) and entry ID. If you want to identify lines of dialogue by unique IDs instead, tick Use Key Field.
Articy IdCeltx IDAfter exporting CSV files, you can import them into any spreadsheet application such as Microsoft Excel or Google Sheets, or send them to translators. (Translators usually prefer to work with spreadsheets.) Add the translations to each CSV file, and then use the Import... button to import them back into your dialogue database.
If you tick the checkbox next to a language in the Languages list, the Import... button will also import any changes you have made to that language file's main text, not just the language translations.
To export each dialogue entry's conversation title instead of conversation ID, tick the Export Conversation Title checkbox. Conversation titles should be unique in your database.
Normally, the localization foldout looks up each dialogue entry by its conversation ID (or title) + dialogue entry ID. If you want to look up each dialogue entry by a unique dialogue entry field value, tick Use Key Field. This is particularly useful with external import formats such as articy:draft, which assigns a unique Articy Id field value to every dialogue entry.
If you export your database for translation and then make changes to your database before importing the translated CSV files back into the database, please be aware of these rules:
The Localization Export/Import Foldout's Import operation imports quest translations by quest name. If you change the quest name before importing again, the import operation will not find the quest to update its translation. You can add new quests and delete quests without any issues.
The Import operation imports dialogue entries by internal conversation ID (or title) and dialogue entry ID, unless you have ticked Use Key Field. If you change or remove a conversation's dialogue entries before importing again, the translation may not find the correct dialogue entries to update their translations. You can add new dialogue entries or new conversations without any issues.
If you use multiple databases: After you export CSVs, do not use the Unique ID Tool until you have reimported the translations. The Unique ID Tool may change conversation IDs.
Chat Mapper, articy:draft, and Aurora Toolset all support localization. For instructions on localizing in these applications, see Import & Export.
The Dialogue System also provides general-purpose, localizable text tables. Text tables are project assets. To create a text table, right-click in the Project view and select Create → Pixel Crushers → Common → Text → Text Table. In the Inspector, click Open Text Table Editor.
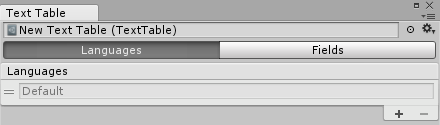
Text tables have two tabs:
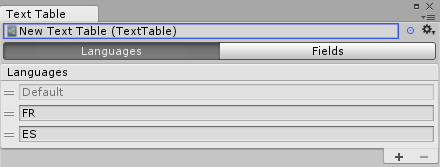
To add a new language, on the Languages tab click the "+" button. Then enter the name by which you want to refer to the language.
To add a new field, on the Fields tab click the "+" button. Enter the field name in the Field column. Then select each language from the dropdown menu in the header of the right column, and enter the field value. You can enter the field value directly into the list row, or you can click on the list row to edit it in a larger text area at the bottom of the window.
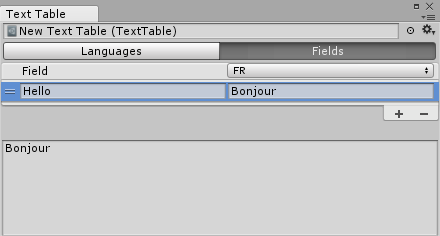
By default, if a field value is blank for a language, at runtime the default language's field value will be used. To use the language's blank field value instead of the default language's field value instead, set the static property TextTable.useDefaultLanguageForBlankTranslations to false.
To localize a UI Text element or the options of a Dropdown element, add a Localize UI component. You can assign a Text Table to this component. If none is assigned, it will pull the localized text from the Text Table assigned to the Dialogue Manager.
You can add a UI Localization Manager to the Dialogue Manager to manage and record the current language setting in PlayerPrefs so it's restored when play is resumed. When the scene starts, and whenever you change languages by calling the UILocalizationManager’s UpdateUIs(string language) method, the Localize UI components will look up the values of their field names in the text table and update their text content.
To get the value of a text table's field in a script, call the text table's GetFieldTextForLanguage method:
Text tables have several other helpful methods that you can explore through the online API reference.
To localize gameplay alert messages, assign a text table to the Dialogue Manager's Localization Settings → Text Table.
When the Dialogue System shows an alert, it will first try to use the alert message as a field index into the text table. Otherwise, if the alert message is not a field index in the table, it will just show the alert message itself.
During conversations, if a localized version of a field exists for the current language, the Dialogue System will use it instead of the default version. You can set the current language on the Dialogue Manager object or by script.
To get the current language, read the Localization.Language property.
On the Dialogue Manager object, under Localization Settings, set the Language property to the desired language code, or blank to use the default language (i.e., Menu Text instead of Menu Text fr-CA). If you tick Use System Language, then on start the Dialogue System will set the Language property to the current system language.
NOTE: Whenever you specify a language to use, the Dialogue System will store the player's current language selection in a PlayerPrefs key. If set, this will override the Dialogue Manager's Localization Settings > Language value. To reset the key, select Tools → Pixel Crushers → Dialogue System → Tools → Clear Saved Localization Settings.
To change the current language, set DialogueManager.SetLanguage. For example:
Or, to use .NET enumerations, use the Localization.GetLanguage() method:
To set the current language using a visual scripting system such as PlayMaker, use the Set Language action provided by the Dialogue System's support package for that visual scripting system.
By default, if a localized field is missing or blank, the Dialogue System will use the default language's value. You can change this by setting Localization.UseDefaultIfUndefined to false.
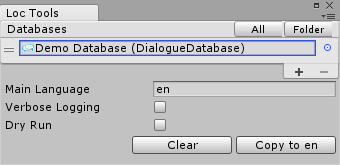
To open the Localization Tools window, select menu item Tools → Pixel Crushers → Dialogue System → Tools → Localization Tools.
The Localization Tools window can copy dialogue databases' Dialogue Text and Menu Text to the primary language fields (e.g., 'Dialogue Text' to 'en' and 'Menu Text' to 'Menu Text en').
Tick Dry Run to print a log of the changes that would be made by the 'Copy to language' button without actually making the changes.
This is often useful in conjunction with I2 Localization Support.
To use different fonts for different languages, create a Localized Fonts asset (Assets > Create > Pixel Crushers > Common > UI > Localized Fonts). Assign fonts (Unity Fonts and/or TextMesh Pro Fonts) to use for each language.
Assign your Localized Font asset to the Dialogue Manager's UI Localization Manager component. If your Dialogue Manager doesn't have a UI Localization Manager component, add one.
Then add a Set Localized Font component to any Text or TextMeshProUGUI component, such as your dialogue UI's Subtitle Text GameObjects. This component will switch the Text/TextMeshProUGUI''s font based on the current language. Note: GameObjects with Localize UI components don't need Set Localized Font components.
To enable the Dialogue System's integration with Unity's Localization Package, import Plugins ► Pixel Crushers ► Dialogue System ► Third Party Support ► Localization Package Support.

The Dialogue System's Localization Package integration provides an editor window to help localize dialogue database content and a runtime component named Dialogue System Localization Package Bridge to allow the Dialogue System to retrieve translations from the Localization Package.
At runtime, the Dialogue System Localization Package Bridge will do the following:
entrytaglocal according the Localization Package's current locale code.The Dialogue System Localization Package Bridge component must be on the Dialogue Manager or one of the conversation participants since it listens for OnConversationLine methods that are only sent to those GameObjects.
To use the Localization Package integration:
Select menu item Tools → Pixel Crushers → Dialogue System → Third Party → Localization → Dialogue To Localization Table. This will open the "DS To Loc" window:
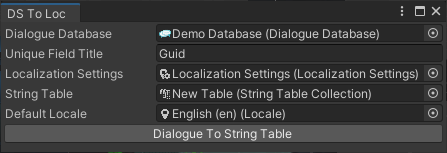
The integration localizes quests, but you must use the DS To Loc window's "String Table To Dialogue System" button to reimport the translations back into the dialogue database in order to see the localizations.