The Dialogue System can import and export files created in Urban Brain Studios' Chat Mapper.
Chat Mapper Importer
Chat Mapper Project Details
The Dialogue System includes a Chat Mapper starter template project in Templates ► Chat Mapper Template Project. You can make a copy of this template and use it as your project file, or copy it to your [Documents] ► Chat Mapper ► Templates folder to make it available as a template in Chat Mapper.
The template is based on the Chat Mapper "Games" template. Several fields from the Chat Mapper Games template are still present but excluded from export to reduce the size of your asset files. You can review these fields and change which ones are exported by selecting Project → Project Settings in Chat Mapper. The template also contains the custom asset fields listed below.
Your Chat Mapper project should contain these settings:
Custom Asset Fields - Items
| Title | Type | Description |
| Is Item | Boolean | Specifies whether the item is an item or a quest. |
If you're using Quests, also add the quest fields listed in the Quest Fields section. If you plan to use quest entries (subtasks), you can read more about how to add fields for them in the Quests Entries in Chat Mapper section.
Custom Asset Fields - Dialogue Nodes
| Title | Type | Description |
| Sequence | Text | Cutscene sequence to run during the node. |
| Response Menu Sequence | Text | (Optional) Cutscene sequence to run during the response menu that follows the node. |
To set up language localization, also add localized fields as described in the Localization section. The Chat Mapper simulator will only recognize localization of the Dialogue Text field, but any other localized fields, such as Menu Text, will be handled properly in the Dialogue System.
Quests Entries in Chat Mapper
Chat Mapper doesn't natively have a concept of quests. To accommodate this, the Dialogue System uses Chat Mapper's Items table to hold quest information. To support quests, you'll need to do a little setup in your Chat Mapper project first by adding some custom item fields. Select Project → Project Settings → Custom Asset Fields → Items. Add these fields:
| Field Name | Type | Default Value |
| Is Item | Boolean | False |
| Entry Count | Number | 0 |
| Entry 1 | Text | (blank) |
| Entry 1 State | Text | unassigned |
| Entry 2 | Text | (blank) |
| Entry 2 State | Text | unassigned |
etc.
Add as many entries as you need for your biggest quest. You can always add more later if you need them. If you're localizing to multiple languages, you can add fields for them, too, such as Entry 1 ru for the Russian version of the text for Entry 1.
These fields are not in the provided template because some developers do not use quest entries.
When you define a quest, set Entry Count. Even though every item record will have the full set of Entry 1... Entry n the Dialogue System will only use the entries up to Entry Count.
Then set Entry 1 to the entry text and Entry 1 State to the quest state (e.g., "unassigned" or "active"). Repeat for all the entries up to Entry Count.
Global Lua Script
If you're using Quests, add this to the Global Lua Script:
Quest = Item;
This Lua statement makes Quest[] an alias for the Item[] table. In your Conditions and Script fields, you can refer to Quest["questName"] instead of Item["questName"]. Or you can use the CurrentQuestState() and SetQuestState() Lua functions, but keep in mind that they will be properly observed in the Dialogue System but ignored in Chat Mapper's simulator.
How to Localize in Chat Mapper
Chat Mapper makes localization easy. The Chat Mapper Importer automatically imports all Chat Mapper localization settings. To set up localization in Chat Mapper, follow these steps:
- Select Project → Project Settings → Custom Asset Fields → Dialogue Nodes.
- Add a custom field for each language:
- Title: The language code (e.g., "es" for Spanish, "fr-CA" for French - Canadian). Use just the language code; do not put "Dialogue Text" in front of it.
- Type: Localization.
- If you want to localize Menu Text or Sequences, add a custom field for each language LN:
- Title: "Menu Text LN" or "Sequence LN" (e.g., "Sequence fr-FR"). There should be exactly one blank space between the default title name and the language code.
- Type: Text. Note: Make sure the type is Text. Only the Dialogue Text localization fields should have the type set to Localization. This is specific to Chat Mapper; in the Dialogue Editor, the field types can be set to Localization.

- Click OK.
Chat Mapper's tree view show the dialogue text of the active localization. To change the active localization, use the Active Localization dropdown on the main window.
When editing dialogue entries, if you leave a localized version of a field blank, the Dialogue System will use the default version.
Note that Chat Mapper only localizes Dialogue Text. The Dialogue System also localizes Menu Text, Sequence, and other fields. You won't see this in Chat Mapper's simulator, but it will take effect in Unity.
Notes about Content
Review these helpful tips before editing your Chat Mapper Project:
- Asset names (actors, items, locations, variables) and conversation titles must be unique. If you define two actors with the same name, only one will be loaded at runtime. If a conversation references the other (not-loaded) actor with the same name, the results may be unpredictable.
- The Dialogue System will try to match the characters' GameObject names with their actor names. It's simplest to keep these the same. If not, you can use a Dialogue Actor component in Unity.
- If you use actor pictures, store them in your Assets folder hierarchy so the Chat Mapper importer can find them.
- If you're using Quests, define your quests as items as described above. You're otherwise free to store whatever information you want in items.
- In Chat Mapper and the Dialogue System, space characters and hyphens get replaced with underscores in Lua table indices. For more information, see Important Note About Table Indices.
- The Dialogue System doesn't use locations for anything specific. You can store whatever information you want in them.
- At runtime, the Dialogue System will create the variables are listed in Special Variables if they don't exist. You can define them ahead of time in your Chat Mapper project so you can use them in your content and test them in the simulator.
- The first dialogue node of every conversation should be START. This is the default.
- If you need to do more dialogue entry validation outside of Lua (e.g., checking GameObjects in Unity), you can use an IsDialogueEntryValid Delegate.
- The Dialogue System supports Chat Mapper's localization functionality. To set up localization, see How to Localize in Chat Mapper.
- If you're using Unity UI, you can use bold, italic, and color rich text codes, as well as the special timing codes described in the Typewriter Effect section.
Limitations and Warnings
- If you create multiple Chat Mapper Projects, it's possible that their internal assets (actors, items, etc.) will have IDs that overlap across projects. To resolve this in the Dialogue System, use the Unique ID Tool.
- The Chat Mapper Importer will split Dialogue Text with pipes (|) into separate dialogue entries.
- The Audio Files, Menu Text, Sequence fields, as well as their localized counterparts, are also split.
- All other fields will be assigned to all of the split entries.
- If the Chat Mapper dialogue entry is set to Passthrough, the Dialogue System will apply the Condition to all of the split entries. Otherwise (if it's Block) it will only be applied to the first entry.
- The Script will only be applied to the first entry.
- There is a known issue when Dialogue Text or Menu Text contains pipes inside other tags such as the
[lua()] tag. For example, this Dialogue Text will not be split properly: Hello, [lua(RandomElement("friend|buddy"))]. | How are you? However, if you use a variable, it will be split properly. For example, set a variable FriendSynonyms to friend|buddy. Then use this Dialogue Text: Hello, [lua(RandomElement(Variable["FriendSynonyms"]))]. | How are you?
- The Dialogue System supports all of Chat Mapper's standard conventions and features except for cross-project links and these Unsupported Chat Mapper Functions.
Chat Mapper Importer Window
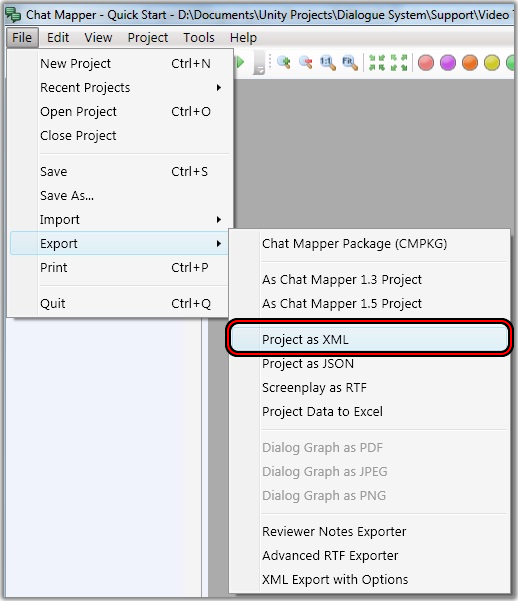
To import a Chat Mapper Project, use the Chat Mapper Importer window. If you use Chat Mapper Commercial, you can import CMP files directly. If you use Chat Mapper Indie, you must export your project to an XML file first.
- If you're using Chat Mapper Indie, export the project to an XML file by selecting File → Export → Project as XML.
- Select Tools → Pixel Crushers → Dialogue System → Import → Chat Mapper.
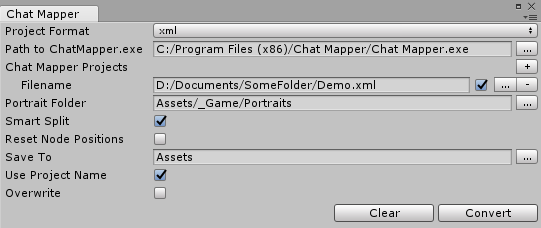
- Set Project Format to XML or CMP. You can use CMP only with Chat Mapper Commercial.
- If you're using Chat Mapper Commercial, set Path to ChatMapper.exe to the location where you installed Chat Mapper. You only need to specify the path to
ChatMapper.exe if you have a Commercial License and want to import directly from the Chat Mapper project file (CMP) instead of manually exporting to XML.
- In the Chat Mapper Projects section, press '+' to add slots for Chat Mapper files. Then click the '...' button next to each slot to add a Chat Mapper file. You can untick the checkbox next to each slot if you don't want to import that file.
- (Optional) For Portrait Folder, specify the folder containing the actor portrait images defined in your Chat Mapper project. If you didn't specify actor portrait images, or if you don't want to display character portraits beside subtitles, you can leave this blank.
- (Optional) If your Sequence fields contains pipes ('|' characters) and the sequencer commands use the '{{end}}' keyword, tick Smart Split. When the importer splits a dialogue entry at the pipe character, it will put all '{{end}}' sequencer commands on the last split. All other sequencer commands will be on the first split, and the middle splits will be
Delay({{end}}).
- For Save To, select the folder inside the
Assets hierarchy where you want the dialogue database to be created.
- Tick Use Project Name to use the Project Name defined in the Chat Mapper Project as the name of the dialogue database. If you untick this, you can specify a different dialogue database name.
- Tick Overwrite if you want to overwrite an existing dialogue database (if one exists).
- Click Import. This will create a dialogue database. If Overwrite is unticked and you need to reimport, you may want to delete the old asset first. Otherwise the new database will be created with a slightly different name, usually by appending a number to the end. The image below shows settings for importing an XML-exported Chat Mapper project:
Note: You can also import Chat Mapper XML to a dialogue database asset at runtime as described below.
How to Import Chat Mapper at Runtime
It's possible to import Chat Mapper XML at runtime, too. See the code example below:
using PixelCrushers.DialogueSystem;
using PixelCrushers.DialogueSystem.ChatMapper;
...
To allow for platform-dependent compilation, these methods have been moved out of ChatMapperProject....
Definition ChatMapperUtility.cs:15
static ChatMapperProject Load(TextAsset xmlFile)
Creates a ChatMapperProject loaded from an XML file.
Definition ChatMapperUtility.cs:21
This static utility class converts Chat Mapper projects to dialogue databases.
Definition ChatMapperToDialogueDatabase.cs:13
static DialogueDatabase ConvertToDialogueDatabase(PixelCrushers.DialogueSystem.ChatMapper.ChatMapperProject chatMapperProject)
Converts a Chat Mapper project to a dialogue database.
Definition ChatMapperToDialogueDatabase.cs:20
A static class that provides a simplified interface to the Dialogue System's core functions.
Definition DialogueManager.cs:14
static void AddDatabase(DialogueDatabase database)
Adds a dialogue database to memory.
Definition DialogueManager.cs:312
static void SendUpdateTracker()
Sends an "UpdateTracker" message to the Dialogue Manager, which may have a quest tracker component th...
Definition DialogueManager.cs:1157
The code above creates a ChatMapperProject object from an XML file. The xmlFile parameter can be a filename or a TextAsset.
It then uses PixelCrushers.DialogueSystem.ChatMapper.ChatMapperProject.ToDialogueDatabase() to import the ChatMapperProject to a DialogueDatabase, and adds it to the Dialogue Manager.
Finally, it updates the quest tracker HUD in case the Chat Mapper project contains active, trackable quests.
Exporting XML To Chat Mapper
The Dialogue Editor can export dialogue databases to Chat Mapper XML format. This is useful for creating a text-format backup copy of your database.
You can also import this back into Chat Mapper.
Chat Mapper's XML importer is very particular. After importing the XML, you must import a Chat Mapper template that defines every field in your dialogue database, in the exact order of your database.
For example, if you've defined a quest that has an Abandonable field, your Chat Mapper template must define an Abandonable field. Similarly, if you use quest entries, you must define Entry Count as well as Entry # and Entry # State fields for as many entries as you have defined in your longest quest.
Follow these instructions to export a dialogue database and then import it into Chat Mapper:
- Make sure there are no links back to the START node in any conversations. Chat Mapper doesn't allow links back to the START node. If you have any conversations where nodes link back to START, correct them before exporting to Chat Mapper XML. You can add a child node of START and link back to that.
- Open your dialogue database in the Dialogue Editor.
- (Optional) On the Template tab, select Menu → Reset. This will reset the Dialogue Editor's template.
- Do this if you've added fields to the template that you have not used in any assets. This will prevent those fields from being added to all assets.
- Do this if you've added fields in different orders in different assets. By resetting the template, you will allow it to apply a consistent order across all assets.
- On the Database tab, export Chat Mapper XML.
- A window will pop up to ask if you want to update the template to match the contents of the database. If you click OK, it will update the template, and then apply the template consistently to all assets in your database.
- The export process will create a file in the same directory as filename
.xml named filename_Template.txt. This text file will list all fields that must be in your template. You can use the Chat Mapper project in Templates ► Chat Mapper Template as a base for your template. Place a copy in your [Documents] ► Chat Mapper ► Templates folder and adjust it so it contains exactly the fields listed in the text file, in the exact order.
- Import the XML into Chat Mapper.
- After importing the XML file into Chat Mapper, select Project → Apply Template to Project... and specify the template.
If the import fails:
<< Import & Export
