|
|
(Click Here For Importer Video Tutorial)
The Dialogue System can import Nevigo's articy:draft 1, 2, 3, and X at design time in the Unity editor and at runtime.
To minimize build sizes and compile times for developers who don't use articy:draft, support for articy:draft must be separately enabled. To enable support, select Tools → Pixel Crushers → Dialogue System → Import → articy:draft. If support has not been enabled yet, this will ask if you want to enable support.
The Dialogue System does not use articy:draft's Unity exporter. You do not need to import articy's special unitypackage plugin for its Unity exporter. We may introduce support for articy's Unity exporter in the future, but for now it's not necessary.
The Dialogue System includes starter projects in Templates ► Articy Draft Template Project ► articy_template.zip. One template is made in articy:draft 2.4 for compatibility with 2.4 and 3.x users. The other is made in articy X. They're configured with all of the custom fields described below.
The Dialogue System's imports data from XML exports. It imports the following data:
Each imported element will have a field named Articy Id containing the articy:draft Id (e.g., 0x01000001000011FB) and a field named Technical Name containing the technical name (e.g., "Loc_Corridor").
The Name field will contain the element's default Display Name.
All imported elements will also be given all the fields defined in the dialogue database template, which you can edit using the Templates tab before importing the articy:draft project. If you define new fields in articy draft, replace blank spaces in their technical names with underscores (e.g., "Alternate_Name").
Your player entity should have a Boolean property named IsPlayer set to True.
Variable sets and variables are imported as elements in the Dialogue System's Variable[] Lua table, where the name of the variable is VariableSet.VariableName. For example:
Variable["GameState.therapist_down"]At runtime, the Dialogue System will create the variables are listed in Special Variables if they don't exist. You can define them ahead of time in articy so you can use them in your content and test them in articy's presentation mode.
In the Dialogue System, articy:draft entities can be any of the following:
You can distinguish between Players, NPCs, Items, and Quests by adding any of these Boolean properties to the entity's feature template:
The property's Technical Name must use the exact capitalization as above with no space characters. If any of these properties exists, they will override the pop-up menu setting in the articy:draft Import Window.
Note: Your player entity should have a Boolean property named IsPlayer set to True. The IsPlayer property distinguishes to the Dialogue System which dialogue fragments are shown as subtitles and which ones are shown in player response menus (IsPlayer fragments).
Item and Quest entities are imported as elements in the Dialogue System's Item[] table. This table is also used for quests, and in Lua has an alias as Quest[]. In your Lua code, you can use Item[] or Quest[] interchangeably.
If you want to use the Dialogue System's Quest Tracker HUD, add these Boolean properties:
You can also add these optional properties to quests:
Quest State Dropdown Values
| Value | State |
|---|---|
| 1 | unassigned |
| 2 | active |
| 3 | success |
| 4 | failure |
| 5 | abandoned |
The dropdown values must be exactly the numbers shown above (1, 2, 3, etc.).
NOTE: A bug in articy:draft 2.4.3 - 2.4.5 causes dropdown values to be offset by one. To resolve this, upgrade to 2.4.6+.
Player and NPC Actor entities are imported as elements in the Dialogue System's Actor[] table. Portrait images (if specified) will be imported from the location specified in the articy:draft project, as long as that location is inside the Unity project's Assets folder. If not, you can manually assign them after import.
To assign additional, alternate portrait images, add a Strip whose technical name is exactly AlternatePortraits (exact capitalization, no space) to your entity template, and assign images to it.
The Dialogue System will try to match the characters' GameObject names with their entity Display Names in articy:draft. It's simplest to keep these the same.
At a minimum, you should define at least two Actors (usually the Player and an NPC).
Locations are imported as elements in the Dialogue System's Location[] table. The Dialogue System doesn't use locations for anything specific. You can store whatever information you want in them.
Flow fragments can be handled three different ways. You can specify which way with a popup menu:
Item[] table as quests.Flow fragments inside conversations will be imported as pass-through dialogue entries. However, in the importer you can also choose to have them invoke a Lua function. The dialogue entry will pass the name of the flow fragment to the Lua function. You can register a custom Lua function and use this feature to invoke your own C# code when the conversation passes through a flow fragment.
Dialogues are imported as defined in articy:draft, into the Dialogue System's Conversation[] table, with the following notes:
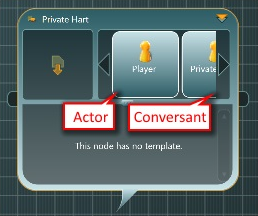
In a Dialogue Fragment, the entity spoken to is called the conversant. Normally the conversant is the non-speaking actor (for this fragment) among the two actors assigned to the Dialogue. However, if you want to assign a different actor as the conversant, add a custom slot property named "ConversantEntity" to your dialogue fragment template. The Technical Name must be "ConversantEntity" with exact capitalization and no blank spaces. For the property's "Allowed object types", tick only "Entities". Make sure to tick "Add to XML-export".
You can define Cutscene Sequences in the Stage Directions field or, if you want to use the Stage Directions field for something else, add a custom text property named Sequence to your dialogue fragment template. In this case, the Technical Name must be "Sequence". If you leave this field blank for any dialogue fragments, the Dialogue System will use the default sequence defined in the Dialogue Manager's display settings.
To specify a sequence for a conversation's <START> entry, add a custom text property named Sequence to your dialogue template.
You can specify conditional logic and code exeuction using regular articy:draft input and output pins, Condition nodes, and Instruction nodes. However, you can also define custom properties "Conditions" and "Script" which will import into the Dialogue System as dialogue entry Conditions and Script fields.
You can define any of these properties in a Dialogue to override the conversation's behavior in the Dialogue System:
| Technical Name | Purpose |
|---|---|
| ShowNPCSubtitlesDuringLine | (Boolean) Show NPC subtitles during NPC lines |
| ShowNPCSubtitlesWithResponses | (Boolean) Show NPC subtitles when response menu is visible |
| ShowPCSubtitlesDuringLine | (Boolean) Show PC subtitles during PC lines |
| SkipPCSubtitleAfterResponseMenu | (Boolean) Skip PC subtitle if it was chosen in a response menu |
| SubtitleCharsPerSecond | (Number) Subtitle chars per second value used to compute {{end}} |
| MinSubtitleSeconds | (Number) Min subtitle seconds value used to compute {{end}} |
| ContinueButton | (String) Any of the values listed in PixelCrushers.DialogueSystem.DisplaySettings.SubtitleSettings.ContinueButtonMode |
| DefaultSequence | (String) Override Dialogue Manager's Default Sequence |
| DefaultPlayerSequence | (String) Override Dialogue Manager's Default Player Sequence |
| DefaultResponseMenuSequence | (String) Override Dialogue Manager's Default Response Menu Sequence |
| AlwaysForceResponseMenu | (Boolean) Always force response menu; if false, auto-selects when there is only one response |
| IncludeInvalidEntries | (Boolean) Show responses whose Conditions are false, in a disabled state |
| ResponseTimeout | (Number) Set timeout value of response menu; zero for no timeout |
articy:draft 1 input and output pins will be imported as-is, assumed to be written in Lua.
articy:draft 2 & 3 input and output pins that contain articy:expresso code will be imported, and the Dialogue System will attempt to translate the expressions to Lua. If the expressions already appear to be written in Lua, they'll be imported as-is.
Note about comments:
// (two slashes) will be imported as –, indicating a Lua comment./// (three slashes) will remove the three slashes and handle the rest as Lua code. This way you can write pure Lua code, preceded by ///, without articy:draft complaining about articy:expresso syntax errors.To use getObj(), getProp(), setProp(), and speaker as detailed in https://www.articy.com/articy-importer/unity/html/howto_script.htm#propertyAccess add an Articy Lua Functions component to your Dialogue Manager (Component → Dialogue System → Third Party → articy:draft → Articy Lua Functions).
Note that articy:draft treats Articy Ids such as "0x0100000000000731" as a hex number (e.g., equivalent to 72057594037929777 decimal). The Dialogue System, however, treats Articy Ids are strings. To ensure proper matching, please use hex for Articy Ids and/or just treat them as strings.
In the Dialogue System, links (equivalent to articy:draft connections) have priority values. The default priority value is Normal.
When the Dialogue System evaluates a level of the conversation tree, it first considers all dialogue entries at the highest priority level. If there are any dialogue entries with true conditions at this level, it stops evaluating, and it only uses those dialogue entries. If no dialogue entries are true at the highest priority level, it considers the next priority level, and so on. This allows authors to write a line that always takes precedence over lower-priority lines as long as its condition is true.
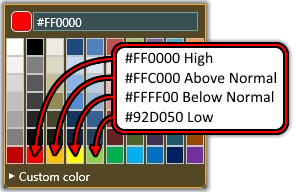
To specify priority levels in articy:draft, the Dialogue System uses colors. To set a priority level in articy:draft, select a connection and then change the color to one of the colors on the bottom row of the color picker, starting from the second button on the left. Any color other than the ones below is treated as Normal priority.
| Color | Priority Level |
|---|---|
| #FF0000 | High |
| #FFC000 | Above Normal |
| (any other) | Normal |
| #FFFF00 | Below Normal |
| #92D050 | Low |
Note: articy:draft versions 3.1.11 and older have a bug with colors (https://www.articy.com/help/Changes_3_1.html#3_1_12) You must update to 3.1.12 or higher. If you are using the multi-user server version of articy, you must also upgrade the server to 2.1.12 or higher.
In articy:draft 2+, you can define templates to apply to elements such as Entities and Dialogues. These templates can contain properties and features (groups of properties). All features and properties are converted to dialogue database fields, with these notes:
As mentioned in the articy:draft Entities section above, if you add an "IsPlayer" Boolean property to actor entities. Set it to true for player characters, false for NPCs.
Strips are imported as text fields with the text "SUBTABLE__" added to the front of the field title. The content of the text field is a semicolon-separate list of Articy Ids, such as:
0x0100000000000260;0x0100000000000264;0x0100000000000B6D
At runtime, you can import all such fields into Lua subtables by calling the method below. The subtable field's title will not have the "SUBTABLE__" prefix.
To get the values of the subtable, which will in turn be elements in the Actor[] or Item[] table, use DialogueLua.GetActorField or DialogueLua.GetItemField:
The Dialogue System supports dialogues inside documents. Dialogue fragments must be located inside dialogues. The importer will ignore loose dialogue fragments that are in documents but not in dialogues within those documents.
The Dialogue System supports four Emphasis ([em#]) Markup Tags. You can define variables in your articy project to specify the values of the emphasis tags. For each emphasis tag, you can define four variables for color (a string using #rrggbbaa format), bold, italic, and underline (Booleans).

You can then specify these variables in the articy:draft importer window's Review → Emphasis Settings section.
articy:draft 3 has a voice-over plugin. For instructions on using this plugin with the Dialogue System, see articy:draft Voice-Over Plugin Instructions.
articy:draft 3 articy:draft 3 has a localization plugin. For instructions on using this plugin with the Dialogue System, see Localization in articy:draft.
articy:draft X In Articy X, you can manage the localization entirely inside articy.
To import your articy:draft project into the Dialogue System:
You can also import articy:draft XML files into dialogue databases at runtime. To do this, call this static function:
For example, to import D:\Data\MyArticy.xml:
The prefs and template parameters are optional.
The prefs object lets you specify which articy:draft content to import and how to import it. Since the runtime project doesn't have access to the Unity editor environment, it won't use any prefs you've already set in the articy:draft Import Window. If you omit prefs, all supported content will be imported.
The template specifies the templates for the various types of assets in the dialogue database. Since the runtime project doesn't have access to the Unity editor environment, it won't use the template you've set in the Dialogue Editor. If you omit template, it will use a default template.
If portrait images are associated with actors in the XML file, the importer will search all Resources folders and loaded asset bundles.
If conversion fails, the method will return null instead of a dialogue database object.
The code below contains a complete example of importing an articy:draft XML at runtime:
The code above creates a DialogueDatabase from an articy:draft file, adds it to the Dialogue Manager, and updates the quest tracker HUD in case the articy:draft file contains active, trackable quests.
The importer converts pins from articy expresso to Lua. If you want to convert additional fields, call ArticyConverter.ConvertExpression. You must have previously imported an articy XML file. The importer will cache the variable names from the XML file conversion to use when converting other expresso code.
This page covers articy:draft 3's localization plugin. For the main articy:draft import instructions, see articy:draft.
articy:draft 3's localization plugin creates Excel spreadsheets for localization. For instructions on localization within articy:draft itself, see: https://www.articy.com/articy-importer/unity/html/howto_localization.htm
To generate the initial spreadsheet file, export your articy:draft project to Unity format. Tick Enable localization support and create MS Excel file(s) before exporting. This will create a starter Excel (.xlsx) file. Create copies of this Excel file for each language. You can discard the generated unitypackage.
Note: articy:draft exports files that not all Excel-compatible readers can read. You may need to open and save the file using Excel or a similar program such as Libre Calc or OpenOffice in order for the Dialogue System's Excel reader (which uses the open source Unity-QuickSheet library) to be able to read it.
The Dialogue System provides a separate window to import these localization spreadsheets into Unity. To make the window available, follow these steps:
Specify the XML file, the base Excel file that the localization plugin created, and the dialogue database you previously created using the articy:draft Import Window. Then click Import Excel Files.
This page covers articy:draft 3's voice-over plugin. For the main articy:draft import instructions, see articy:draft.
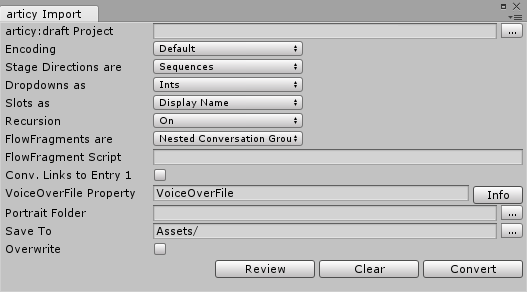
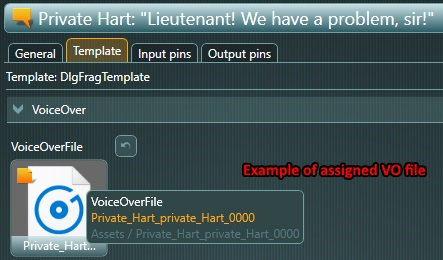
If you use articy's voice-over plugin, you can specify the voice-over property in the Dialogue System's articy:draft Import Window. This will create a custom field named VoiceOverFile in your dialogue database that contains the name of the dialogue entry's voice-over audio clip. Put these clips in a Resources folder or asset bundle.
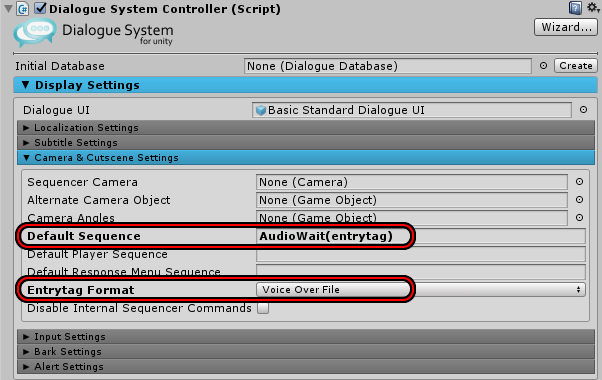
If you set the Dialogue Manager's Camera & Cutscene Settings → Entrytag Format to VoiceOverFile, the value of the entrytag sequencer keyword will be set to the VoiceOverFile's value. For more info about entrytags, see Entrytags.
Download the Voice Over Helper plugin from Nevigo's plugins site: https://www.articy.com/en/downloads/#plugins
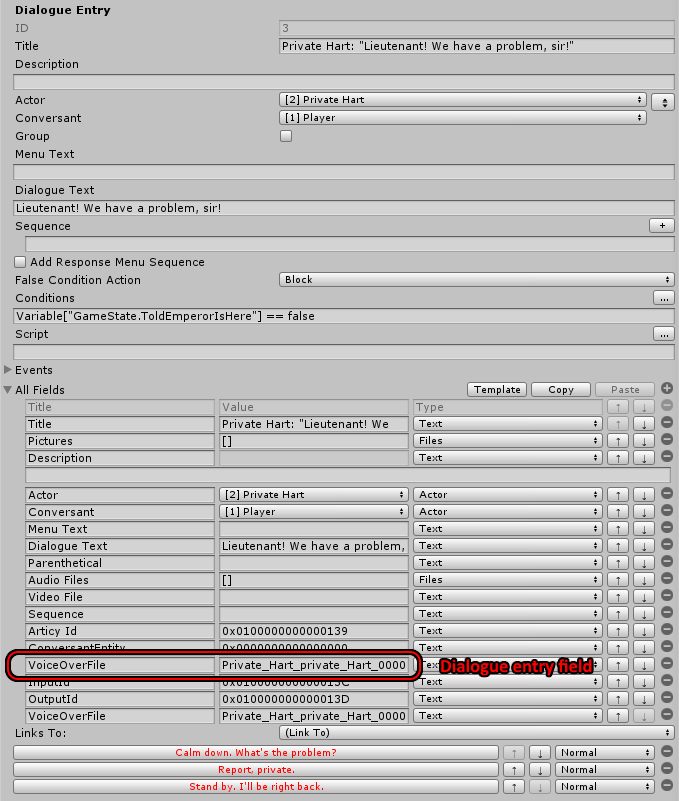
Add a slot property named "VoiceOverFile" to your dialogue fragment template. Tick Add to XML-export.
Add this property to your dialogue fragments, as shown in the example below. You don't have to assign a voice-over file right now. You can use the plugin to create stand-in files to test the process first.
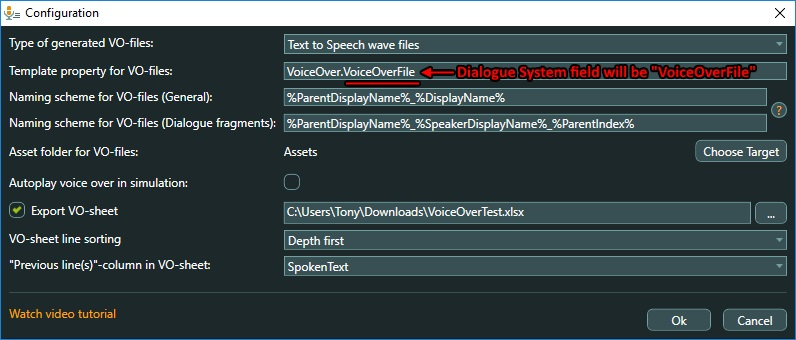
From the plugins menu on the top bar of articy:draft, select Voice-over Helper → Configuration. Make sure the template property for voice-over files matches your property, as shown below.
Select Voice-over Helper → Create/Update VO-Files to generate stand-in audio files.
Export your project to XML.
In the generated Excel file, you should see that the filenames match their settings in articy:draft:

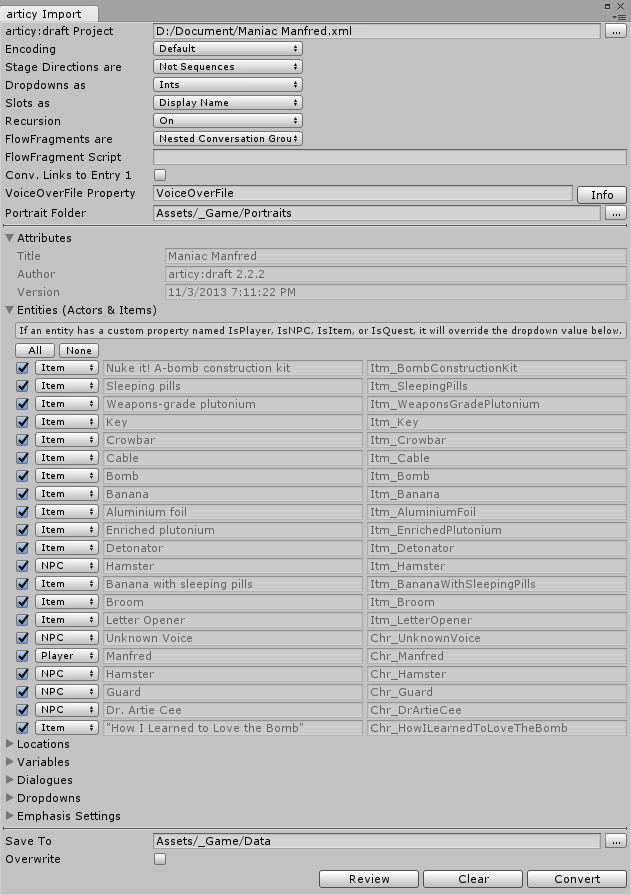
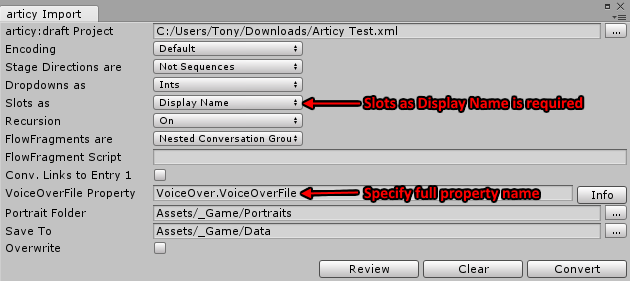
In the articy import window:
After conversion, verify that your dialogue entries have VoiceOverFile fields, as shown below.
To automatically play the voice-over files:
AudioWait(entrytag) as shown below, or something similar.