 |
|
The Dialogue System provides two kinds of quest-related UIs:
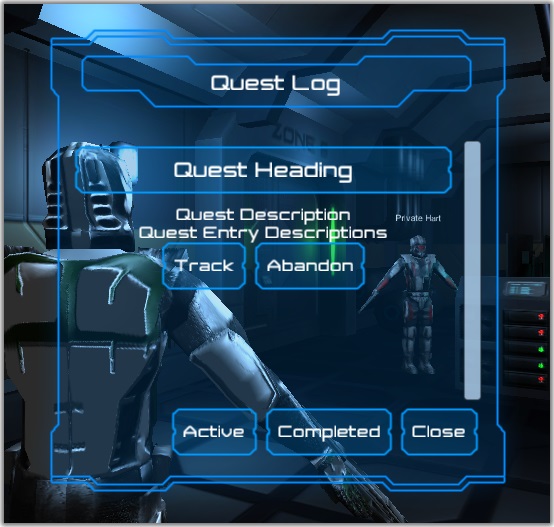
A quest log window displays the current state of active and completed quests. It gets the titles, descriptions, states, and other information from the PixelCrushers.DialogueSystem.QuestLog class, which in turn gets the data from the Quest[] table. If a quest is trackable, it allows the player to toggle tracking. If a quest is abandonable, it allows the player to abandon it. All quest log windows use a structure similar to the image above, although the positions of controls and their appearance may be different.
The elements of a quest log window are:
| Element | Description |
|---|---|
| Quest Group | (Not shown) Group heading for quests that are organized into gruops |
| Quest Heading | The name of the quest. The player can click on the heading to expand the quest and view its description and options |
| Quest Description | This text includes the current description based on the state of the quest as well as all entries that are not unassigned |
| Track Button | This button is only shown if the quest is trackable. When clicked, it broadcasts an "OnQuestTrackingEnabled" or "OnQuestTrackingDisabled" message to the Dialogue Manager See Quest Messages for more details |
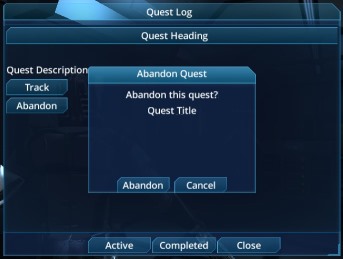
| Abandon Button | This button is only shown if the quest is abandonable. When clicked, it sets the state of the quest to the abandon state defined in the quest log window. It also sends "OnQuestTrackingDisabled" and plays the sequence defined in the Abandon Sequence field if it's defined |
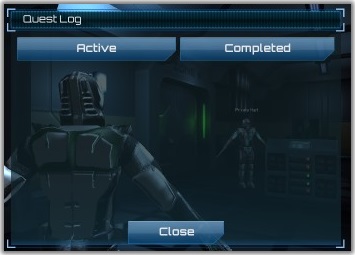
| Active/Completed Buttons | These buttons switch between viewing active quests and completed quests |
| Close Button | This button closes the window |
To show the window, call the Open() method. The user can close the window by clicking the Close button.
If Pause While Open is ticked, the quest log window pauses the game by setting Time.timeScale = 0. When closed, it restores the previous time scale.
The Feature Demo script, FeatureDemo.cs, references a quest log window as a child object and calls Open() when the player clicks the "Quest Log" button on the main menu.
To assign a hotkey that toggles the quest log window on and off, add a Quest Log Window Hotkey component to your scene (Component > Dialogue System > Miscellaneous > Quest Log Window Hotkey).
The Dialogue System provides an implementation of the QuestLogWindow abstract class for Unity UI. You can find prefabs in the Prefabs/Unity UI Prefabs folder. Before creating your own quest log window, you may want to example the prefabs to see how they're built. You can also add the Generic Quest Log Window to your scene and customize it by changing the layout and textures.
To set up your own Unity UI quest log window, add these controls as children of a main graphic control:
The final hierarchy should look something like this:

Then add a Unity UI Quest Log Window component to the main graphic control, and assign the UI elements. You can also add an Animator and assign animations for showing and hiding the window (e.g., fade in/out).
The Unity UI Quest Log Window uses a quest template GameObject. This GameObject is instantiated (copied) for every quest that is being displayed. It should contain the following child UI elements:
When the quest log window adds a quest to the Quest Table, it makes a copy of the Quest Template and fills in the values of the UI elements.
In version 1.5.6+, you can define alternate text elements for quest entries that are in success or failure states. If you define alternate text elements for quest entries, you must also assign a container that instantiated copies of the text elements will be added to. There is an example prefab in Prefabs/Unity UI Prefabs/Generic/Generic Unity UI Quest Log Window Styled.
If you tick Use Groups on the quest log window, you can also organize your quests in groups. Each quest should have a Group field that specifies which group it belongs to.
To use groups, you'll need to specify a quest group template. Set up a Text element, optionally under a panel if you want to add other visual elements. Assign a Unity UI Quest Group Template to the template, and assign the Text element to its Heading field. Finally, assign the template to the quest log window.
If the quest group template has a Button, the quest log window will automatically set it up so it collapses and expands the quest group when clicked.
If you tick Auto Focus on the Unity UI Quest Log Window component, the window will always keep a control focused. This is useful for gamepad navigation.
By default, if you've defined a scrollbar, Unity UI always shows it. You can add the Unity UI Scrollbar Enabler component (Component > Dialogue System > Unity UI > Effects > Scrollbar Enabler) to only enable the scrollbar when the content is larger than the Quest Table's containing scroll rect. Add it to any GameObject in the quest log window, such as the quest log window itself. Assign the Quest Table to Content. Assign its containing scroll rect to Container. Assign the scrollbar to Scrollbar.
On the Unity UI Quest Log Window component, click the "+" in the lower right of the "On Content Changed ()" box. This will create an event slot. Assign the Unity UI Scrollbar Enabler component to the event slot, and select UnityUIScrollbarEnabler.CheckScrollbar from the dropdown menu.
The Dialogue System provides prefabs for a selection of legacy Unity GUI Quest Log Windows using the default, JRPG, Necromancer GUI, Sci-Fi, and Wheel2 styles. You can find them in the Prefabs/Unity Dialogue UIs folder.
To set up a quest log window, add a prefab from the Prefabs folder or create your own GUI layout and add the Unity GUI Quest Log Window component (not the deprecated Unity GUI Quest Log Window). The Prefabs folder contains prefabs with different appearances.
If you're creating your own layout, you'll need to create the following controls:

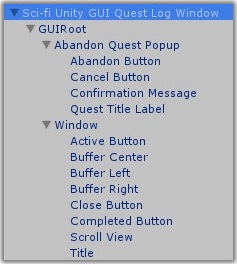
You can see them set up in this screenshot of the Sci-Fi quest log window:
Which uses the object hierarchy shown below:
Then assign a Unity GUI Quest Log Window component to the containing GameObject and assign the values as described below:
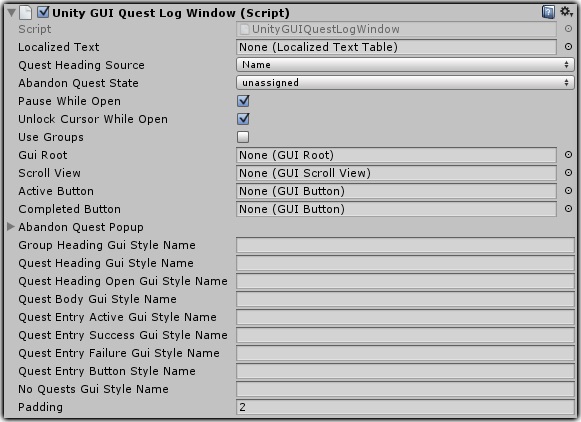
| Property | Function |
|---|---|
| Localized Text | (Optional) Localized text for buttons and messages. See Localization for details |
| Quest Heading Source | Specifies whether to use the quest's name or its description as the heading |
| Abandon Quest State | The state that gets assigned to abandoned quests |
| Pause While Open | Specifies whether to pause the game while the quest log window is open |
| Unlock Cursor While Open | Unlocks and shows the cursor while the window is open |
| Use Groups | Organizes quests under their group names |
| Gui Root | The GUIRoot object |
| Scroll View | A GUIScrollView control that will contain the list of active or completed quests |
| Active Button | When clicked, the scroll view is populated with the list of active quests. This button should send the message "ClickShowActiveQuests" |
| Completed Button | When clicked, the scroll view is populated with the list of completed quests. This button should send the message "ClickShowCompletedQuests" |
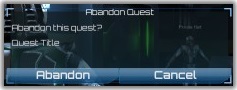
| Abandon Quest Popup | A set of controls for the modal popup window used to ask the player to confirm abandonment of a quest (see image below) |
| Gui Style Names | GUI styles for the various elements of the window. Different GUI styles are available for entries in the active, success, and failure states – for example to use a GUI style with a green checkmark next to successful entries and a different GUI style with a red X for failed entries |
| Padding | Pixel padding between quests in the scroll view |
You do not need to assign the Close button. Instead, your close button (if you have one) should send a "ClickClose" message to the window when clicked.
If you examine any of the provided quest log prefabs, you'll see that you can add additional controls, too, such as a containing window or other ornaments.
By default, the window will show the text "No Active Quests" if there are no active quests to show, and "No Completed Quests" if there are no completed quests to show. To change the text or add localization for multiple languages:
You can customize the appearance of the quest log window by changing the GUI elements.
If you need to change the functionality of the quest log window, you can create a subclass. The UnityUIQuestLogWindow and UnityGUIQuestLogWindow classes, as well as NGUIQuestLogWindow and DaikonForgeQuestLogWindow, derive from the abstract QuestLogWindow class. This class has several virtual methods that you can override:
| Method | Description |
|---|---|
OpenWindow | Override to add window-opening activity, such as a tween that expands the window over time |
CloseWindow | Override to add window-closing activity, such as a tween that shrinks the window over time |
OnQuestListUpdated | Override to process the quest list after it has been updated – for example, when switching between active and completed quests. Commonly used to sort the quest list by certain criteria, or to cull out quests |
ConfirmAbandonQuestHandler | Override to change the default action that occurs when the player clicks the Abandon button. The default is to open a confirmation window |
More information: PixelCrushers.DialogueSystem.QuestLogWindow
The quest tracker HUD displays the status of tracked quests on the gameplay screen.
Implementations of the quest tracker HUD are provided in raw script form, and not in the precompiled DLL, because its behavior is often very dependent on the design of your game. This makes it easy to copy and modify to suit your needs.
Internally, each quest uses a Boolean field named Track. You can add this field manually in the Dialogue Editor, set it using QuestLog.SetQuestTracking(), or allow the player to set it by selecting the Track button in the quest log window. If it's true and the quest is active, the quest tracker HUD will show the quest.
(In contrast, the Trackable field specifies whether the player should be presented a button in the quest log window to toggle tracking.)
The end of conversations and many components such as Quest Trigger, Lua Trigger, and Increment On Destroy automatically update the quest tracker. See the details of the component in the Components section to check if a component updates the tracker.
If you update the quest some other way, you can run the code below to update the tracker manually:
If you update a variable manually or load/restart the game manually, you must call DialogueManager.SendUpdateTracker() to update the quest tracker HUD. The built-in functionality, such as the Game Saver component, LevelManager.LoadLevel(), Increment On Destroy, etc., on the other hand, automatically call DialogueManager.SendUpdateTracker() so you don't have to.
To add a quest tracker HUD using Unity UI:
If you're using a bundled UI such as Generic Bundled UI, it already includes a quest tracker prefab.
If you're not using a prefab, you must point the quest tracker's Container field to a UI element, such as a Vertical Layout Group, that will contain instantiated quest tracking entries for each quest.
In your container, define a template set of canvas elements that will display the quest description and, optionally, quest entry descriptions. Typically this is a panel. Add a Quest Track Template component (Component > Dialogue System > UI > Unity UI > Quest > Quest Track Template) to the panel, and assign its properties.
In version 1.5.6+, you can define alternate text elements for quests and quest entries that are in success or failure states. If you define alternate text elements for quest entries, you must also assign a container that instantiated copies of the text elements will be added to. There is an example prefab in Prefabs/Unity UI Prefabs/Generic/Generic Unity UI Quest Tracker HUD Styled.
You can add a legacy Unity GUI quest tracker HUD to the Dialogue Manager GameObject using the menu item Component > Dialogue System > UI > Unity GUI > Quest > Quest Tracker. This HUD uses Unity GUI and updates itself at the end of conversations and when the player toggles tracking in the quest log window. It displays quest titles, as well as any entries if the quest has entries. You can use it as-is or as a base for your own quest tracking HUD.
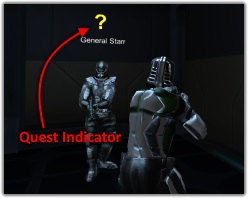
Some games, such as MMOs, display quest indicators on NPCs to notify the player that they have a quest to offer. In the Quest Example scene, General Starr and Private Hart demonstrate quest indicators.
To set up quest indicators:
<< How To Manage Quests | Save System >>