 |
|
(Click Here for Video Tutorial 1 - Using Chat Mapper)
(Click Here for Video Tutorial 2 - Chat Mapper Converter)
You can use Urban Brain Studios' Chat Mapper and the Dialogue System's Chat Mapper Converter to create a Dialogue Database.
Your Chat Mapper Project should contain these settings:
| Title | Type | Description |
|---|---|---|
| Is Item | Boolean | Specifies whether the item is an item or a quest |
If you're using the Quest System, also add the quest fields listed in the Items/Quests section. If you plan to use quest entries (subtasks), you can read more about how to add fields for them in the Quests Entries in Chat Mapper section.
| Title | Type | Description |
|---|---|---|
| Sequence | Text | Cutscene sequence to run during the node |
| Response Menu Sequence | Text | (Optional) Cutscene sequence to run during the response menu that follows the node |
To set up Localization, also add localized fields as described in the Conversations section. The Chat Mapper simulator will only recognize localization of the Dialogue Text field, but any other localized fields, such as Menu Text, will be handled properly in the Dialogue System.
If you're using the Quest System, add this to the Global Lua Script:
Quest = Item;
This Lua statement makes Quest[] an alias for the Item[] table. In your Conditions and Script fields, you can refer to Quest["questName"] instead of Item["questName"].
The Dialogue System provides a blank template Prefabs/Chat Mapper Template/Template.cmp that already contains these settings. You can make a copy of this template and use it as your project file, or copy it to your [Documents]/Chat Mapper/Templates folder to make it available as a template choice in Chat Mapper.
The template is based on the Chat Mapper "Games" template. Several fields from the Chat Mapper "Games" template are still present but excluded from export to reduce the size of your asset files. You can review these fields and change which ones are exported by selecting Project > Project Settings in Chat Mapper.
Review these helpful tips before editing your Chat Mapper Project:
Assets folder hierarchy so Unity will be able to access them.My Quest becomes My_Quest when referencing the Item[] table. For example:Item["My_Quest"].State = "active"| Variable | Type | Description |
|---|---|---|
| Alert | Text | You can assign text to this variable. At the end of the conversation, the dialogue UI will display that text. You can use this to give the player information. For example, to let the player know that they just acquired a new quest, add a Script such as Variable["Alert"] = "New Quest: Kill 5 Rats" |
| Actor | Text | The name of the current actor. In the Dialogue System, you can configure a conversation to trigger for any character, not just the character defined in your Chat Mapper Project. You can read the value of Variable["Actor"] to get the name of the current actor. This is useful for general-purpose, shared conversations such as shopkeepers |
| Conversant | Text | Similarly, this is the name of the current conversant (see Actor above) |
START. This is the default.Sequence in this form:Action(parameters)[@seconds] If you leave a Sequence field blank, the Dialogue System will use the default sequence defined in the Dialogue Manager's display settings. Frequently, you will want to make the conversants face each other at the beginning of a conversation. To do this, set the START node's Sequence to: LookAt()
[lua()] tag. For example, this Dialogue Text will not be split properly: Hello, [lua(RandomElement("friend|buddy"))]. | How are you?
However, if you use a variable, it will be split properly. For example, set a variable FriendSynonyms to friend|buddy. Then use this Dialogue Text:
Hello, [lua(RandomElement(Variable["FriendSynonyms"]))]. | How are you?
Chat Mapper doesn't actually have a concept of quests. You have to do a little setup in your Chat Mapper project first by adding some custom item fields. Select Project > Project Settings > Custom Asset Fields > Items. Add these fields:
| Field Name | Type | Default Value |
|---|---|---|
| Is Item | Boolean | False |
| Entry Count | Number | 0 |
Entry 1 | Text | Entry 1 State | Text | unassigned Entry 2 | Text | Entry 2 State | Text | unassigned etc.
Add as many entries as you need for your biggest quest. You can always add more later if you need them. If you're localizing to multiple languages, you can add fields for them, too, such as Entry 1 ru for the Russian version of the text for Entry 1.
These fields are not in the provided template because many developers do not use quest entries.
When you define a quest, set Entry Count. Even though every item record will have the full set of Entry 1 ... Entry n, the Dialogue System will only use the entries up to Entry Count.
Then set Entry 1 to the entry text and Entry 1 State to the quest state (e.g., "unassigned" or "active"). Repeat for all the entries up to Entry Count.
To convert a Chat Mapper Project into a dialogue database, use the Chat Mapper Converter. If you use Chat Mapper Commercial, you can convert CMP files directly. If you use Chat Mapper Indie, you must export your project to an XML file first.
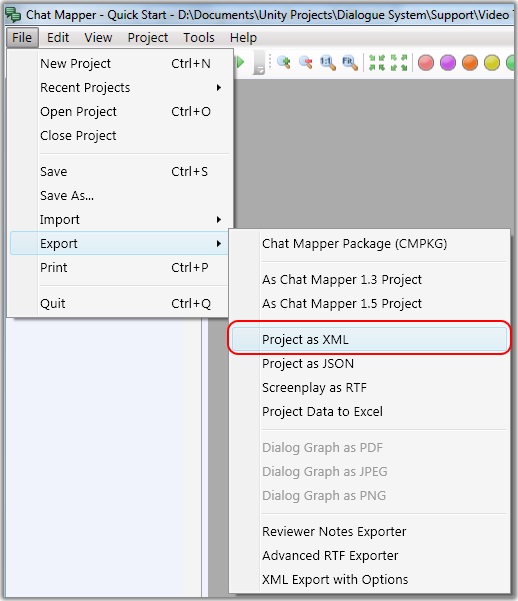
To export to XML from Chat Mapper, select File > Export > Project as XML.
The Chat Mapper Converter creates a dialogue database out of a Chat Mapper CMP or XML file.
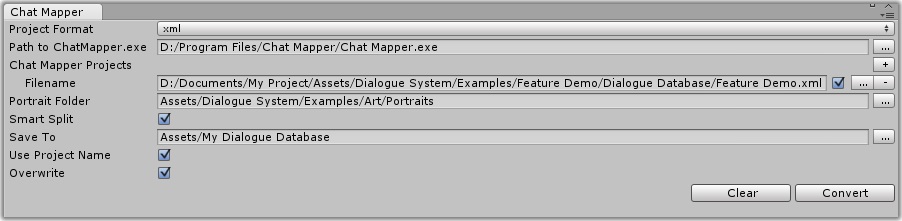
Assets folder hierachy. If you're using Chat Mapper Commercial, the Chat Mapper Converter can process the CMP file directly, so you don't need to export it to XML.ChatMapper.exe. You only need to specify the path to ChatMapper.exe if you have a Commercial License and want to convert directly from the Chat Mapper project file (CMP) instead of manually exporting to XML.Delay({{end}}).Assets hierarchy where you want the dialogue database to be created.The image below shows settings for converting an XML-exported Chat Mapper project:
Note: You can also convert Chat Mapper XML to a dialogue database asset at runtime using PixelCrushers.DialogueSystem.ChatMapper.ChatMapperProject.ToDialogueDatabase().
The Dialogue Editor can export dialogue databases to Chat Mapper XML format. This is useful for creating a text-format backup copy of your database.
Using Chat Mapper 1.7+, you can also import this back into Chat Mapper.
Chat Mapper's XML importer is very particular. After importing the XML, you must import a Chat Mapper template that defines every field in your dialogue database, in the exact order of your database.
For example, if you've defined a quest that has an Abandonable field, your Chat Mapper template must define an Abandonable field. Similarly, if you use quest entries, you must define Entry Count as well as Entry # and Entry # State fields for as many entries as you have defined in your longest quest.
Follow these instructions to export a dialogue database and then import it into Chat Mapper:
.xml, named filename_Template.txt. This text file will list all fields that must be in your template. You can use the Chat Mapper project in Prefabs/Chat Mapper Template as a base for your template. Place a copy in your [Documents]/Chat Mapper/Templates/ folder and adjust it so it contains exactly the fields listed in the text file, in the exact order.If the import fails:
/Chat Mapper/log.txt.It's possible to import Chat Mapper XML at runtime, too. See the code example below:
The code above creates a ChatMapperProject object from an XML file. The xmlFile parameter can be a filename or a TextAsset.
It then converts the ChatMapperProject to a DialogueDatabase and adds it to the Dialogue Manager.
Finally, it updates the quest tracker HUD in case the Chat Mapper project contains active, trackable quests.