 |
|
This page describes how to set up the Dialogue System with Opsive's UFPS version 1. (UFPS is required.)
For instructions on current Opsive Character Controller integration, see Opsive Character Controllers Support.
UFPS copyright © Opsive.
This package adds functionality to:
Follow these steps to set up the Dialogue System with UFPS.
Contact Pixel Crushers for the integration package. It's no longer included with the Dialogue System package itself.
If you want to use the Dialogue System Menu Framework with UFPS, see Set Up the Dialogue System Menu Framework.
For instructions on current Opsive Character Controller integration, see Opsive Character Controllers Support.
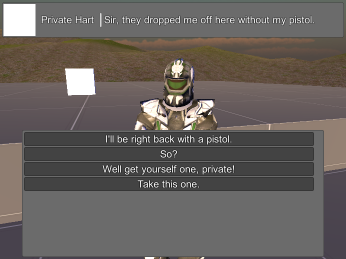
Play the example scene to see how the Dialogue System works with UFPS.
In this example:
Set up the Dialogue Manager GameObject normally as described in Dialogue Manager. Then add these components:
The FPSync Lua Player On Load Level component allows you to have a different UFPS player GameObject in each level so you can test a level simply by playing it in the editor. When playing a game, before changing levels you can save the player's current UFPS data, such as health and inventory, into the Dialogue System's Lua environment. When the new level is loaded, this component applies the saved data from the previous level to the player GameObject in the new level.
To set up the UFPS player in your scene, first make sure it has a UFPS player such as Camera&Controller, AdvancedPlayer, or HeroHDWeapons. Then select menu item Tools → Pixel Crushers → Dialogue System → Third Party → UFPS → Add All Player Scripts. This will automatically configure your player with these scripts:
vp_FPInteractManager for UFPS Interaction Some UFPS player prefabs, such as Camera&Controller, don't start with a vp_FPInteractManager component. This component is required to use UFPS interaction, such as with FPInteractable Dialogue. If you want to use UFPS interaction, make sure your player has a vp_FPInteractManager.
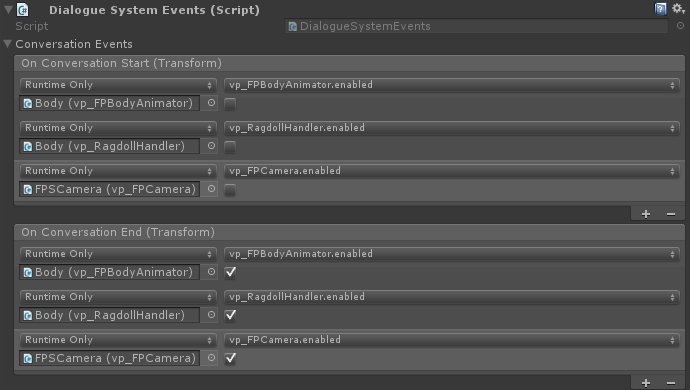
Players with Bodies
Players with bodies, such as HeroHDWeapons, need an additional component. Add a Dialogue System Events, disable these three components in OnConversationStart, and re-enable them in OnConversationEnd:
On NPCs, add these components:
If you want to use the Dialogue System's Selector functionality instead of UFPS's interaction framework, don't add FP Interactable Dialogue, and instead add a Usable component.
You can also set up barks and other Dialogue System features as normal, without having to configure any special UFPS versions.
On destructible objects such as crates, or killables such as enemies, add this component:
To set up a level transition trigger, create a GameObject with a trigger collider. Then add a Dialogue System Trigger set to OnTriggerEnter that runs a Sequence. In the Sequence, use the LoadLevel() sequencer command.
Note: The Dialogue System Menu Framework hasn't been updated for version 2.0 yet.
To use the Dialogue System Menu Framework (available on the Dialogue System extras page at www.pixelcrushers.com/dialogue-system-extras/), follow these steps:
These instructions will get the Menu Framework running with UFPS with the least work.
Dialogue System / Third Party Support / UFPS / Example / Menu Framework Example / Start UFPSDialogue System Extras / Dialogue System Menu Framework / Example / LoadingDialogue System Extras / Dialogue System Menu Framework / Example / CreditsDialogue System / Third Party Support / UFPS / Example / Menu Framework Example / Gameplay UFPSGameplay UFPS, update the scene numbers/names on the Menu System's scripts and the Dialogue Manager's Level Manager script.)Start UFPS scene.Play the Start UFPS scene to test it out. After you've confirmed that it's working, you can assign your own dialogue database, dialogue UI, etc. You can save the Start UFPS scene's Menu System and Dialogue Manager as prefabs and add them to your gameplay scenes for easy playtesting. In your gameplay scenes' copy of the Menu System prefab, deactivate the TitleMenuPanel child GameObject, as was done in Gameplay UFPS. When using the Menu Framework, in your gameplay scenes add the script FPLockCursorOnStart to your player.
The FPPlayer Lua Bridge component makes the following information available in the Lua environment during conversations:
| Lua | Description |
|---|---|
Actor["Player"].Health | The player's current health. |
Actor["Player"].TotalSpace | The total capacity of the player's inventory. (read-only) |
Actor["Player"].UsedSpace | The current used space in the player's inventory. (read-only) |
Actor["Player"].RemainingSpace | The current remaining space in the player's inventory. (read-only) |
Actor["Player"].CurrentWeaponIndex | The index of the player's currently-equipped weapon. |
Variable["Pistol"],, etc. | (For all weapons defined in the player's vp_Inventory. If the value is 0 or nonexistent, the player does not have the item. If the value is 1 or higher, the player has the item, and the number indicates the amount of ammo. If you set a value during a conversation, the change will be reflected in the UFPS player at the end of the conversation. |
Variable["Pistol_Units"],, etc. | The amount of ammo loaded into each weapon. |
Variable["Bullet"], , etc. | The amount of ammo held by the player (outside of weapons). |
You can predefine these variables in your dialogue database to make it easier to select them from the Lua dropdown wizards. In the screenshot below, some of these variables have already been defined:
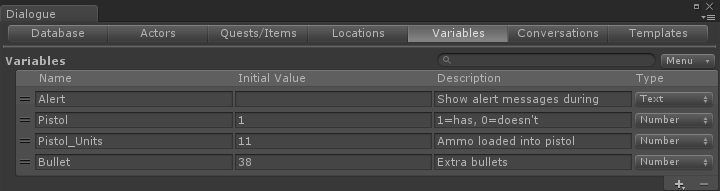
You may want to share additional data between UFPS and the Dialogue System. One way to do this is to put that information in the Dialogue System's Lua environment using variables.
For example, NPC conversations can branch based on whom the player has killed, or what UFPS items the player has in his inventory.
See the demo menu script (DemoMenu.cs) for a simple example of how to save and load.
If the first scene of your game does not have a UFPS player object and a Dialogue Manager object, you'll have to take an extra step. This is the process:
Whenever a new level is loaded, the FP Player Lua Bridge applies the Lua data to UFPS data.
When switching between gameplay levels, the FP Player Lua Bridge in the old level saves the UFPS data to Lua. Then the new level applies the Lua data to UFPS.
If your level selection scene does not have an FP Player Lua Bridge, it will not save UFPS-->Lua.
To address this, you'll need to add some starting values to the dialogue database. These Lua environment will be initialized with these values.
On the Actors tab, add a field named "Health" to the Player. Change its Type to Number. Set the Value to the player's starting health (e.g., 42) and the starting weapon index (e.g., 1):
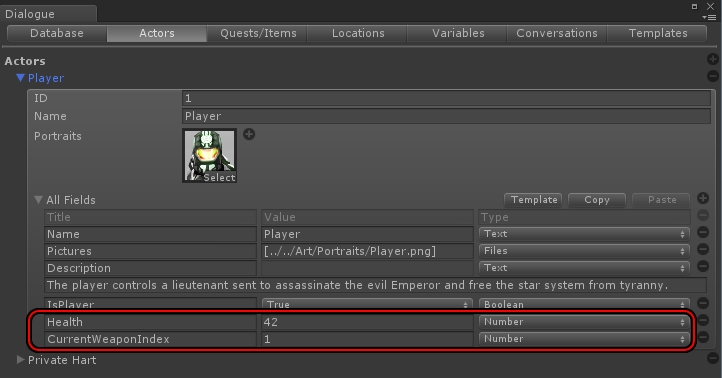
Similarly, set the other Actor and Variable values as described in the Lua Bridge Data table above.
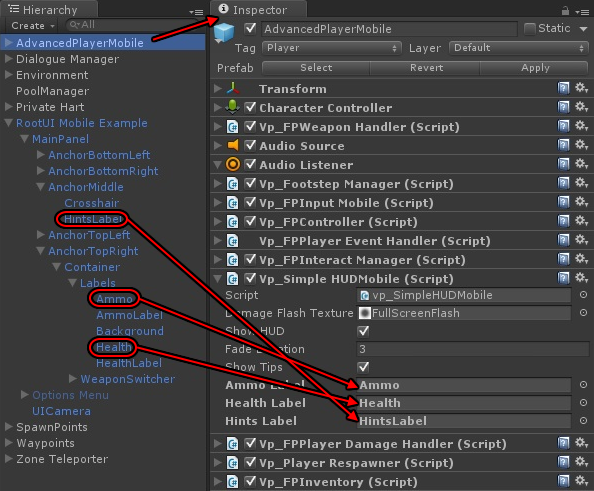
Support for the UFPS Mobile-Addon is in the package UFPS Mobile Addon Support. When you import this package, it will add an example folder containing a two-level mobile demo.
IMPORTANT: To be able to switch between levels, you must add 'Mobile Level 1' and 'Mobile Level 2' to the build settings. For the example main menu's Restart Game button to work, you must make 'Mobile Level 1' the first scene in the build settings.
The example menu is accessed through the mobile demo's menu. The Dialogue System Menu object (which contains the example menu script) is a child of the Dialogue Manager object.
Follow these steps to set up up the Dialogue System with the UFPS Mobile Addon:
The FPPersistentPlayerData and FPSyncPlayerOnLoadLevel components are only necessary if your player will be switching levels or saving and loading games.
If you're using the Dialogue System's Menu Framework, add this script (ConnectPauseMenu.cs) to the RootUI GameObject, create a menu button, and configure it to call the script's OpenPausePanel method and the RootUI menu's Toggle method.