Use these instructions to import Yarn 2.x stories into the Dialogue System. If you're using Yarn 1.x, see Yarn Spinner 1.
Overview
If you're familiar with Yarn, Unity, and the Dialogue System, importing Yarn stories is fairly straightforward.
One difference to be aware of is that Yarn doesn't explicitly specify actors, but the Dialogue System does. In the Yarn Importer window, you will be able to specify how to interpret your Yarn stories to appropriately assign actors to lines of dialogue.
Yarn 2 Importer Window
Yarn 2 Importer Window
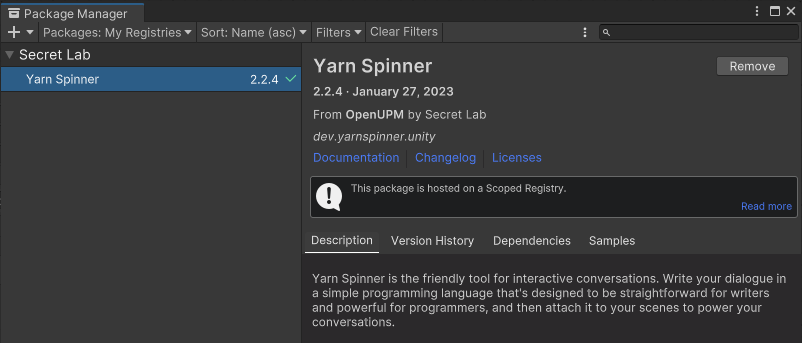
- Before enabling the Dialogue System's Yarn 2 importer, make sure the Yarn Spinner package is installed in your project:
https://docs.yarnspinner.dev/using-yarnspinner-with-unity/installation-and-setup
- The next step is to prepare Dialogue System assembly definition files (asmdefs) for use with Yarn. You can either:
- Import the preconfigured assembly definition files: Assets ► Plugins ► Pixel Crushers ► Dialogue System ► Third Party Support ► YarnImportAssemblyDefinitions.unitypackage. The asmdefs in this package are preconfigured for Yarn and TextMesh Pro.
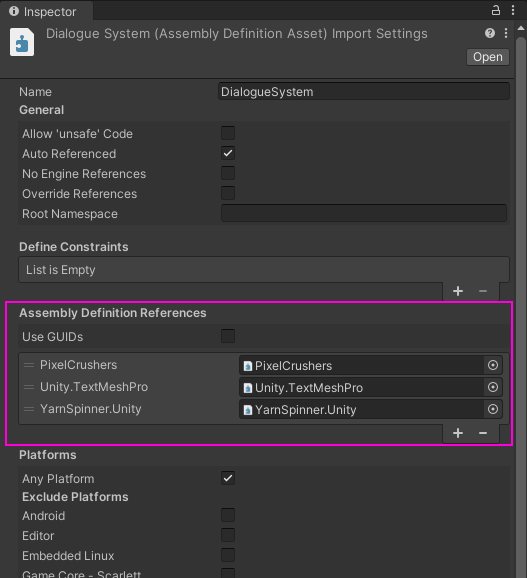
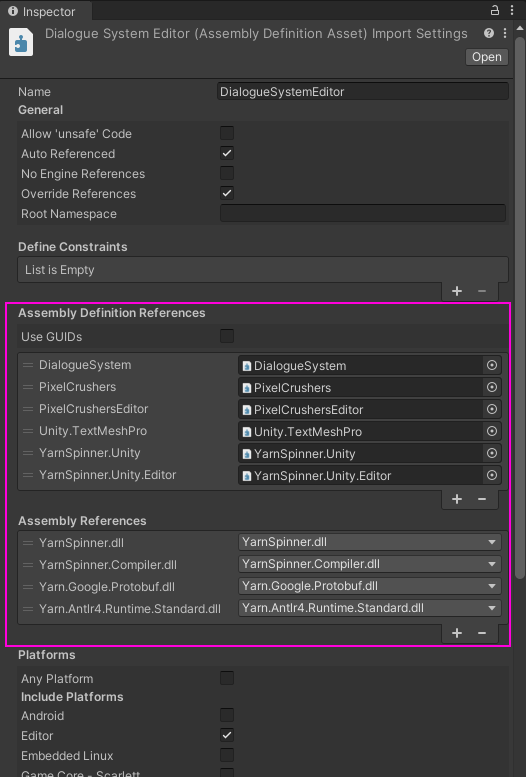
- Or prepare them manually by importing Assets ► Plugins ► Pixel Crushers ► Dialogue System ► Scripts ► DialogueSystemAssemblyDefinitions.unitypackage. You may want to use this option if you need to give the Dialogue System source code access to other asmdefs. They should at the least have these references:
- To begin the import process, select menu item Tools → Pixel Crushers → Dialogue System → Import → Yarn 2. If you haven't already enabled Yarn 2 import functionality in the Dialogue System's Welcome Window, the first time you select this menu item it will ask if you want to enable it. Click OK. Then allow the project to recompile, and select the menu item again.
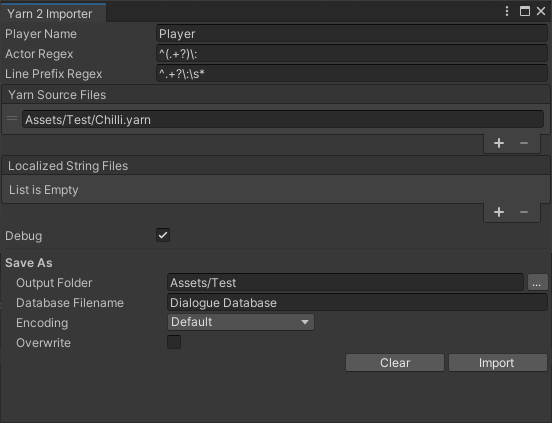
The Yarn 2 Importer window looks like this:
Yarn Importer Window Fields
- Player Name: Sets the name of the Player actor. There is only one player actor and leaving this empty uses the default name “Player”.
- Actor Regex : A regular expression used to pull actor names out of a Yarn project. This regex is matched against each line of dialogue, if a match is found the contents of its capture group is used to create new actors. Here is an example regular expression that matches and captures from the start of the string up to but not including the first colon:
^(.+?)\:
The dialogue line: “Sally: Hello!” will extract the actor name “Sally” using the regex above.
- Line Prefix Regex: A regular expression used to truncate the start of lines in a Yarn project. Usually used in combination with the Actor Regex, when this matches against the start of a line of dialogue, the entire match is stripped out. For example this regular expression:
^.+?\:\s*
Truncates this line: “Sally: Hello!” to “Hello!”
- Yarn Source Files: Add all Yarn source files in your project to this list.
- Localized String Files: Add all Yarn localized string files in your project to this list. It is expected that these filenames will end in “.csv”, and that the locale will be part of the filename. An example filename is: “Sally (de).csv”. Files that do not match this pattern will not be recognized by the importer.
- These localized dialogue lines are processed in the same way as the default dialogue by the Actor and Line Prefix regular expressions.
- Debug: Ticking this outputs verbose logging to the Console window.
- Output Folder: The folder where the newly created dialogue database will be placed.
- Database Filename: The filename of the newly created dialogue database.
- Encoding: Specifies the text encoding type of the Yarn files. In most cases, you can leave this set to the default value.
- Overwrite: Checking this will overwrite any file that exists at the specified database path (Output Folder / Database Filename).
After setting the fields shown above, click Import to read the Yarn files and create a dialogue database.
Import Notes
Miscellaneous import notes:
- Hashtags will be imported into the corresponding dialogue entry in a field named "Metadata". If a line has more than one hashtag, they'll all be in the Metadata field separated by semicolons (;).
Playing Yarn Content
Once you've imported your Yarn content into a dialogue database, you can use it like any other content that was generated directly in the Dialogue System.
Built-In Yarn Functions To use Yarn's built-in functions, add the YarnCustomCommands script to your Dialogue Manager GameObject. Or, if you've defined new custom functions, add your custom subclass as described in Implementing Custom Yarn Commands.
Upgrading Yarn 1 scripts to Yarn Spinner 2
Follow the instructions on Yarn Spinner's website: https://docs.yarnspinner.dev/getting-started/upgrading-yarn-scripts
Note that the Yarn Spinner Console (ysc) updates Yarn scripts in-place (overwrites files), unless an output directory for the upgraded scripts is specified with –output-directory.
Localization
Upgrading Yarn scripts does not upgrade localized string files. Please refer to the localization documentation on Yarn’s website for the new localized strings file format:
To properly upgrade localized string files, 3 columns need to be added: language, lock, and comment.
Language contains the locale, lock is auto-updated by Yarn and can be left empty, and the optional comment can be anything you want.
The order they need to be added is as follows, old columns are enclosed in square brackets:
language,[id,text,file,node,lineNumber,]lock,comment
For example, Yarn Spinner 1 localization string table looking like this:
id,text,file,node,lineNumber,
en-US,line:794945,Line 1,SomeNode.yarn,SomeNode,1
en-US,line:794946,Line 2,SomeNode.yarn,SomeNode,2
Would be upgraded like this for Yarn Spinner 2:
language,id,text,file,node,lineNumber,lock,comment
en-US,line:794945,Line 1,SomeNode.yarn,SomeNode,1,,Line 1 comment
en-US,line:794946,Line 2,SomeNode.yarn,SomeNode,2,,Line 2 comment
Variable Declarations
Variable Declarations While not required, it is good practice to initialize all Yarn Script variables with declare statements. Variables can be declared as one of bool, number, or string types. Below is an example Yarn script declaring a variable of each type:
title: DeclareVars
tags:
---
<<declare $var_1 = "test_string" as string>>
<<declare $var_2 = 43 as number>>
<<declare $var_3 = true as bool>>

This is var_1: {$var_1}
This is var_2: {$var_2}
This is var_3: {$var_3}
Declare statements can appear anywhere in your scripts, however there should only ever be a single declare statement for each variable. It is often a good idea to create a single Yarn node that contains all variable declarations in the project.
Sequencer Commands
To add Cutscene Sequences to your dialogue, use [seq=sequence] tags at the end of a line.
So this is valid:
Some line [seq="Delay(5)"/]
But this is not:
Some [seq="Delay(5"/] line
Line hashtags do not show up as dialogue text, they're metadata, so this is also perfectly valid syntax that works:
Some line [seq="Delay(5)"/] #some_metadata:some_value
The [seq] markup can also be the only thing on a line, so this is valid and identical in functionality to the <<seq>> command:
[seq="Delay(5)"/]
If there's a backslash in front of the [seq] markup tag, it is ignored. So this is ignored:
\[seq="Delay(5)"/]
To append a sequence to the previous line, use
<<appSeq...
or
<<appendSequence...
instead of
<<seq...
.
Implementing Custom Yarn Commands
If your Yarn stories contain any custom commands, use these steps to implement them in Unity:
- Create a subclass of the YarnCustomCommands script. Refer to the original YarnCustomCommands script to know which commands to register and implement. Add the script to your Dialogue Manager GameObject.
- In your subclass, use Lua.RegisterFunction() and Lua.UnregisterFunction() to register and unregister each command with the Dialogue System.
- Implement the command by overriding the empty stub that's defined in YarnCustomCommands.
Step 1 - Subclass YarnCustomCommands
The Custom Commands File field is where this class is located. The class will always be named YarnCustomCommands. Subclass this and override its RegisterFunctions() and UnregisterFunctions() methods, making sure to call back to the base class' RegisterFunctions() and UnregisterFunctions() in your methods.
Add the script to your Dialogue Manager GameObject.
Step 2 - Register and Unregister the Command
Commands are registered by associating the command name with a function that implements it. Commands in Yarn are specified like this:
<<my_command arg1 arg2 arg3>>
where “my_command” is in the place of your command’s actual name. The next thing to do is write the method that will implement your command’s functionality. In this example, we will write a C# method that prints out all arguments passed to it, and call it MyCustomCommand.
public void MyCustomCommand(string arg1, float arg2, bool arg3)
{
Debug.Log($"MyCmd('{arg1}', {arg2}, {arg3}) - SUCCESS");
}
Next enter this line in the RegisterFunctions() method of your YarnCustomCommands subclass, substituting your command name for “my_command”, and your method name for MyCustomCommand:
Lua.RegisterFunction("my_command", this, SymbolExtensions.GetMethodInfo(() => MyCustomCommand("", 0f, false)));
Finally, the command needs to be unregistered when the YarnCustomCommands classes are unloaded. Enter this line in the UnregisterFunctions() method of your YarnCustomCommands subclass, again substituting your command name for “my_command”:
Lua.UnregisterFunction("my_command");
Your YarnCustomCommands subclass should now look like this:
using UnityEngine;
using PixelCrushers.DialogueSystem.Yarn;
public class YarnCustomCommandExtensions : YarnCustomCommands
{
public override void RegisterFunctions()
{
base.RegisterFunctions();
}
public override void UnregisterFunctions()
{
base.UnregisterFunctions();
}
public void MyCustomCommand(string arg1, float arg2, bool arg3)
{
Debug.Log($"MyCustomCommand('{arg1}', {arg2}, {arg3}) - SUCCESS");
}
}
A static class that provides a global Lua virtual machine.
Definition Lua.cs:18
static void UnregisterFunction(string functionName)
Unregisters a C# function.
Definition Lua.cs:328
static void RegisterFunction(string functionName, object target, MethodInfo method)
Registers a C# function with the Lua interpreter so it can be used in Lua.
Definition Lua.cs:311
Definition SymbolExtensions.cs:13
static MethodInfo GetMethodInfo(Expression< Action > expression)
Given a lambda expression that calls a method, returns the method info.
Definition SymbolExtensions.cs:20
<< Import & Export