This page describes how to set up the Dialogue System with More Mountains' Corgi 2D + 2.5D Platformer Engine. (Corgi Engine is required.)
Corgi copyright © More Mountains.
Corgi Engine Support Setup
Import these 2 package:
- Plugins ► Pixel Crushers ► Common ► Third Party Support ► Corgi Support
- Plugins ► Pixel Crushers ► Dialogue System ► Third Party Support ► Corgi Support
This will unpack files into the folders Assets ► Pixel Crushers ► Common and Dialogue System ► Third Party Support ► Corgi Support.
This package adds functionality to start conversations within the Corgi Engine framework.
How To Set Up Scenes
Use these steps to set up a Corgi scene for the Dialogue System:
- Add a Dialogue Manager (e.g., from Prefabs).
- Add a DialogueSystemCorgiEventListener component if you plan to use Corgi's pause menu or save system. This component allows dialogue UIs to release UI navigation to the pause menu when paused and regain UI navigation when unpaused. Also add this component if you plan to use the Character Persistence component on your player prefab. (Reminder: When using Character Persistence, configure your Corgi Level Manager to instantiate the player from a prefab; don't put the player GameObject directly in the scene at design time.)
- If you want to allow the player to click on response menu buttons using the mouse, inspect UICamera → Canvas → Fader and untick Raycast Target. Otherwise Corgi's Fader will prevent mouse input.
- If the player will be using the gamepad to select response menu buttons, verify that UICamera → EventSystem and Standalone Input Module's inputs are what you want to use. You can usually leave these at the default.
- To set up an NPC:
- Using the Standard Dialogue UI system (recommended):
- Add a ConversationZone prefab (located in Corgi Support ► Example ► Prefabs) as a child of the NPC. This has a ConversationZone component which works similarly to Corgi's DialogueZone script except it starts a Dialogue System conversation. This script also has options to temporarily disable Corgi's player and/or camera control.
- Select the conversation from the Dialogue System Trigger component's dropdown.
- Set the Dialogue Actor component's Actor name.
- Using the older Unity UI Dialogue UI instead:
- Add a ConversationZone component to the NPC.
- Add the CorgiUnityUIDialogueControls prefab as a child of the ConversationZone.
- Optionally add a Dialogue Actor component to specify the name that appears in dialogue. Otherwise it will use the GameObject name.
- For more details: How to Run Conversations in Corgi.
- If you want the player to stop playing its movement animation during conversations, add a Dialogue System Trigger component to the player prefab. Select Actions → Sequence. Specify a sequence, typically using the AnimatorFloat() command, to set the player's animator parameters to values that will make it stop. For example, the player prefab used by the Dialogue System's Corgi Example is configured with this component:
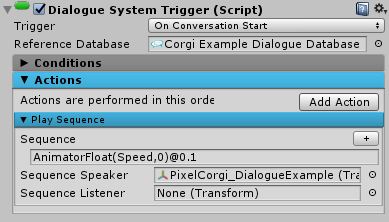
because its animator controller uses a parameter named "Speed".
Depending on what animator controller you're using, you may need to set additional values, such as:
AnimatorFloat(xSpeed,0)@0.1;
AnimatorFloat(ySpeed,0)@0.1;
AnimatorBool(Walking,false)@0.1;
AnimatorBool(Running,false)@0.1;
AnimatorPlay(idle)@0.1
(This resets the animator's xSpeed and ySpeed, clears the animator states, and plays the idle animation.)
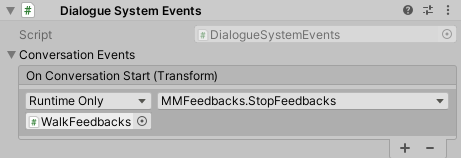
To also stop feedbacks (such as footstep dust particles), configure a Dialogue System Events component's OnConversationStart() method to stop them:
For more information about how the example scene was set up, see Corgi Integration Example Scene.
If you're using More Mountains' Inventory Engine, see Inventory Engine Support. In particular, please keep in mind that Inventory Engine disables UI navigation while the inventory is closed. If you want to be able to navigate other UIs with a joystick/keyboard such menus, see How To Set Up Scenes.
If you're using Rewired for input, make sure to define a Rewired action named "Interact", as this is what Corgi's interaction system (used in ConversationZones) will query.
If your player's Grounded property doesn't become true when starting a conversation in mid-air and landing during the conversation, increase the CorgiController's RayOffsetVertical value a little.
Quest Log Window
If you plan to use a quest log window, follow these steps:
- Remove the reference to the quest log window prefab that's in the Dialogue Manager's Instantiate Prefabs component.
- Add your quest log window directly to a Canvas that's a child of the Dialogue Manager.
- Add a Dialogue System Corgi Event Listener component to the Dialogue Manager if not already present.
- Configure the quest log window's OnOpen() UnityEvent to call the Dialogue Manager's DialogueSystemCorgiEventListener.PauseCorgi method, and tick the checkbox. (The checkbox tells the Dialogue System to allow auto-focus of UI elements.)
- Configure OnClose() to call DialogueSystemCorgiEventListener.UnpauseCorgi.
- Optional: Add a Quest Log Window Hotkey component to the quest log window.
How to Run Conversations in Corgi
To add a Dialogue System conversation in Corgi:
- Add the ConversationZone prefab to the NPC.
- Select the conversation from the Dialogue System Trigger component's dropdown. Optionally assign the NPC to the Conversant field if your conversation uses sequencer commands that control the NPC (such as playing animations).
- Set the Dialogue Actor component's Actor name.
- If the character changes direction by flipping its model on direction change, you can add a MatchCharacterTransform script to the ConversationZone.
Then customize the components through the inspector to run a Dialogue System conversation:
| Setting | Description |
| Player Is Actor | If ticked, automatically finds the spawned player and uses it as the conversation's actor. |
| Can Move While Talking | If ticked, the player can move while the conversation is active; in this case, you may want to tick the Conversation Trigger's Stop On Trigger Exit checkbox. |
| Corgi Controls Camera While Talking | If ticked, Corgi retains camera control; in this case, you can't use Zoom2D(). |
Key Navigation Input Setup
For keyboard navigation, first make sure that the first response appears highlighted when running the conversation. (Make sure the dialogue UI's Auto Focus checkbox is ticked.) If it does appear highlighted, check the steps below:
Since Corgi is a complete project, it overwrites Unity's default input definitions. The Dialogue System relies on standard Unity UI navigation using an EventSystem. Inspect your scene's EventSystem GameObject, which is usually located under UICamera. Make a note of the Standalone Input Module's Vertical Axis. Then select Edit → Project Settings → Input to view Unity's input definitions. Look for one or more elements that correspond to the Vertical Axis. These will indicate which inputs are already mapped to the Vertical Axis. You can add another element for Vertical Axis that maps the positive and negative values to 'w' and 's' (for WASD) and/or 'up' and 'down' (for the arrow keys).
Continue Button Setup
If you want to require the player to click a continue button to progress conversations, use these steps.
- Expand ConversationZone ► CorgiStandardDialogueControls ► Panel ► TextPanel. Add a new UI button named "Continue Button".
- Add a Standed UI Continue Button Fast Forward component to the button. Pointed the Typewriter Effect field to the Subtitle Line. Configur the button's OnClick() event to call StandardUIContinueButtonFastForward.OnFastForward.
- If you want to assign a hotkey such as joystick button 0, add a UI Button Key Trigger and assign the hotkey.
- Assign the continue button to the NPC's Standard UI Subtitle ► Continue Button field.
- Set the Dialogue Manager's Subtitle Settings ► Continue Button mode to a setting that uses continue buttons, such as Always.
Corgi Integration Example Scene
These steps were taken to set up the example scene:
- UICamera → EventSystem → inputs were changed to Player1 inputs to let the player press the 'A' button to choose a conversation response. The Fader UI element was also changed to not block raycasts, which would prevent mouse input.
- A Dialogue Manager prefab was added.
- New NPCs Dude 1 & Dude 2 have an instance of the ConversationZone prefab.
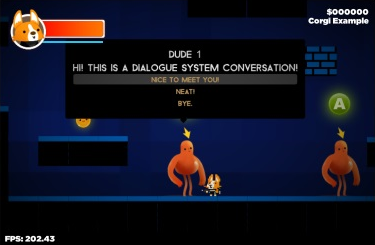
- Dude 3 has a slightly different dialogue UI variant.
- Dude 4 (on a higher platform) just barks and doesn't engage in interactive conversations.
Other Notes in Corgi Example Scene
- Dude 1's conversation demonstrates the Zoom2D() sequencer command.
- Dude 3's conversation demonstrates the AnimatorFloat() sequencer command.
Sequencer Commands
The integration adds these sequencer commands:
Face( target, subject )
where:
- target (Optional) is the name of a GameObject, or speaker to listener. Default: listener.
- subject (Optional) is the name of a GameObject, or speaker or listener. Default: speaker.
This command makes the subject face the target by flipping the Corgi character if necessary using Character.Flip(). If target and subject are both omitted, makes both speaker and listener face each other.
PermitAbility( abilityName, value, subject )
where:
- abilityName is the name of an ability such as CharacterJump.
- value is true or false.
- subject (Optional) is a GameObject that has the named ability, or speaker or listener. Default: speaker.
This command permits or disallows the named ability on the subject.
Saving & Loading
Corgi Engine has a SaveLoadManager. To tie the Dialogue System in, add a Dialogue System Corgi Event Listener component to the Dialogue Manager, and tick Handle MM Save Load Events.
<< Third Party Integration