The Dialogue System can import (Arcweave) projects.
The Dialogue System does not use Arcweave's Unity plugin. You do not need to import Arcweave's special unitypackage plugin.
Arcweave Coupon Code
Pixel Crushers has arranged a coupon code for a 20% discount on Arcweave subscriptions to the first 100 users:
CRUSH20
Importer Window Setup
- Install Newtonsoft Json.NET.
- Open Unity's Package Manager window. If the Newtonsoft Json.NET package is already installed, skip to step 3.
- Select menu item Edit → Project Settings. In the Package Manager section, click “+” if necessary to create a new, empty form. If nothing is registered yet in the Scoped Registries section, you don’t have to click “+”. Enter the following information into the form:
- Then click Save.
- In the Package Manager window, select Unity Registry → My Registries. Select Json.NET and click Install.
- To minimize build sizes and compile times for developers who don't use Arcweave, support for Arcweave must be separately enabled. To enable support, select Tools → Pixel Crushers → Dialogue System → Import → Arcweave. If support has not been enabled yet, this will ask if you want to enable support.
Importing Arcweave Projects
- In Arcweave, export your Arcweave project (all files) to a zip file.
- Unpack the zip file into a folder inside your Unity project. You must unpack them into the Unity project so the importer can find characters' portrait images. If you've added additional fields "Portrait 2", "Portrait 3", etc., to an actor, make sure to put the corresponding images in the Arcweave data folder's assets subfolder (see Arcweave Content Notes).
- Select menu item Tools → Pixel Crushers → Dialogue System → Import → Arcweave... The first time you select this menu item, it will ask you to enable Arcweave import support. Click Enable, wait for the project to recompile, and then select the menu item again to open the Arcweave Import window.
- In the Arcweave Import window, specify the Project Folder in which you unpacked your Arcweave project. Then click Load JSON.
- If you're on Arcweave's Team Plan, you can configure the importer to download Arcweave project updates from the web. First create an API Token as explained here: https://arcweave.com/docs/1.0/api
- Then examine the your project's URL to get the Project Hash Code. If your project's URL is something like
https://arcweave.com/app/project/dQlAXQ50ng?board=..., the Hash Code would be dQlAXQ50ng.
- Enter the API Token and Project Hash in the importer fields.
- Click Download JSON. This will download the latest project_settings.json file from Arcweave into your Project Folder and then load the JSON into memory just as if you had clicked the Load JSON button.
- In the Components foldout, set the components that represent NPCs to "NPC".
- In the Boards foldout, set the boards that represent conversations to "Conversation". Then select the starting element, conversation actor, and conversation conversant.
- Review the Save As section. Then click Import to create a dialogue database.
Notes
- To quickly reimport changes after you've set up the importer window, you can inspect your dialogue database, set the Reconvert dropdown to Arcweave, and then click the Reconvert... button. This will re-run the import process using the existing importer window settings.
- You can also manually change prefs in an editor script by accessing ArcweaveImporterWindow.Init() to get the window and then changing the values in the importerPrefs property, and then call the window's LoadAndConvert() method.
Arcweave Content Notes
- Text on connection arrows are treated as Player responses.
- To assign an element to a different actor:
- Set the elements' title to "Speaker:actorname" where actorname is the name of the actor.
- Or add the actor component to the element. Optionally add the conversant (character being spoken to) as a second item in the element's component list.
- To add sequencer commands to a dialogue entry node, include [SEQUENCE: xxx] in an element's text, where xxx is the sequence. Include the square brackets [ ] in the text.
- Pipe characters (|) will split elements into multiple dialogue entry nodes.
- You can use all Arcscript functions except reset() and resetAll(). To make Arcscript functions available in Unity, add the ArcweaveLua script to your Dialogue Manager GameObject. Note: ArcweaveLua uses the Dialogue System's default LuaInterpreter.
- The ArcweaveLua component is a Saver component in order to handle the visits() function. Make sure to set a unique Key value such as "arcweave".
- If you've assigned a cover image to an actor component in Arcweave, the importer will use that image as the actor's primary portrait. To assign additional portraits to an actor, add custom fields named "Portrait 2", "Portrait 3", etc., to the actor component in Arcweave. Set the field to the portrait image name, without file extension. In Unity, put these additional images in the Arcweave data's assets subfolder.
- To define quests in Arcweave, see Arcweave Quests below.
Arcweave Quests
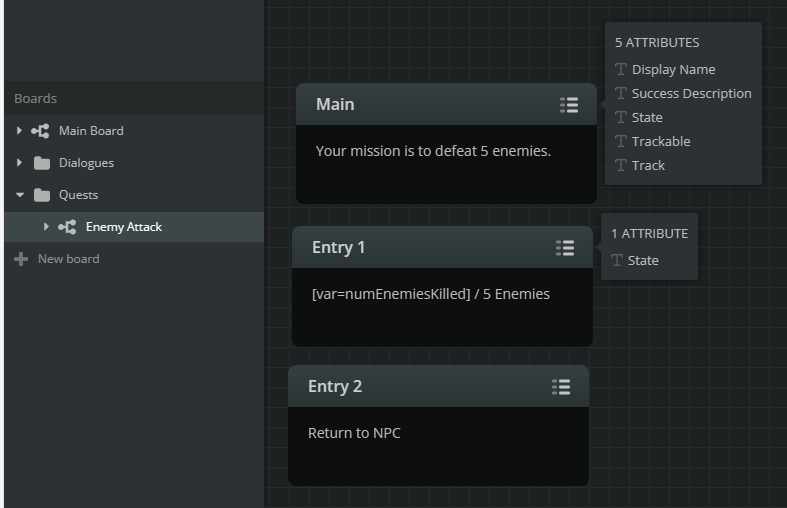
To define a quest in Arcweave, create a board. The board's name will be the quest's Name.
Create an element named "<b>Main</b>". The element's text will be the quest's Description. You can add attributes to the Main element. These will be imported as fields in the quest, such as:
- Display Name
- Group
- Success Description
- Failure Description
- State (set to "unassigned", "active", "success", "failure", etc.)
- Trackable (set to "true" or "false")
- Track (set to "true" or "false")
At a minimum, you should add a State attribute.
If your quest has quest entries, create an element for each quest entry. Name them "Entry 1", "Entry 2", etc. The quest entry element's text will be the Entry # text. You can add attributes to the quest entry element. These will be imported as fields in the quest, such as:
- State (set to "unassigned", "active", "success", "failure", etc.)
At a minimum, you should add a State attribute to each quest entry element.
In the Arcweave Importer window, specify that the board is a Quest.
Runtime Import
You can also import Arcweave content at runtime. Create an ArcweaveImporter object, and then call its Import() method or manually call its Setup() and LoadAndConvert() method. The Import() method requires three parameters:
- JSON string containing preconfigured Arcweave Importer window prefs
- A dialogue database into which the Arcweave content will be imported
- A Template object that will be used to create new database elements (actors, dialogue entries, etc.)
Example:
using UnityEngine;
using PixelCrushers.DialogueSystem;
using PixelCrushers.DialogueSystem.ArcweaveSupport;
public class TestRuntimeImport : MonoBehaviour
{
public TextAsset prefs;
public void Start()
{
var importer = new ArcweaveImporter();
}
}
A dialogue database asset.
Definition DialogueDatabase.cs:16
void Clear()
Removes all assets from this database.
Definition DialogueDatabase.cs:613
This class defines the template that the Dialogue Database Editor will use when creating new dialogue...
Definition Template.cs:17
static Template FromDefault()
Definition Template.cs:41
<< Import & Export