 |
|
(Click Here for Unity UI Video Tutorial)
See also:
The Unity UI-based UI features a fully-customizable layout. A selection of Unity UI dialogue UI prefabs demonstrate what you can do with this system. See Unity UI Prefabs.
The Dialogue System has Unity UI support for these user interface elements:
The UIs work independently, so you can mix and match GUI systems. For example, you can use legacy Unity GUI for the Selector and the new Unity UI for the Quest Log Window. This allows you to convert existing setups from Unity GUI to Unity UI gradually. You don’t need to convert them in one big effort.
Any UI that uses Unity UI has three requirements:
The first two requirements apply to anything that uses Unity UI, not just the Dialogue System. The third requirement is because otherwise the Dialogue System wouldn’t know which canvas to child the prefab instance to if your scene has multiple canvases.
If your prefab has a Canvas as well as a UnityUIDialogueUI component, you can assign the prefab directly to the Dialogue Manager's Dialogue UI field. The Dialogue System's built-in prefabs don't have Canvases, so you should add them to the scene as described in the previous paragraph.
Note about canvases: Different UI elements may be located in different canvases. For example, see the "World Space UI Example Scene". This uses world-space speech bubble canvases above each character's head to deliver subtitles and show response menus.
Follow these instructions to quickly get the Dialogue System working with a Unity UI.
If you've added the prefab Prefabs/Dialogue Manager, your Dialogue Manager already has a set of Unity UI Generic UI Prefabs. You only need to add a Unity UI EventSystem to make it all work (Component > UI > EventSystem).
Prefabs/Unity UI Prefabs/Generic/Generic Unity UI Dialogue UI as a child of the Canvas (i.e., just drag it from the Project view onto the Canvas in the Hierarchy view).Once you've confirmed that this is working, you can edit the appearance of the dialogue UI to your liking by changing fonts, images, layout, etc. See How to Create a Unity UI Dialogue UI for detailed steps, or Unity UI Prefabs for a list of other built-in prefabs.
You can also read more about Unity UI Generic UI Prefabs.
Unity GUI Quest Log Window GameObject.Prefabs/Unity UI Prefabs/Generic/Generic Unity UI Quest Log Window to the Canvas.You can also read more about Unity UI Generic UI Prefabs.
Prefabs/Unity UI Prefabs/Generic/Generic Unity UI Quest Log Tracker HUD to the Canvas.You can also read more about Unity UI Generic UI Prefabs.
The Dialogue System provides a set of generic starter UIs in Prefabs/Unity UI Prefabs/Generic. These UIs are very plain but implement all Dialogue System UI features. You may want to use them as starting points for your own custom UIs by adding them to a scene and changing textures, fonts, and layout positions.
By default the Generic Dialogue UI does not auto-focus the first response button. If you're using keyboard or gamepad navigation, tick Auto Focus. If you're using mouse or touch input, you probably want to leave this unticked so no response button starts with focus.
The Examples/Unity UI Examples folder contains some example scene that use Unity UI prefabs. In general, they have these features:
The World Space UI Example Scene uses the Speech Bubble prefabs, which work with world space canvases.
The easiest way to change the appearance of your dialogue is to use a different prefab by adding it to the scene under a canvas. Then assign this scene instance to the Dialogue Manager's Dialogue UI property.
IMPORTANT: For Unity UI, your dialogue UI must be a scene object, not a reference to a prefab. Assign the scene object to the Dialogue Manager's Dialogue UI field. Unity UI requires two elements in the scene: a Canvas and an EventSystem. You can make them children of the Dialogue Manager GameObject if you want them to persist through scene changes.
If you want to customize a prefab, drag it into your scene and expand its children.
The main panels (Alert Panel and Dialogue Panel) may be inactive, or their Canvas Group > Alpha values may be zero (transparent). In this case, you'll need to activate them in the scene and/or set Alpha to 1 to see their contents.
The easiest way to create a custom Unity UI Dialogue UI is to make copies of the Unity UI Generic UI Prefabs and change them to your liking.
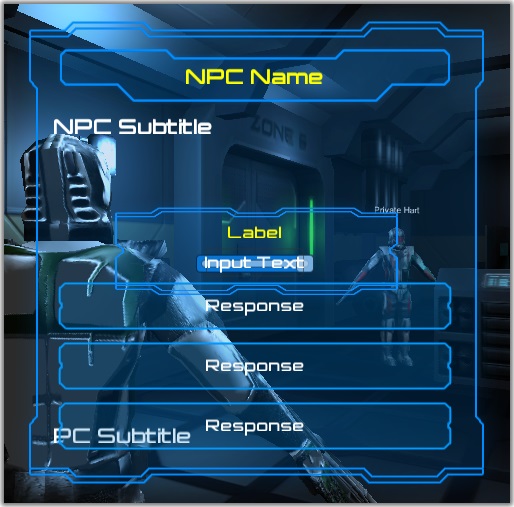
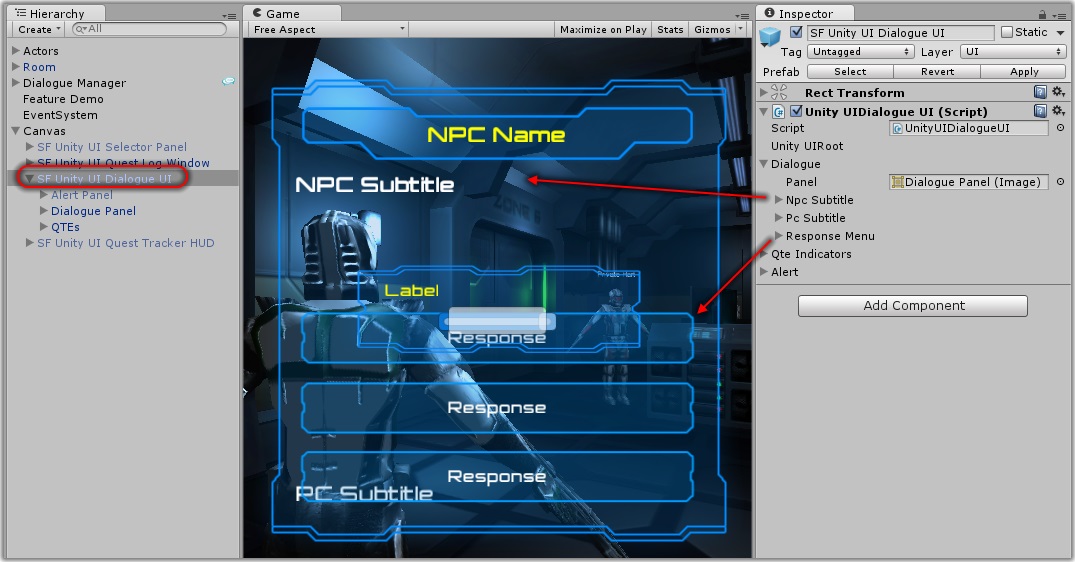
To create your own Unity UI Dialogue UI completely from scratch:
Your final setup should look similar to the screenshot below:
In many Unity UI dialogue UIs, you may notice that the same NPC Subtitle UI element(s) are also assigned to the Response Menu > Subtitle Reminder section. The Subtitle Reminder is what’s shown during the response menu. This allows you to have different UI elements for when the NPC speaks (NPC Subtitle) versus when the NPC is waiting for a response (Subtitle Reminder). For example, the NPC Subtitle could have a typewriter effect that the reminder doesn’t have, or the reminder could be positioned differently and in a smaller font.
To avoid cluttering the Scene and Game views, you can deactivate the Dialogue Panel and Alert Panel. The Dialogue System will automatically enable them as needed.
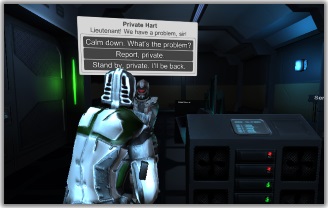
The example scene in Examples/Unity UI Examples/SF Example Scene demonstrates the UI shown above.
If you've ticked Always Visible for the NPC Subtitle Panel, make sure you haven't assigned the same UI elements to the Subtitle Reminder. Otherwise, when the response menu closes, it will hide the Subtitle Reminder – which, being the same as the NPC Subtitle Panel, will hide the NPC Subtitle Panel, too.
If you don't want to define the buttons at design time, you can use template response buttons. This allows the dialogue UI to automatically instantiate the correct number of buttons for each response menu. You can even put them inside a scroll view if you have a lot of responses.
To use this feature, define a single response button, and assign it to Button Template. Assign the button's containing graphic control (e.g., panel or scroll content) to Button Template Holder. Make sure to assign Button Template Holder so the dialogue UI knows where to parent the instantiated buttons.
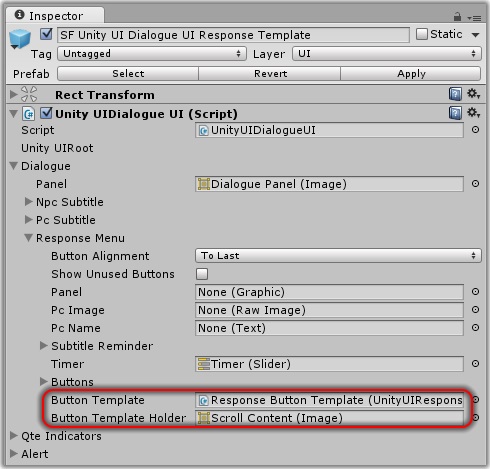
If you've attached a scrollbar to your Button Template Holder, assign the scrollbar to Button Template Holder Scrollbar, and set the Button Template Holder Scrollbar Reset Value. When refreshing the response menu, the scrollbar will be reset to this Reset Value.
The example scene in UI/Example/Example Scene with Response Template demonstrates the use of a response button template.
Scrollbars Only When Needed
By default, if you've defined a scrollbar, Unity UI always shows it. You can add the Unity UI Scrollbar Enabler component (Component > Dialogue System > Unity UI > Effects > Scrollbar Enabler) to only enable the scrollbar when the content is larger than the Button Template Holder's containing scroll rect. Add it to any GameObject in the dialogue UI, such as the dialogue UI itself. Assign the Button Template Holder to Content. Assign its containing scroll rect to Container. Assign the scrollbar to Scrollbar.
On the Unity UI Dialogue UI component, click the "+" in the lower right of the "On Content Changed ()" box. This will create an event slot. Assign the Unity UI Scrollbar Enabler component to the event slot, and select UnityUIScrollbarEnabler.CheckScrollbar from the dropdown menu.
Auto Focus
An additional checkbox, Auto Focus, is not in the screenshot above. If ticked, the dialogue UI will always automatically focus:
This is useful for gamepad and keyboard navigation using Unity UI's built-in nagivation features.
Navigation Notes
There's one thing to be aware of: When Unity UI's navigation set to Automatic, it tries to let the player navigate to everything. If you enable visualization during gameplay, you may see that the navigation arrows go from the response buttons to the response template holder scrollbar (if you've added one), and even to bark UIs in NPCs' world space canvases. This clearly won't work to allow players to navigate just the response menu, or just the continue button.
One solution is to create a fixed number of response buttons and set their navigation to Explicit. For each response menu, the Dialogue System will use as many buttons as it needs (as long as you've created enough) and temporarily deactivate the rest.
Navigation with Response Button Templates
To enable gamepad and keyboard navigation for buttons that are dynamically created from the response button template, tick Auto Focus and Explicit Navigation for Template Buttons.
Keyboard/Gamepad Button Shortcuts for Response Buttons
To assign a key or gamepad button shortcut to a response button, add a UI Button Key Trigger component (Component > Dialogue System > Unity UI > Effects > Unity UI Button Key Trigger). Then set the key and/or button name that simulates a click.
The panels (Dialogue Panel, NPC Subtitle Panel, PC Subtitle Panel, and Response Menu Panel) don't actually need to be under the same canvas. As long as the properties in your UnityUIDialogueUI point to valid UI elements, they can be in any canvas. For example, you could make them world-space canvases attached to different GameObjects.
You can also set a different dialogue UI for each character by using an Override Dialogue UI component.
If you want to re-parent the panels to the conversation participants, you can add an OnConversationStart(Transform actor) or OnConversationLine(Subtitle line) method to a script on your Dialogue Manager GameObject to move the panels. You can reference the properties DialogueManager.CurrentActor (usually the player) and DialogueManager.CurrentConversant (the NPC) to know which GameObjects to parent the world canvases to.
If you want to use the same dialogueUI for all conversations, on the other hand, but change to different world-space canvases based on the NPC, you can change the dialogue UI's NPC Subtitle Panel property in an OnConversationStart() method to point it to the current NPC. For example, add a short script to each NPC with an OnConversationStart() that sets the property to the NPC's panel.
For a slightly different approach, you can use a Unity UI Bark Subtitle Dialogue UI instead of Unity UI Dialogue UI. This sends the subtitle text to the NPCs' bark UIs instead of using a traditional NPC Subtitle Panel.
You can add an Animator to any the following UI elements:
If you assign an animator controller, it will automatically play states named "Show" (when opening the panel) and "Hide" (when closing the panel). Examine the Animation Transitions sections of the Unity UI Dialogue UI component if you want to use different names for the animation triggers. The Unity UI Dialogue UI component watches for completion of the "Show" and "Hide" animations (if set) on layer 0 of the animator controller.
In addition, you may want to add Animators to any QTEs to animate them when they're active.
You can also add Animators to Unity UI Bark UIs and Unity UI Quest Log Windows.
Unity UI can work with world space canvases. You can also configure Unity UI Dialogue UI to automatically find the world space canvas associated with the speaker.
World space canvases are useful for visually associating text with the speaker's avatar, for example showing a cartoon speech bubble above the speaker's head. They're also useful for virtual reality environments where it might be disorienting to overlay a screen space UI on the player's view.
To set up a world space dialogue UI:
Speech Bubble Dialogue UI prefab is a copy of the Generic UI with this checkbox already ticked.Speech Bubble Canvas and Speech Bubble Canvas With Menu prefabs are preconfigured. The first prefab overrides only subtitle lines; the second prefab overrides response menus involving this character as well.If a character does not have an Override Unity UI Dialogue UI Controls component, it will use the regular dialogue UI controls defined on your dialogue UI.
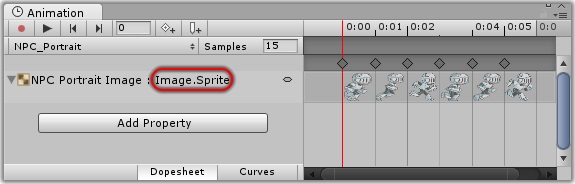
You can use animated sprites instead of static textures for NPC and PC Portrait Images. To set it up:
The sequence above plays the character's "Talking" animator state on the NPC Portrait Image UI element. At the end of the duration determined by the length of the subtitle text, it plays the character's "Idle" animator state.
To automatically add numbered keyboard shortcuts to response buttons, expand Response Menu > Autonumber and tick the Enabled checkbox.
The default button label format is "#. Menu Text" (separated by a period). If you want to change the format, edit the Format field.
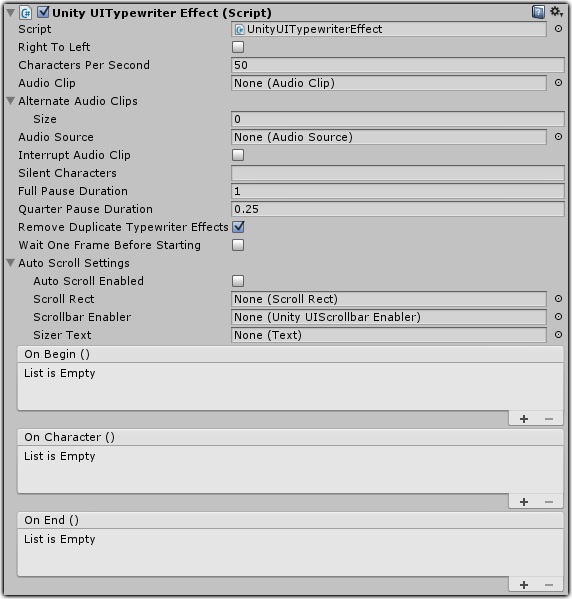
The Unity UI Typewriter Effect displays text one character at a time. You can use it on subtitle lines in your dialogue UI and elsewhere. It's a general-purpose effect.
| Property | Function |
|---|---|
| Right To Left | Tick to type right to left (e.g., Arabic) |
| Characters Per Second | How fast to type (see Characters Per Second) |
| Audio Clip | Audio clip to play with each character (see Audio Settings) |
| Alternate Audio Clips | Additional audio clips to use randomly with characters |
| Audio Source | Audio source through which to play the audio clip(s) |
| Interrupt Audio Clip | Tick to restart the audio clip with each character |
| Silent Characters | Characters that should not play the audio clip (frequently punctuation and white space) |
| Full Pause Duration | Duration of the full pause code (see Special Codes) |
| Quarter Pause Duration | Duration of the quarter pause code (see Special Codes) |
| Remove Duplicate Typewriter Effects | Ensures only one typewriter effect on this GameObject to prevent conflicting typewriter effects |
| Wait One Frame Before Starting | Tick to wait 1 frame before starting effect to allow some other process to set the text content first |
| Auto Scroll Settings | Settings to auto scrolling (see Auto Scroll) |
| OnBegin() | Events to run when the typewriter effect begins |
| OnCharacter() | Events to run when the typewriter effect types a character |
| OnEnd() | Events to run when the typewriter effect ends |
Character Per Second specifies how fast to type. When using this effect with subtitle lines, make sure its Characters Per Second is no faster than the Dialogue Manager's Subtitle Chars Per Second; otherwise the subtitle will disappear before it's fully typed out.
You can optionally assign a one or more audio clips to play with each character. If you assign alternate audio clips, the typewriter effect will choose randomly between the Audio Clip and the Alternate Audio Clips.
If Interrupt Audio Clip is ticked, the typewriter effect will stop the currently-playing audio clip (if any) and play the audio clip from the beginning with each character. If it's unticked, the typewriter effect will allow the previous character's audio clip to finish playing.
If you specify any Silent Characters, the typewriter effect will not play audio clips for them.
The typewriter effect handles bold, italic, and color rich text codes, as well as these special time control codes:
| Code | Description |
|---|---|
\, | Wait 15 frames (quarter second) |
\. | Wait 60 frames (a full second) |
\> | Following text is instant |
\< | Following text is no longer instant |
\^ | Skip to the end |
If you use the time control codes above (e.g., on NPC Subtitle Line), add a Unity UI Ignore Pause Codes component to the corresponding non-typewriter line (e.g., NPC Subtitle Line Reminder) to hide those codes.
For text that's longer than the subtitle panel, you can use Auto Scroll Settings to automatically scroll a Unity UI Scroll Rect as the typewriter effect runs.
This is the general idea of how it works: There are two copies of the Text element. One of them is invisible and grows character by character. The Scroll Rect and Content Size Fitter work off of this copy. The second one is visible and uses the invisible rich text code trick.
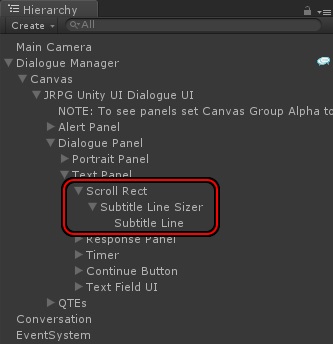
Here's an example of setting up auto scrolling:
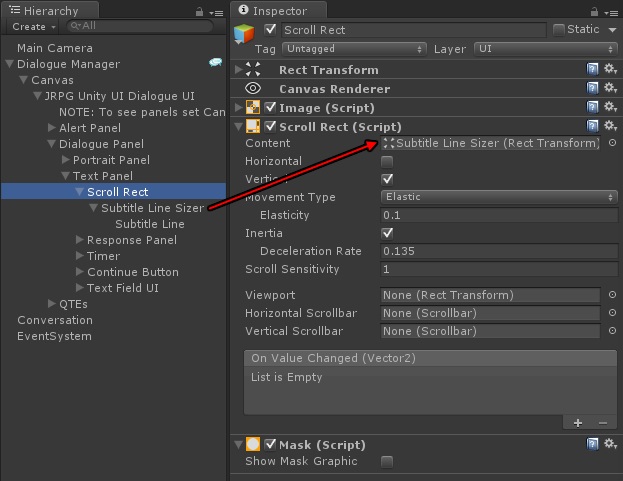
Copy Subtitle Line and rename it to Subtitle Line Sizer. They're both identical copies that look exactly the same at this point. Then make Subtitle Line a child of Subtitle Line Sizer:
On Subtitle Line Sizer, remove the Unity UI Typewriter Effect component:
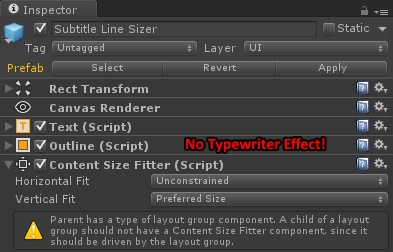
On Subtitle Line, remove the Content Size Fitter, and assign Subtitle Line Sizer to the new Sizer Text field:
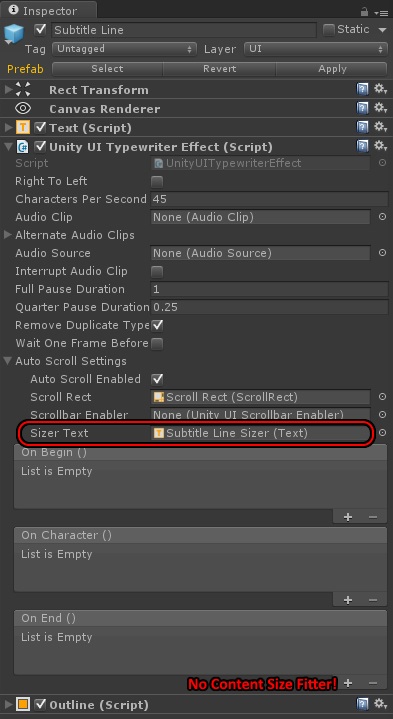
Finally, assign Subtitle Line Sizer to the Scroll Rect:
To add continue buttons:
If you're using the typewriter effect and continue buttons, you may want the continue button to only skip the effect forward if the effect is still typing. And, if the effect is done, the continue button should behave normally by progressing to the next stage of the conversation. To do this:
Here's what happens under the hood with continue buttons:
If the continue button is assigned to the subtitle's Continue Button field, it will show the button when the subtitle is shown (using GameObject.SetActive), and it will hide the button when the subtitle is hidden. The exception is if the Dialogue Manager's Continue Button mode is set to Never. In this case, the button will never be shown. If you expand the dialogue UI hierarchy in the Scene view during gameplay, you'll see which GameObjects it's activating and deactivating.
If you want to prompt the player for text input during conversations:
To localize a Text element (such as a "Continue" button), add a Localize UI Text component to it. (Components > Dialogue System > UI > Unity UI > Effects > Localize UI Text) You can also localize the options of a Dropdown element with the same component.
The Localize UI Text component localizes the Text element's Text field. You can assign a localized text table to this component or the Dialogue Manager. The Text element's starting text value serves as the field name to look up in the table.
If you use a language selection menu, add an Update Localized UI Texts component to any GameObject in the scene. (Components > Dialogue System > UI > Unity UI > Effects > Update Localized UI Texts) When the user selects a language, configure the event handler to invoke this component's UpdateTexts(string) method. Pass the language code (e.g., fr for French) as the parameter to the event handler.
Note: You do not need to do this for text in your dialogue database such as conversations and quests. Dialogue databases contain their own localization.
The Update Localized UI Texts component saves the current localization language setting in PlayerPrefs. To clear this, select menu item Window > Dialogue System > Tools > Clear Saved Localization Settings.
<< How to Set Up the Dialogue UI || Legacy Unity GUI Dialogue UI >>