 |
|
(Click Here for Video Tutorial)
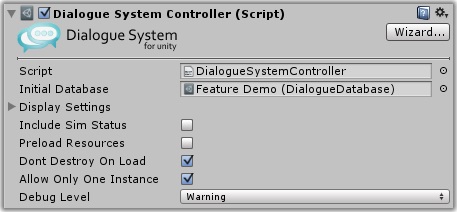
The Dialogue Manager GameObject is the engine that operates between your dialogue database and your actors and UI. It also maintains the Lua environment that contains the Dialogue System's runtime data.
The Dialogue Manager's default settings make it persist between level changes and ensure that only one copy exists in the scene.
To add a Dialogue Manager GameObject to your scene, follow one of these steps:
This will create a GameObject named "Dialogue Manager" containing a Dialogue System Controller component.
IMPORTANT: Your Dialogue Manager object should exist in the very first scene that does any kind of Dialogue System activity. Otherwise the Dialogue System will create a dummy Dialogue Manager GameObject. This dummy GameObject will then become the one and only Dialogue Manager, preventing the intended one from being loaded.
| Property | Function |
|---|---|
| Initial Database | The initial dialogue database to load into the Lua environment |
| Display Settings | Dialogue System display settings (see Dialogue Manager Display Settings below) |
| Allow Simultaneous Conversations | (Not shown) Allow more than one conversation to play simultaneously (see Simultaneous Conversations) |
| Include Sim Status | Tick to include Chat Mapper's "Sim Status" data in the Lua environment; if you don't use this, leave it unticked to save memory |
| Preload Resources | Tick to load the dialogue database and UI at start instead of lazy-loading when needed |
| Persistent Data Settings | (Not shown) Allows you to change settings on the Persistent Data Manager |
| Dont Destroy On Load | Tick to make the Dialogue Manager persist between level changes |
| Allow Only One Instance | Tick to ensure that only one Dialogue Manager exists in the scene |
| Debug Level | The amount of debugging information to log to Unity's Console view |
To quickly open the Dialogue Editor on the Initial Database, just click on the "Dialogue System" banner.
Click the Wizard... button to open an interactive wizard that will step you through the process of customizing your Dialogue Manager.
Most of the Dialogue Manager settings are located in the Display Settings foldout. These settings determine how the Dialogue System handles various user interface elements.
| Property | Function |
|---|---|
| Dialogue UI | The dialogue UI* |
| Localization Settings | Language localization |
| Subtitle Settings | How subtitles are displayed |
| Camera Settings | How the sequencer and its camera work |
| Input Settings | How player input is handled |
| Alert Settings | How alert messages are shown |
You can assign a prefab from the subfolders in the Prefabs folder or define your own. If the Dialogue UI field is unassigned, it will search for a dialogue UI in the Dialogue Manager's child GameObjects. If it doesn't find one, it will use a generic default Unity GUI-based UI located in Prefabs/Unity Dialogue UIs/Default/Resources. See How to Set Up the Dialogue UI for more info.
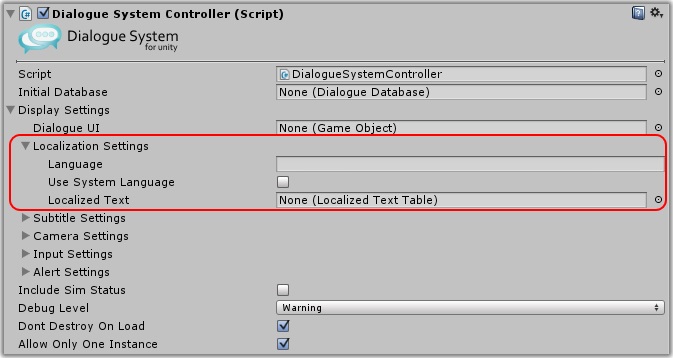
| Property | Function |
|---|---|
| Language | The current language. Leave blank to use the default language |
| Use System Language | Tick to make the Dialogue Manager set Language to the current system language on startup |
| Localized Text | A localized text table to use for general localization, such as for alert messages |
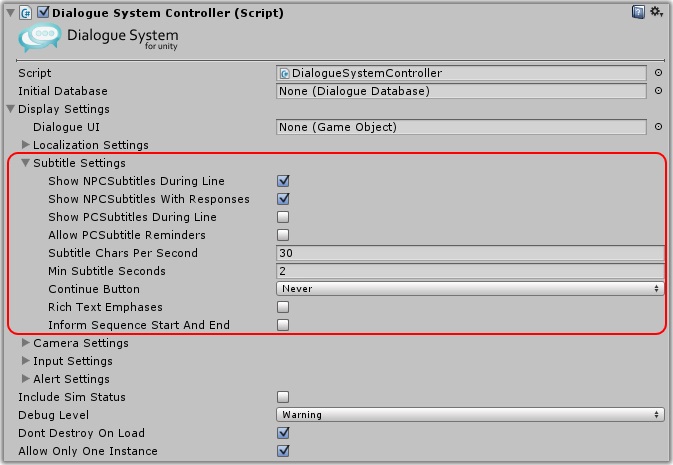
| Property | Function |
|---|---|
| Show NPC Subtitles During Line | Tick to show NPC subtitles while the NPC is speaking its lines |
| Show NPC Subtitles With Responses | Tick to show NPC subtitles while the PC response menu is showing. This is usually ticked to remind the player what the NPC just said |
| Show PC Subtitles During Line | Tick to show PC subtitles while the PC is speaking its lines |
| Allow PC Subtitle Reminders | Tick to allow the PC's last line to be used as the reminder line when showing the response menu. Normally only the NPC's last line is shown as a reminder |
| Skip PC Subtitle After Response Menu | Tick to skip the PC subtitle if it was selected from a response menu |
| Subtitle Chars Per Second | Influences the value of the sequencer keyword {{end}}, used to specify the duration that subtitles are displayed |
| Min Subtitle Seconds | Guaranteed minimum value for {{end}} |
| Continue Button | See Continue Button Mode |
| Rich Text Emphases | By default, the built-in dialogue UIs apply the first emphasis tag to the entire line. If you want to use multiple tags in a single line, or have tags affect only a subset of the line, tick this to convert emphasis tags to rich text codes. Your dialogue UI must support rich text. The provided Unity GUI prefabs all support rich text |
| Inform Sequence Start And End | To reduce the number of messages being sent, conversations by default suppress OnSequenceStart and OnSequenceEnd messages associated with dialogue entries' sequences. To enable these messages, tick this checkbox |
The Subtitle Chars Per Second and Min Subtitle Seconds values determine the value of the sequencer keyword {{end}}. The default sequence for dialogue entries waits for the duration specified by {{end}}.
Example: If your Dialogue Text is 90 characters long and Subtitle Chars Per Second is 30, then {{end}} will be 3 seconds (90 ÷ 3). However, if Min Subtitle Seconds is 4, then {{end}} will be increased to 4 seconds.
Note that typewriter effects on GUI controls such as subtitle labels usually have their own separate Chars Per Second values that could be faster or slower.
The Continue Button mode can be:
| Continue Button Mode | Description |
|---|---|
| Never | Never wait for the player to click the UI's "continue" button, or otherwise receive an OnConversationContinue message, before progressing |
| Always | Always wait for the continue button after every subtitle, if a continue button is assigned in the dialogue UI for the type of subtitle (PC or NPC) |
| Optional | Always show the continue button, but don't wait for it. |
| Optional Before Response Menu | Like Always except when the player response menu is next. In this case, wait until the subtitle is done and then immediately progress to the response menu without waiting for the continue button |
| Not Before Response Menu | Like Always except when the player response menu is next. In this case, don't show the continue button at all. When the subtitle is done, it immediately progress to the response menu |
| Optional Before PC Autoresponse Or Menu | Like Always except when the player response menu or a player auto-select response is next. In this case, wait until the subtitle is done and then immediately progress to the response menu without waiting for the continue button |
| Not Before PC Autoresponse Or Menu | Like Always except when the player response menu or a player auto-select response is next. In this case, don't show the continue button at all. When the subtitle is done, it immediately progress to the response menu |
| Optional For PC | Wait for the continue button, except when delivering PC lines show but don't wait. |
| Not For PC | Wait for the continue button except when delivering PC lines. |
| Optional For PC Or Before Response Menu | Wait for the continue button, except when preceding response menus or delivering PC lines show but don't wait. |
| Not For PC Or Before Response Menu | Wait for the continue button only for NPC lines that don't precede response menus. |
| Optional For PC Or Before PC Autoresponse Or Menu | Wait for the continue button, except when delivering PC lines and lines preceding a response menu or PC auto-select response show the continue button but don't wait |
| Not For PC Or Before PC Autoresponse Or Menu | Wait for the continue button only for NPC lines that don't precede response menus or PC auto-select responses |
Notes:
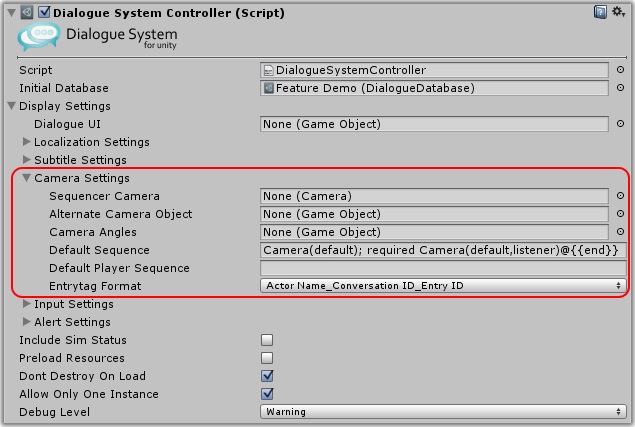
| Property | Function |
|---|---|
| Sequencer Camera | The Sequencer Camera to use during sequences |
| Alternate Camera Object | If your camera is not a Unity Camera (e.g., an Oculus VR OVRCameraController), assign it here |
| Camera Angles | The camera angle object prefab that defines camera angles for the sequencer. If unassigned, the Dialogue System will use a default set of camera angles |
| Default Sequence | The default cutscene sequence to use when a dialogue entry doesn't define its own |
| Default Player Sequence | The default cutscene sequence to use when a player-spoken dialogue entry doesn't define its own; if blank, uses Default Sequence |
| Entrytag Format | The file naming format to use for entrytags. (See Using entrytag To Simplify Sequences) |
In the Default Sequence, you can use the keyword {{end}}. It will be replaced by the default subtitle duration for each subtitle.
If your project uses a body-less first person controller, you'll want to change the default because a closeup of the player won't look right (since the player doesn't have a body).
If you want to use a different default sequence for a specific conversation, add an Override Display Settings component to the conversant and specify its default sequence.
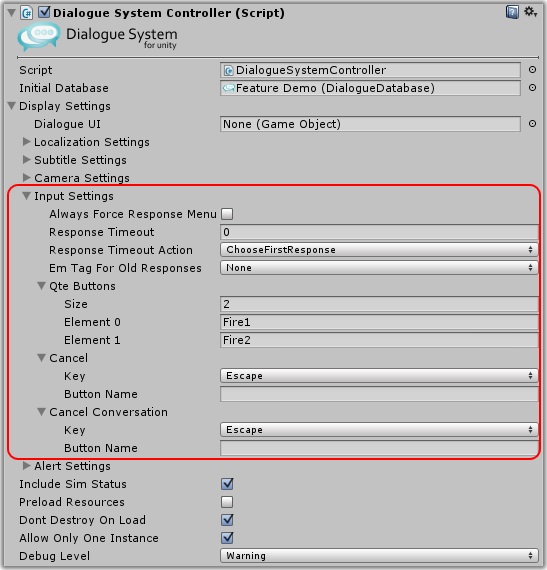
| Property | Function |
|---|---|
| Always Force Response Menu | Tick to always show the player response menu, even if there's only one choice. If unticked, it auto-selects the choice if it's the only one, which is the default behavior in Chat Mapper. You can also override this on a line-by-line basis by using the [f] tag |
| Include Invalid Entries | (Not shown in screenshot) Tick to include responses whose Conditions are false. Your dialogue UI can distinguish them because their Response.enabled fields will be false |
| Response Timeout | Specifies a countdown time. If the player doesn't select a response before the timeout period, a response will automatically be selected for him. If set to 0, there is no timeout |
| Response Timeout Action | Specifies what happens if the timer runs out |
| Em Tag For Old Responses | The em tag to wrap around old responses. A response is old if its SimStatus is "WasDisplayed". You can change this from None if you want to visually mark old responses in the player response menu. Note: This will enable SimStatus tracking |
| QTE Buttons | The names of buttons defined in UnityEngine.InputManager that will be associated with specific Quick Time Event (QTE) indicators. (See QTE()) |
| Cancel | The key and/or button that the player can use to cancel a dialogue entry sequence |
| Cancel Conversation | The key and/or button that the player can use to cancel the active conversation |
By default, the Cancel and Cancel Conversation buttons use Unity's standard Input. For information about controlling input, see How to Control Input.

| Property | Function |
|---|---|
| Allow Barks During Conversations | Tick to allow barks to display during conversations |
| Bark Chars Per Second | Specifies the default duration that barks are shown, based on the alert text length. If zero, uses Subtitle Settings > Subtitle Chars Per Second |
| Min Bark Seconds | Specifies the minimum default duration that barks are shown. If zero, uses Subtitle Settings > Min Subtitle Seconds |
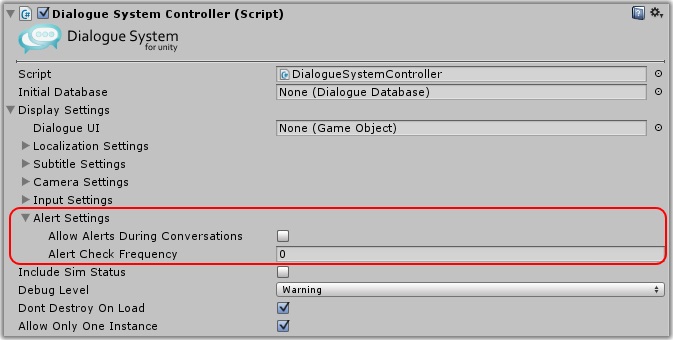
| Property | Function |
|---|---|
| Allow Alerts During Conversations | Tick to allow the dialogue UI to display alert messages during conversations. This is unticked by default, which causes alert messages to wait until the conversation is done |
| Alert Check Frequency | The frequency in seconds that the Dialogue System will check the value of the Lua variable Variable["Alert"]. The default value of 0 disables the check |
| Alert Chars Per Second | Specifies the default duration that alerts are shown, based on the alert text length. If zero, uses Subtitle Settings > Subtitle Chars Per Second |
| Min Alert Seconds | Specifies the minimum default duration that alerts are shown. If zero, uses Subtitle Settings > Min Subtitle Seconds |
If the Lua variable Variable["Alert"] is set to a non-blank string, the Dialogue System will display the string as a gameplay alert message and reset the variable to a blank string.
The Dialogue System automatically checks Variable["Alert"] at the end of conversations, regardless of what Alert Check Frequency is set to.
The default value of 0 disables timed checks of Variable["Alert"].
If you want to enable the check, 2 is a good value. For performance reasons, you shouldn't set this value too low because it has to query the Lua environment every time, which involves a little bit of overhead.
You can make the Dialogue System manually check by calling DialogueManager.CheckAlerts().
The Dialogue System supports simultaneous conversations by ticking the Allow Simultaneous Conversations checkbox. However, you may need to use Bark Dialogue UI and Override Dialogue UI components (or similar components) to coordinate how each conversation is displayed.
For example, say NPC1 & NPC2 engage in conversation A, and NPC3 & NPC4 engage in conversation B. If they both try to use a typical whole-screen dialogue UI, visually their conversations will step on each others' toes. One way to resolve this is to:
When conversation A starts between NPC1 & NPC2, the Dialogue System will use NPC1's Override Dialogue UI and run the conversation using NPC1's Bark Dialogue UI. The Bark Dialogue UI will cause the conversation's lines to play through the NPCs' bark UIs.
Similarly, when conversation B starts between NPC3 & NPC4, the Dialogue System will use NPC3's Override Dialogue UI.
The Override Dialogue UI component temporarily overrides the Dialogue Manager's Dialogue UI. This means that new conversations will also default to using this UI until the previous conversation ends and restores the original dialogue UI. When running simultaneous conversations, the safest approach is to ensure that every conversation uses an Override Dialogue UI rather than relying on the Dialogue Manager's current Dialogue UI value.
Note that, when a conversation starts, the Conversant's Override Dialogue UI takes precedence over the Actor's Override Dialogue UI if they both have one.
<< How to Set up Components | How to Set Up the Dialogue UI >>