 |
|
(Click Here for Video Tutorial)
This page will show you how to integrate the Dialogue System with Unitycoding's RPG Kit to add conversations, barks, cutscene sequences, and Dialogue System-managed quests. (RPG Kit 3.1.5+ is required.)
RPG Kit copyright © Unitycoding.
The support package adds these features:
The package also depends on the ICode support package.
IMPORTANT: Please read the RPG Kit Setup section! You must follow a few very specific steps get the Dialogue System working with RPG Kit.
For general gameplay integration topics, see How to Integrate with Gameplay.
You must follow these steps to set up the Dialogue System in RPG Kit.
Third Party Support/ICode Support. This will unpack files into the folder Third Party Support/ICode.Third Party Support/RPG Kit Support. This will unpack files into the folder Third Party Support/RPG Kit.Third Party Support/RPG Kit/Example. This is a customized version of RPG Kit 3.1.7's Loading scene. If you're using a newer version of RPG Kit and it has a newer Loading scene, you may want to use Option 2 below.Third Party Support/RPG Kit/Prefabs/Dialogue Manager to the scene.Third Party Support/RPG Kit/Example/NPCs to RPG Kit's Main Level scene.The screenshot below shows how to manually connect the Dialogue System's quest log window to RPG Kit's action bar:
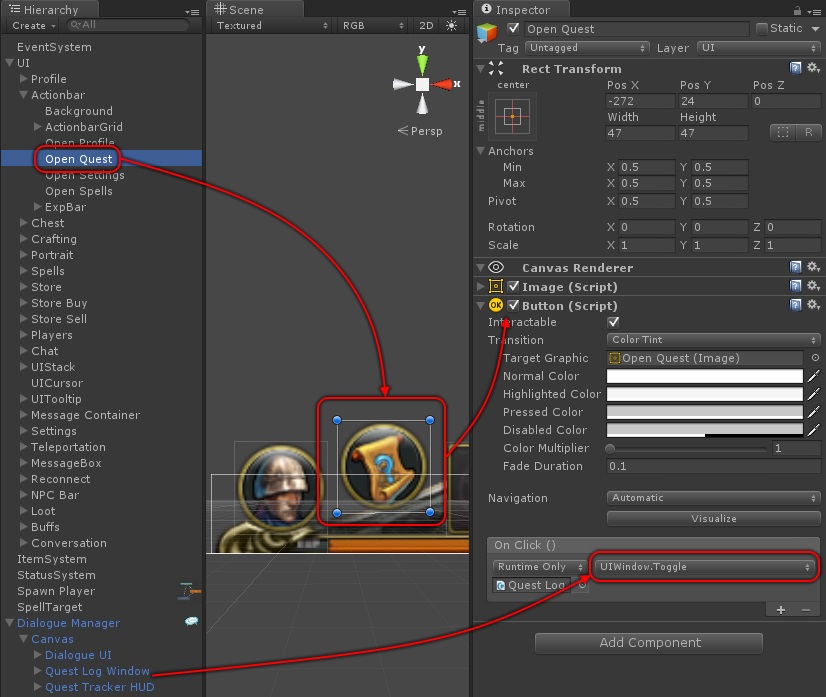
You don't need to do this if you used Option 1 above (the Dialogue System's customized Loading scene) because it already includes this step.
To make an NPC bark, follow the instructions on these pages:
Third Party Support/RPG Kit/Example/State Machines/Bark StateMachine.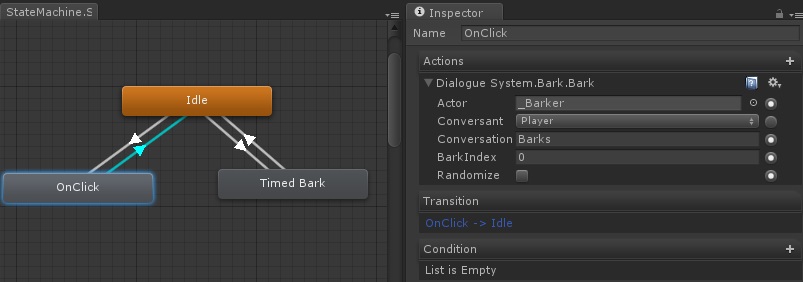
The support folder's Barker prefab uses Unity UI Bark UI. When you add the Barker prefab to your scene and expand it, you'll see a child GameObject named Basic Unity UI Bark UI. Inspect this GameObject. On the Canvas Group component, set Alpha to 1. Then customize the appearance to your liking.
When you're ready to make a build for players, set Alpha back to 0. The game will still run fine if you don't set it to 0, but the bark will flicker when appearing and disappearing.
The easiest way to make an NPC engage in conversation is to add an RPG Kit Conversation Trigger component to the NPC (Component > Dialogue System > Third Party > RPG Kit > RPG Kit Conversation Trigger).
Alternatively, you can use an ICode state machine:
-Add or modify the NPC's state machine to invoke the Start Conversation action. If your NPC doesn't have a state machine yet, you can add Third Party Support/RPG Kit/Example/Conversation StateMachine.
false.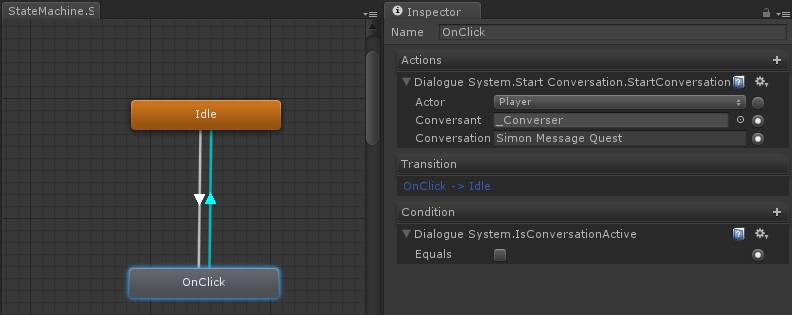
This is the easiest way to configure an NPC with a shop and a conversation:
OpenShop("Conversant") in a response menu entry (blue node). For more details about the OpenShop Lua function, see Using OpenShop.Alternatively, you can configure shops to use your NPC's state machine. Follow these steps to make an NPC switch from a conversation to the shop:
OpenShop. Leave it false (unticked).OpenShop is true. Your state machine should now look something like this: 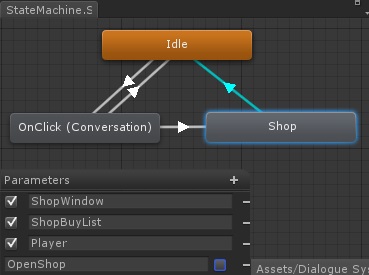
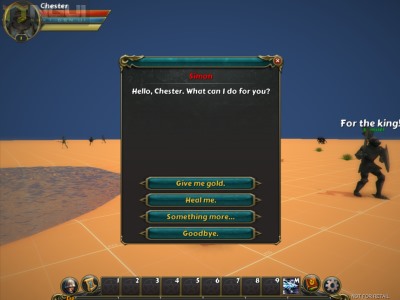
Overhead icons are often used to indicate that an NPC has a quest.
The easiest way to set up an NPC with overhead icons is to add the prefab Example/NPCs/Animation/Overhead Icon UI to your NPC. This UI comes with question mark and exclamation mark icons.
You can set up your own icons by following these steps:
To change an icon, you can any use any of these methods:
For example, use this sequencer command to show an exclamation above the NPC named "Converser":
Note that if you use the Lua command, you should wrap the strings in double quotes:
Use "none" as the icon name to hide all icons.
Use the Icon Conditions section to specify which icon (if any) should be visible when the NPC starts and when the player levels up:
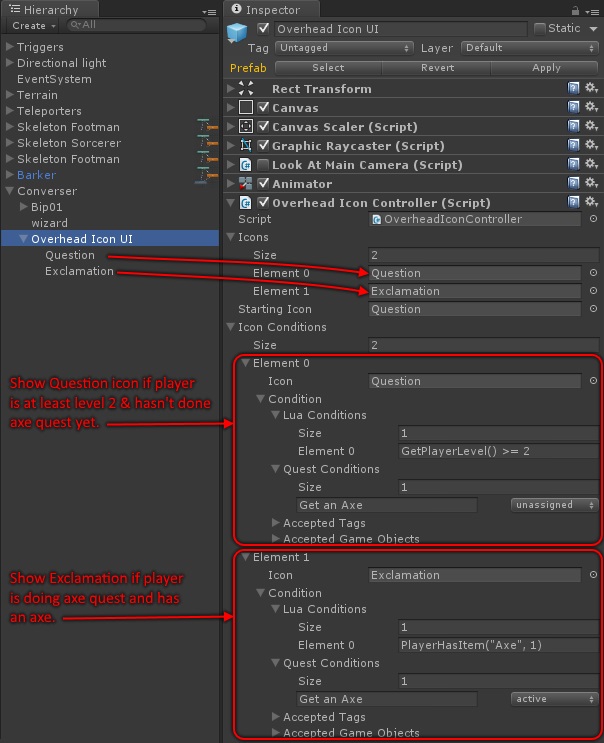
The Overhead Icon UI will process the list of Icon Conditions from top to bottom, so Icon Conditions that are lower in the list can override earlier ones. When you add an element to the Icon Conditions list, specify the icon and the conditions that must be true to show it.
If you've specified any Icon Conditions, the Starting Icon will be ignored in favor of the Icon Conditions.
The Dialogue System currently saves its data to PlayerPrefs in single-player and multi-player modes. This includes all the standard Save System data, such as variable values and quest states.
It loads data:
It saves data:
The RPG Kit Bridge component is on the Dialogue Manager GameObject in the Loading scene.
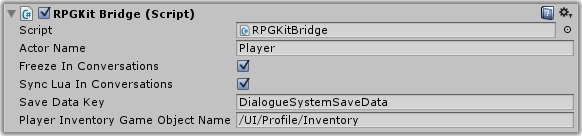
The RPG Kit Bridge component does the following:
The following data are synchronized:
| Lua Data | Notes |
|---|---|
Actor["Player"].PlayerName | Read-only |
Actor["Player"].Gender | Read-only |
Actor["Player"].Class | Read-only |
Actor["Player"].Level | Read-only |
You can also call these static methods manually:
| Method | Description |
|---|---|
RPGKitBridge.SetPlayerControl(bool) | Enables or disables player movement and camera control |
RPGKitBridge.SyncToLua() | Copies RPG Kit data (player name, gender, class, level) into the Lua environment |
RPGKitBridge.SyncFromLua() | Copies the Lua environment back into RPG Kit (currently does nothing) |
RPGKitBridge.SaveDialogueSystemData() | Saves the current character's Dialogue System data |
Or in state machines use the ICode actions Dialogue System > RPG > SyncLuaToRPG and SyncRPGToLua. (See the RPG Kit ICode Actions section for a complete list of new actions.)
| Lua Function | Returns | Description | Example |
|---|---|---|---|
| GetPlayerName() | String | Get player's name | GetPlayerName() |
| GetPlayerGender() | String | Get player's gender | GetPlayerGender() |
| GetPlayerClass() | String | Get player's class | GetPlayerClass() |
| GetPlayerLevel() | Number | Get player's level | GetPlayerLevel() |
| GetPlayerStatus(statusName) | Number | Get status value on player | GetPlayerStatus("Health") |
| ModifyPlayerStatus(statusName, amount) | N/A | Modify status value on player | ModifyPlayerStatus("Health", -10) |
| GetEntityStatus(gameObjectName, statusName) | Number | Get status value on entity | GetEntityStatus("King", "Hunger") |
| ModifyEntityStatus(gameObjectName, statusName, amount) | N/A | Modify status value on entity | ModifyEntityStatus("King", "Hunger", 20) |
| PlayerHasItem(itemName, amount) | Boolean | Check player has amount of item | PlayerHasItem("Axe", 1) |
| PlayerAddItem(itemName, amount) | N/A | Give item to player | PlayerAddItem("Gold", 50) |
| PlayerRemoveItem(itemName, amount) | N/A | Remove item from player | PlayerRemoveItem("Nail", 3) |
| EntityHasItem(itemName, amount) | Boolean | Check entity has amount of item | EntityHasItem("King", "Axe", 1) |
| EntityAddItem(itemName, amount) | N/A | Give item to the entity | EntityAddItem("King", "Gold", 50) |
| EntityRemoveItem(itemName, amount) | N/A | Remove item from entity | EntityRemoveItem("King", "Nail", 3) |
| OpenShop(gameObjectName) | N/A | Open StoreTrigger (see note) | OpenShop("Conversant") |
| SetOverheadIcon(gameObjectName, iconName) | N/A | Set an NPC's overhead icon ("none" for no icon) | SetOverheadIcon(Converser, Question) |
To use OpenShop(), add a StoreTrigger to the NPC, and set its Distance to 0.
Note: If you pass "Actor" to OpenShop(), it will open the StoreTrigger on the current actor (if a conversation is active). If you pass "Conversant" or a blank string (""), it will open the StoreTrigger on the current conversant. Otherwise it will look for a matching GameObject in the scene.
The RPG Kit support package adds the following actions under "Dialogue System/RPG":
| Action | Description |
|---|---|
| Delete Data | Delete the Dialogue System saved data for a specific character |
| Open Shop | Open an NPC's shop |
| Save Data | Save the current character's Dialogue System data (quests, etc.) |
| Set Overhead Icon | Change an NPC's overhead icon |
| Sync Lua To RPG | Sync the Dialogue System's Lua values to RPG Kit (currently does nothing) |
| Sync RPG To Lua | Sync RPG Kit's values to the Dialogue System's Lua environment |
| Update Quest Tracker | Update the Dialogue System's quest tracker HUD |