 |
|
We're here to help! If you get stuck at any point, please contact us.
Note: If you are making a 2D project, see Enable Physics2D Support.
(Click Here For Video Version)
This section jumps right into using the Dialogue System to create and run a conversation. You will learn how to:
You can find more detailed steps in the sections following this Quick Start section.
Step 1. Create a new scene (File → New Scene).
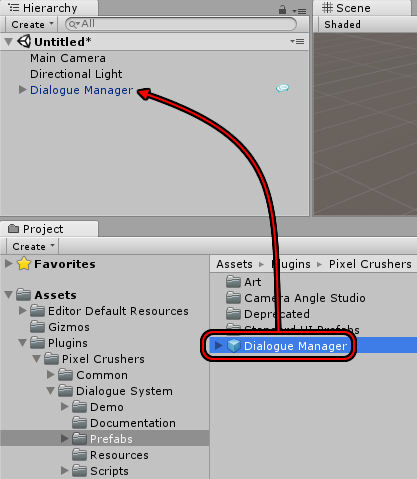
Step 2. Drag the prefab Assets ► Plugins ► Pixel Crushers ► Dialogue System ► Prefabs ► Dialogue Manager into the scene:
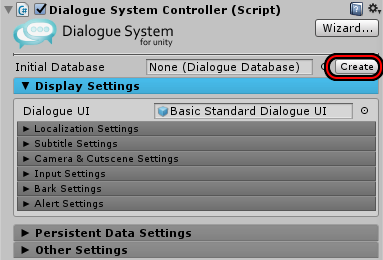
Step 3. This GameObject already points to a basic dialogue UI that will suffice for now. But we need to create a dialogue database. Inspect the GameObject. Next to the Initial Database field, click Create:
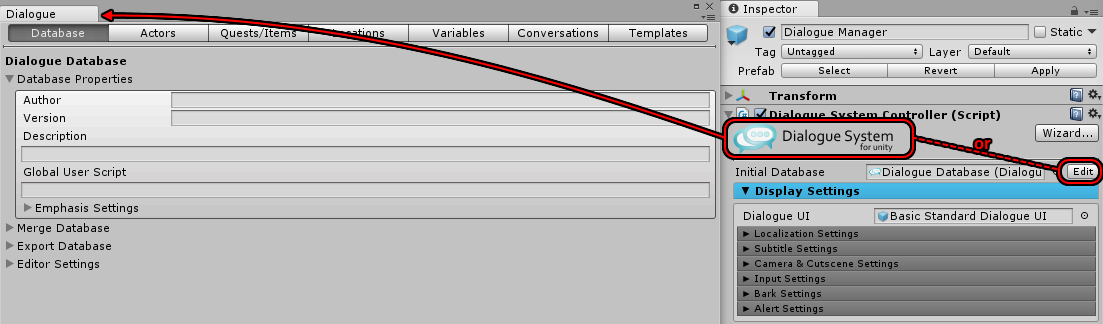
Step 4. After specifying a name for your database, inspect the Dialogue Manager GameObject again. Click the Edit button or the Dialogue System logo banner. This will open the Dialogue Editor window:
Step 5. Click the Conversations tab.
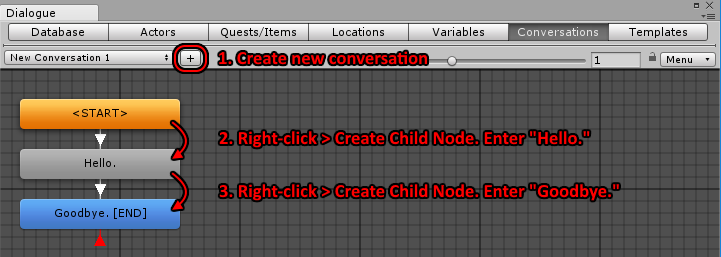
Step 6. Create an empty GameObject for the Player (GameObject → Create Empty) and a cube for the NPC (GameObject → 3D Object → Cube). Rename the empty GameObject to "Player". Rename the cube to "NPC" and set its position to (0,0,0) so it's visible in the Game view. (In your own project, you'll use your actual characters instead.)
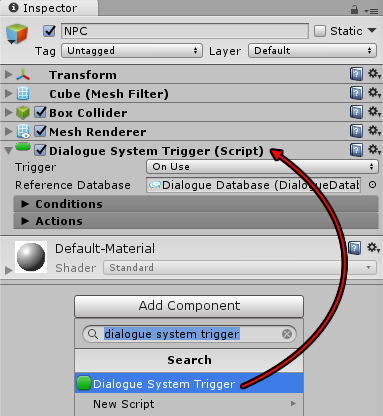
Step 7. Inspect the NPC. Add a Dialogue System Trigger component:
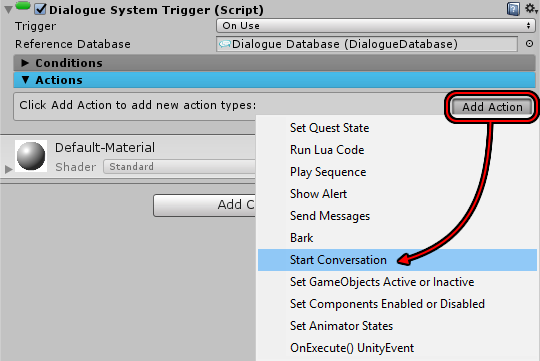
Step 8. Click Add Action and select Start Conversation:
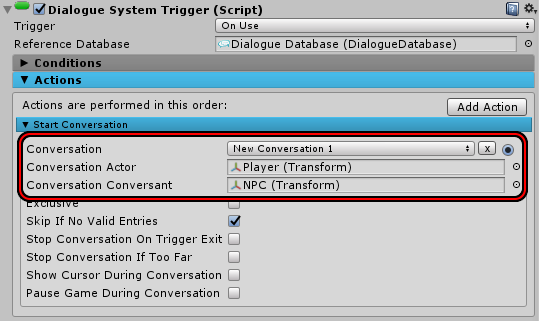
Step 9. Select your conversation from the Conversation dropdown, assign Player to the Conversation Actor field, and assign NPC to the Conversation Conversant.
Step 10. Finally, set the Trigger dropdown to On Start. This tells the Dialogue System Trigger to perform its actions when the scene starts.

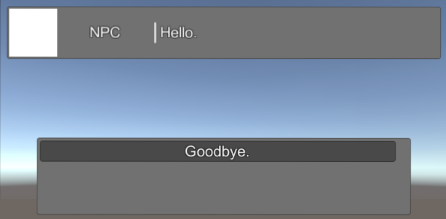
Step 11. Now play your first conversation! The Dialogue System will show the NPC line ("Hello.") followed shortly by the player response menu, which contains one choice ("Goodbye."). It uses the Basic Standard Dialogue UI, which is a generic template that you can later customize to look however you want.
Next, we're going to use the interaction system to start the conversation.
Step 12. Set the Trigger dropdown back to On Use. This tells the Dialogue System Trigger to perform its actions when it receives an OnUse message, typically from an interaction component on the player.

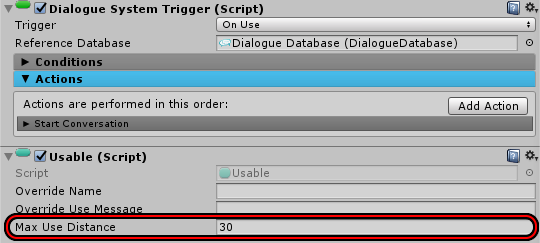
Step 13. Add a Usable component. This tells the player's interaction component that the NPC is usable. Set Max Use Distance to 30, since the camera (where we'll interact from) is more than 5 units away.
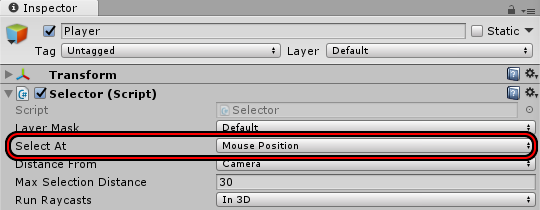
Step 14. Inspect the Player and add a Selector component. Set the Select At dropdown to Mouse Position:
Step 15. Now play the scene again. Position your mouse over the cube so you see this yellow message:
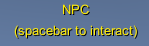
This means the player's Selector component has detected the NPC's Usable component. Press the space bar or right mouse button. The Selector component will send an OnUse message to the NPC, whose Dialogue System Trigger will respond by starting the conversation.
The Selector component and a similar component, Proximity Selector, provide ways to trigger Dialogue System activity. They're very customizable. You can configure them to select usables many different ways, not just with the mouse cursor. It's also not mandatory to use them. You can run Dialogue System Triggers using your own interaction system or C# code if you prefer.
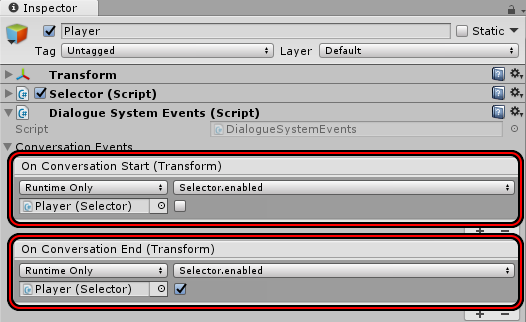
Step 16. You may notice that the Selector component stays active during the conversation. In many cases, during conversations you'll want to disable the Selector and possibly other components such as player movement and camera control. One way to do this is to add a Dialogue System Events component. This component has events that run on various Dialogue System activity. Configure On Conversation Start to disable the Selector and On Conversation End to re-enable it:
Note: Once you've configured your Dialogue Manager GameObject the way you want, you may want to drag it into the Project view to turn it into a prefab variant. The prefab variant will record your custom changes to the original Dialogue Manager prefab. This way you won't lose your customizations when you update the Dialogue System. You can add instances of this prefab variant to any scene to make it easy to playtest that scene directly in the Unity editor's play mode. When you need to make changes to the Dialogue Manager, edit the prefab variant. Your changes will automatically appear in instances of the prefab variant that you've placed in any scenes.
This quick start has demonstrated how to:
There's much more to the Dialogue System. Read on for more information. If you have any questions or need help, please contact us.
<< Overview | Dialogue Editor >>